
Increasing Local Contrast
The previous section showed adjustments to the brightness and contrast of the entire image. The adjustment changes every pixel of original brightness value A to the same final brightness value B, regardless of the pixel�s neighbors. Another class of operations increases the visibility of local differences between pixels, by suppressing the longer-range variations. These neighborhood functions use a moving neighborhood, usually a small circle, that compares or combines the central pixel and the neighbors to produce a new value that is assigned to the central pixel to construct a new image. Then the neighborhood shifts to the next pixel and the process is repeated. These calculations are applied to the pixel brightness values in a color coordinate system such as HSI or LAB that leaves the color values unchanged.
For instance, local equalization functions just like the histogram equalization procedure, except that it takes place within a moving circular neighborhood and assigns a new value only to the central pixel. The result makes a pixel that is slightly brighter than its surroundings brighter still, and vice-versa, enhancing local contrast. The result is usually added back in some proportion to the original image to produce a more visually pleasing result, as shown in the Local Equalization interactive tutorial.
| Interactive Tutorial | |||||||||||
|
|||||||||||
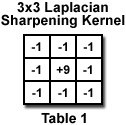
Sharpening of images to increase local contrast is almost universally applied by publishers to counter the visual blurring effect of halftoning images in the printing process. This is usually done by a convolution using a kernel of weights, just as the Gaussian smoothing function shown above. But in this application, some of those weights will have negative values. For instance, the Laplacian sharpening filter in Table 1 combines each pixel with its eight adjacent neighbors as shown in the Laplacian Sharpening interactive tutorial.
| Interactive Tutorial | |||||||||||
|
|||||||||||
A more flexible extension of this basic idea is the widely used (and as often misused) unsharp mask. The name derives from a century-old darkroom procedure that required printing the original image at 1:1 magnification but out of focus onto another piece of film (this was the unsharp mask), and then placing the two films together to print the final result. Where the original negative was dense, the mask was not (and vice versa) so that little light was transmitted, except near detail and edges where the mask was out of focus.
The same effect can be produced in the computer by applying a Gaussian blur to a duplicate of the original and then subtracting it from the original. The difference between the two images is just the detail and edges removed by the blurring. The original image is then added back to the difference to increase the visibility of the details while suppressing the overall image contrast. In the Unsharp Masking interactive tutorial, the result image is automatically scaled to the range of the display so that negative values that can result from the calculation are not lost.
| Interactive Tutorial | |||||||||||
|
|||||||||||
One of the characteristics of the unsharp mask is the formation of bright and dark �haloes� adjacent to the dark and bright borders (respectively) of structure in the image. This increases their visibility, but can hide other nearby information. A related approach using neighborhood ranking rather than Gaussian blurring alleviates this problem. The method applies a median filter to remove fine detail, subtracts this from the original to isolate the detail, and then adds the original image back to enhance the visibility as shown in the Rank Masking interactive tutorial. This method is called a rank mask, but is sometimes (incorrectly) referred to as a top hat filter (the real top hat is shown below).
| Interactive Tutorial | |||||||||||
|
|||||||||||
Note that all of these local enhancement methods are very noise sensitive, because both random speckle and shot noise produce pixels that are different from their local neighborhood. Image noise must be removed before enhancement is attempted, or the visibility of the noise will be increased as shown in the Comparison of Local Contrast Enhancement Methods interactive tutorial.
| Interactive Tutorial | |||||||||||
|
|||||||||||
The top hat filter is also a based on neighborhood ranking, but unlike the procedure above it uses the ranked value from two different size regions. The brightest value in a circular interior region is compared to the brightest value in a surrounding annular region. If the brightness difference exceeds a threshold level, it is kept (otherwise it is erased). The Top Hat Filter interactive tutorial shows the filter�s operation. If the interior and annular regions are drawn as shown in the diagram in Figure 1, the reason for the filter name becomes apparent. The interior region is the crown and the threshold is its height, while the surrounding annulus is the brim of the hat. This operation is particularly well suited for finding the spikes in Fourier transform power spectra, as illustrated previously.

| Interactive Tutorial | |||||||||||
|
|||||||||||
The top hat is also good for locating any features of a known size by adjusting the radius of the crown. Objects too large to fit into the crown of the hat are selectively removed. Reversing the logic to use the darkest values in both regions enables the same procedure to isolate dust or other dark features. By replacing the interior value by the mean of the surroundings, the dust can be selectively removed. In this application, shown in the Rolling Ball Filter interactive tutorial, the method is called a rolling ball filter.
| Interactive Tutorial | |||||||||||
|
|||||||||||
Contributing Authors
John C. Russ - Materials Science and Engineering Dept., North Carolina State University, Raleigh, North Carolina, 27695.
Matthew Parry-Hill and Michael W. Davidson - National High Magnetic Field Laboratory, 1800 East Paul Dirac Dr., The Florida State University, Tallahassee, Florida, 32310.
BACK TO INTRODUCTION TO DIGITAL IMAGE PROCESSING AND ANALYSIS
BACK TO MICROSCOPY PRIMER HOME