Polarized Light Microscopy
Microscope Configuration
The polarized light microscope is designed to observe and photograph specimens that are visible primarily due to their optically anisotropic character. In order to accomplish this task, the microscope must be equipped with both a polarizer, positioned in the light path somewhere before the specimen, and an analyzer (a second polarizer), placed in the optical pathway between the objective rear aperture and the observation tubes or camera port.
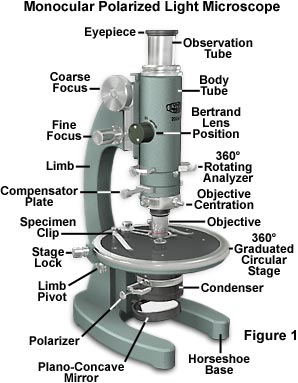
Image contrast arises from the interaction of plane-polarized light with a birefringent (or doubly-refracting) specimen to produce two individual wave components that are each polarized in mutually perpendicular planes. The velocities of these components are different and vary with the propagation direction through the specimen. After exiting the specimen, the light components become out of phase with each other, but are recombined with constructive and destructive interference when they pass through the analyzer.
When an anisotropic specimen is brought into focus and rotated through 360 degrees on a circular polarized light microscope stage, it will sequentially appear bright and dark (extinct), depending upon the rotation position. When the specimen long axis is oriented at a 45-degree angle to the polarizer axis, the maximum degree of brightness will be achieved, and the greatest degree of extinction will be observed when the two axes coincide. During rotation over a range of 360 degrees, specimen visibility will oscillate between bright and dark four times, in 90-degree increments. This is due to the fact that when polarized light impacts the birefringent specimen with a vibration direction parallel to the optical axis, the illumination vibrations will coincide with the principal axis of the specimen and it will appear isotropic (dark or extinct). If the specimen orientation is altered by 45 degrees, incident light rays will be resolved by the specimen into ordinary and extraordinary components, which are then united in the analyzer to yield interference patterns. Because interference only occurs when polarized light rays have an identical vibration direction, the maximum birefringence is observed when the angle between the specimen principal plane and the illumination permitted vibrational direction overlap. Interference between the recombining white light rays in the analyzer vibration plane often produces a spectrum of color, which is due to residual complementary colors arising from destructive interference of white light. The colors observed under illumination with white light in the microscope eyepiece can be utilized to quantitatively draw conclusions about path differences and specimen thickness values when the refractive indices of the specimen are known.
| Interactive Java Tutorial | |||||||||||
|
|||||||||||
Polarized light microscopy is utilized to distinguish between singly refracting (optically isotropic) and doubly refracting (optically anisotropic) media. Anisotropic substances, such as uniaxial or biaxial crystals, oriented polymers, or liquid crystals, generate interference effects in the polarized light microscope, which result in differences of color and intensity in the image as seen through the eyepieces and captured on film, or as a digital image. This technique is useful for orientation studies of doubly refracting media that are aligned in a crystalline lattice or oriented through long-chain molecular interactions in natural and synthetic polymers and related materials. Also investigated in polarized light are stresses in transparent singly refracting media (for example, glass) and the identification and characterization of a wide spectrum of anisotropic substances through their refractive index and birefringence.
The microscope illustrated in Figure 1 is equipped with all of the standard accessories for examination of birefringent specimens under polarized light. Although similar to the common brightfield microscope, the polarized light microscope contains additional components that are unique to instruments of this class. These include the polarizer and analyzer, strain-free objectives and condenser, a circular graduated stage capable of 360-degree rotation, and an opening in the microscope body or intermediate tube for a full-wave retardation plate, quartz wedge, Berek compensator, or quarter-wavelength plate. The monocular microscope presented in Figure 1 is designed with a straight observation tube and also contains a 360-degree rotatable analyzer with a swing-out Bertrand lens, allowing both conoscopic and orthoscopic examination of birefringent specimens. The objectives (4x, 10, and 40x) are housed in mounts equipped with an individual centering device, and the circular stage has a diameter of 140 millimeters with a clamping screw and an attachable mechanical stage. Removal of the polarizer and analyzer (while other components remain in place) from the light path renders the instrument equal to a typical brightfield microscope with respect to the optical characteristics. Polarized light is a contrast-enhancing technique that improves the quality of the image obtained with birefringent materials when compared to other techniques such as darkfield and brightfield illumination, differential interference contrast, phase contrast, Hoffman modulation contrast, and fluorescence.
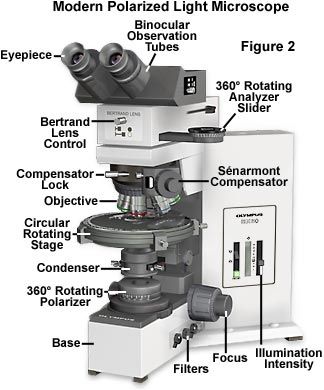
Typical modern polarized (and brightfield) microscopes (Figure 2) have a lamphouse, which contains a 50 to 100-watt high-energy tungsten-halogen lamp, attached to the base of the microscope. A transformer providing direct current (DC) voltage to the lamp is usually built directly into the microscope base and is controlled by a potentiometer positioned near the lamp switch in bottom of the base (the lamp voltage control). Between the lamphouse and the microscope base is a filter cassette that positions removable color correction, heat, and neutral density filters in the optical pathway. Also built into the microscope base is a collector lens, the field iris aperture diaphragm, and a first surface reflecting mirror that directs light through a port placed directly beneath the condenser in the central optical pathway of the microscope. These components control the size, intensity, and distribution of light in the illumination field. The entire base system is designed to be vibration free and to provide the optimum light source for Köhler illumination. In general, the modern microscope illumination system is capable of providing controlled light to produce an even, intensely illuminated field of view, even though the lamp emits only an inhomogeneous spectrum of visible, infrared, and near-ultraviolet radiation.
In some polarized light microscopes, the illuminator is replaced by a plano-concave substage mirror (Figure 1). Almost any external light source can directed at the mirror, which is angled towards the polarizer positioned beneath the condenser aperture. This configuration is useful when an external source of monochromatic light, such as a sodium vapor lamp, is required. Because the illumination intensity is not limited by a permanent tungsten-halogen lamp, the microscope can be readily adapted to high intensity light sources in order to observe weakly birefringent specimens.
Polarizers
Polarized light microscopy was first introduced during the nineteenth century, but instead of employing transmission-polarizing materials, light was polarized by reflection from a stack of glass plates set at a 57-degree angle to the plane of incidence. Later, more advanced instruments relied on a crystal of doubly refracting material (such as calcite) specially cut and cemented together to form a prism. A beam of white unpolarized light entering a crystal of this type is separated into two components that are polarized in mutually perpendicular directions. One of these light rays is termed the ordinary ray, while the other is called the extraordinary ray. The ordinary ray is refracted to a greater degree in the birefringent crystal and impacts the cemented surface at the angle of total internal reflection. As a result, this ray is reflected out of the prism and eliminated by absorption in the optical mount. The extraordinary ray traverses the prism and emerges as a beam of linearly polarized light that is passed directly through the condenser and to the specimen (positioned on the microscope stage). Several versions of this polarizing device (which was also employed as the analyzer) were available, and these were usually named after their designers. The most common polarizing prism (illustrated in Figure 3) was named after William Nicol, who first cleaved and cemented together two crystals of Iceland spar with Canada balsam in 1829. Nicol prisms were first used to measure the polarization angle of birefringent compounds, leading to new developments in the understanding of interactions between polarized light and crystalline substances.
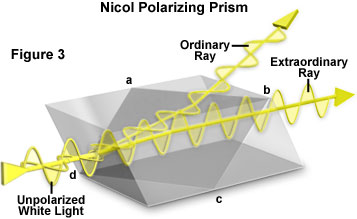
Presented in Figure 3 is an illustration of the construction of a typical Nicol prism. A crystal of doubly refracting (birefringent) material, usually calcite, is cut along the plane labeled a-b-c-d and the two halves are then cemented together to reproduce the original crystal shape. A beam of unpolarized white light enters the crystal from the left and is split into two components that are polarized in mutually perpendicular directions. One of these beams (labeled the ordinary ray) is refracted to a greater degree and impacts the cemented boundary at an angle that results in its total reflection out of the prism through the uppermost crystal face. The other beam (extraordinary ray) is refracted to a lesser degree and passes through the prism to exit as a plane-polarized beam of light.
Other prism configurations were suggested and constructed during the nineteenth and early twentieth centuries, but are currently no longer utilized for producing polarized light in most applications. Nicol prisms are very expensive and bulky, and have a very limited aperture, which restricts their use at high magnifications. Instead, polarized light is now most commonly produced by absorption of light having a set of specific vibration directions in a dichroic medium. Certain natural minerals, such as tourmaline, possess this property, but synthetic films invented by Dr. Edwin H. Land in 1932 soon overtook all other materials as the medium of choice for production of plane-polarized light. Tiny crystallites of iodoquinine sulphate, oriented in the same direction, are embedded in a transparent polymeric film to prevent migration and reorientation of the crystals. Land developed sheets containing polarizing films that were marketed under the trade name of Polaroid®, which has become the accepted generic term for these sheets. Any device capable of selecting plane-polarized light from natural (unpolarized) white light is now referred to as a polar or polarizer, a name first introduced in 1948 by A. F. Hallimond. Today, polarizers are widely used in liquid crystal displays (LCDs), sunglasses, photography, microscopy, and for a myriad of scientific and medical purposes.
Light exiting the port in the microscope base is first passed through a neutral linear Polaroid HN-type polarizer to create plane-polarized light having a vibration vector that is confined to a single plane. H-films are produced by stretching a sheet of polyvinyl alcohol to align the long-chain polymeric molecules, which are subsequently impregnated with iodine. These films are less effective polarizing devices than a calcite prism, but do not restrict numerical aperture. Typically, a pair of crossed polarizing H-films transmits between 0.01 percent and 40 percent of the incident light, depending upon the film thickness.
| Interactive Java Tutorial | |||||||||||
|
|||||||||||
On most microscopes, the polarizer is located either on the light port or in a filter holder directly beneath the condenser. The microscope illustrated in Figure 2 has a rotating polarizer assembly that fits snugly onto the light port in the base. The polarizer can be rotated through a 360-degree angle and locked into a single position by means of a small knurled locking screw, but is generally oriented in an East-West direction by convention. Other microscopes typically have the polarizer attached to the substage condenser assembly housing through a mount that may or may not allow rotation of the polarizer. Some polarizers are held into place with a detent that allows rotation in fixed increments of 45 degrees. Polarizers should be removable from the light path, with a pivot or similar device, to allow maximum brightfield intensity when the microscope is used in this mode.
Light diffracted, refracted, and transmitted by the specimen converges at the back focal plane of the objective and is then directed to an intermediate tube (illustrated in Figure 4), which houses another polarizer, often termed the "analyzer". The analyzer is another HN-type neutral linear Polaroid polarizing filter positioned with the direction of light vibration oriented at a 90-degree angle with respect to the polarizer beneath the condenser. By convention, the vibration direction of the polarizer is set to the East-West (abbreviated E-W position), as illustrated in the birefringence interactive Java tutorial. The same convention dictates that the analyzer is oriented with the vibration direction in the North-South (abbreviated N-S) orientation, at a 90-degree angle to the vibration direction of the polarizer.
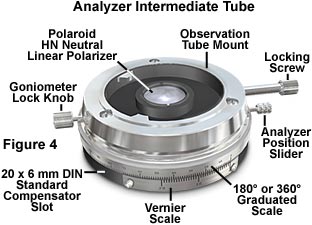
The analyzer is positioned after the specimen, either in a slot above the objective or in an intermediate tube between the nosepiece and the observation tubes. Older polarized light microscopes may have an analyzer that is fitted into the eyepiece, either near the eye lens or somewhere before the intermediate image plane (Figure 1). It is not wise to place polarizers in a conjugate image plane, because scratches, imperfections, dirt, and debris on the surface can be imaged along with the specimen. Simple polarized light microscopes generally have a fixed analyzer, but more elaborate instruments may have the capability to rotate the analyzer in a 360-degree rotation about the optical axis and to remove it from the light path with a slider mechanism. Analyzers of this type are usually fitted with a scale of degrees and some form of locking clamp.
Before using a polarized light microscope, the operator should remove any birefringent specimens from the stage and check to ensure the polarizer is secured in the standard position (often indicated by a click stop), and that the light intensity is minimal when the analyzer is set to the zero mark on the graduated scale. When properly configured, the vibration direction of the analyzer is North-South when the polarizer vibration plane is oriented in an East-West direction (this orientation is now standardized). If the polarizer and analyzer are both capable of rotation, it is possible that they may be crossed (with light intensity at a minimum when minus a specimen) even through their permitted vibration directions are not East-West and North-South, respectively. This situation may be rectified by moving the polarizer to its zero degree click stop (or rotation angle), followed by re-setting the analyzer to this reference point. It is essential that the polarizer and analyzer have vibration planes oriented in the proper directions when retardation and/or compensation plates are inserted into the optical path for measurement purposes.
| Interactive Java Tutorial | |||||||||||
|
|||||||||||
In older microscopes that are not equipped with graduated markings for the polarizer and analyzer positions, it is possible to use the properties of a known birefringent specimen to adjust the orientation of the polarizer and analyzer. Recrystallized urea is excellent for this purpose, because the chemical forms long dendritic crystallites that have permitted vibration directions that are both parallel and perpendicular to the long crystal axis. A small quantity (about 5 milligrams) of the purified chemical can be sandwiched between a microscope slide and cover glass, then carefully heated with a Bunsen burner or hot plate until the crystals melt. Once liquefied, the cover glass can be pressed onto the slide to minimize the thickness of the urea sandwich, which is then allowed to cool. After recrystallization, the slide is placed on a polarized light microscope stage and the long axes of the crystals oriented East-West using the crosshairs in the eyepiece reticle as a reference. The polarizer and analyzer are then rotated as a pair until both the crystal and background are equally dark.
Condensers for Polarized Light Microscopy
Basic substage condenser construction in a polarized light microscope is no different from an ordinary condenser used in brightfield microscopy. In all forms of microscopy, the degree of condenser optical correction should be consistent with that of the objectives. Typical laboratory polarizing microscopes have an achromat, strain-free condenser with a numerical aperture range between 0.90 and 1.35, and a swing-out lens element that will provide even illumination at very low (2x to 4x) magnifications (illustrated in Figure 5). Removal of the swing lens alters the focal length of the condenser to enable illumination of a much larger specimen area and to allow the larger field of view provided by low magnification objectives to be evenly illuminated. This is ideal for polarized light microscopy where low magnifications are used to view crystals and other birefringent materials in the orthoscopic mode.
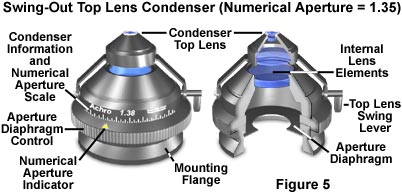
When interference patterns are to be studied, the swing lens can quickly be brought into the optical path and a high numerical aperture objective selected for use in conoscopic observation. It is important that the numerical aperture of the condenser is high enough to provide adequate illumination for viewing conoscopic images. Failure to insert the top condenser lens when utilizing high magnification objectives will result in poor illumination conditions and may lead to photomicrographs or digital images that have an uneven background. Also, because the cone of illumination and condenser numerical aperture are reduced without the top lens, resolution of the microscope will be compromised, resulting in a loss of fine specimen detail.
The condenser aperture diaphragm controls the angle of the illumination cone that passes through the microscope optical train. Reducing the opening size of this iris diaphragm decreases the cone angle and increases the contrast of images observed through the eyepieces. It should be noted, however, that the condenser aperture diaphragm is not intended as a mechanism to adjust the intensity of illumination, which should be controlled by the voltage supplied to the lamp. Some polarized light microscopes are equipped with a fixed condenser (no swing-lens) that is designed to provide a compromise between the requirements for conoscopic and orthoscopic illumination. Variation in the degree of illumination convergence can be accomplished by adjusting the condenser aperture diaphragm or by raising or lowering the condenser (although the latter technique is not recommended for critical examinations).
Rotating Circular Stages
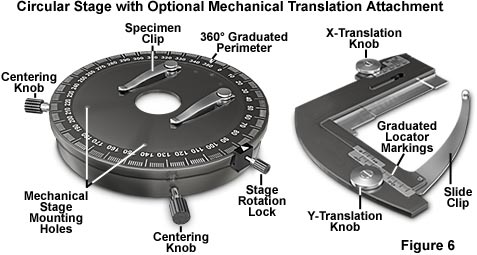
Early polarized light microscopes utilized fixed stages, with the polarizer and analyzer mechanically linked to rotate in synchrony around the optical axis. Although this configuration was cumbersome by today's standards, it had the advantage of not requiring coincidence between the stage axis and the optical axis of the microscope. Modern polarized light microscopes are often equipped with specially designed 360-degree rotatable circular stages, similar to the one shown in Figure 6, which ease the task of performing orientation studies in polarized light. The circular stage illustrated in Figure 6 features a goniometer divided into 1-degree increments, and has two verniers (not shown) placed 90 degrees apart, with click (detent or pawl) stops positioned at 45-degree steps. Use of a precision ball bearing movement ensures extremely fine control over the verniers, which allow the microscopist to read angles of rotation with an accuracy near 0.1 degree. A clamp is used to secure the stage so specimens can be positioned at a fixed angle with respect to the polarizer and analyzer.
The most critical aspect of the circular stage alignment on a polarizing microscope is to ensure that the stage is centered within the viewfield and the optical axis of the microscope. This is accomplished with the two centering knobs located on the front of the stage illustrated in Figure 6. The first step in the alignment process is to center the microscope objectives with respect to the condenser, the field of view, and the optical axis of the microscope. A pair of small setscrews in the nosepiece of most research-grade polarizing microscopes allows centering of individual objectives by means of an Allen wrench. Each objective should be independently centered to the optical axis, according to the manufacturer's suggestions, while observing a specimen on the circular stage. Some microscopes provide for individual objective centration, while other centration systems operate on the nosepiece as a unit. After the objectives are centered, the stage should be centered in the viewfield, which will coincide with the optical axis of the microscope. When the stage is properly centered, a specific specimen detail placed in the center of a cross hair reticle should not be displaced more than 0.01 millimeter from the microscope optical axis after a full 360-degree rotation of the stage. In general, microscopes are designed to allow adjustment of either the stage or the objectives to coincide with the optical axis, but not both. Some designs have objectives that are in fixed position in the nosepiece with an adjustable circular stage, while others lock the stage into position and allow centration of the objectives.
Errors in centration of the rotating circular stage can lead to aggravation when examining birefringent specimens with a polarized light microscope. If the center of stage rotation does not coincide with the center of the field view, a feature being examined may disappear when the stage is rotated. As objective magnification increases (leading to a much smaller field of view), the discrepancy between the field of view center and the axis of rotation becomes greater. At the highest magnifications (60x and 100x), even minute errors in centration can lead to huge differences in specimen placement as the stage is rotated.
The circular microscope stage shown on the left in Figure 6 contains a pair of spring clips intended to secure the specimen during observation with the microscope. An optional mechanical stage intended for use on the circular stage is illustrated on the right in Figure 6. This stage is a low-profile model that has a cross-travel motion of about 25 x 25 millimeters, with a graduated vernier to log specific locations on the specimen. The mechanical stage is fastened to pre-drilled holes on the circular stage and the specimen is translated with two rack-and-pinion gear sets controlled by the x- and y-translational knobs. Use of a mechanical stage allows precise positioning of the specimen, but the protruding translation knobs often interfere with free rotation of objectives and can even collide with them.
In the past, several manufacturers offered a universal attachment for circular polarized microscope stages. This accessory allows a mineral thin section to be secured between two glass hemispheres and rotated about several axes in order to precisely orient selected grains in the optical path. The universal stage is employed to observe selected optical, crystallographic, and textural features that yield clues to the structure of semi-crystalline specimens. Another stage that is sometimes of utility in measuring birefringence and refractive index is the spindle stage adapter, which is also mounted directly onto the circular stage. Specimen grains are secured to the spindle tip, which is positioned on a base plate that allows the spindle to pivot around a horizontal axis while holding the grain immersed in oil between a glass window and a coverslip. Although these stages are presently difficult to obtain, they can prove invaluable to quantitative polarized light microscopy investigations.
Objectives for Polarized Light Microscopy
Optical correction of polarized light objectives can be achromatic, plan achromatic, or plan fluorite. Apochromatic objectives from older fixed tube length microscopes should be avoided because it is difficult to remove all residual stress and strain from the numerous lens elements and tight mounts. Recently however, advances in objective design for infinity-corrected microscopes have yielded high-quality strain-free apochromatic objectives that are useful for differential interference contrast or examination of birefringent specimens with crossed polarized illumination. The average numerical aperture of 20x and 40x polarized light objectives is usually 10 to 25 percent higher than those for ordinary microscopes because observations of conoscopic interference patterns require high numerical apertures. Objectives designed for polarized light microscopy must be stress and strain-free. Most manufacturers thoroughly test objectives designed for use on polarized microscopes, selecting only those that pass the rigorous tests.
Unwanted birefringence in microscope objectives can arise primarily by two mechanisms. The first is "natural" birefringence, which is an artifact of the inherent anisotropic character of glasses, crystals and other materials used to make the lenses. To circumvent this problem, manufacturers choose strain-free optical glass or isotropic crystals to construct lens elements. The second type is "strain" birefringence, which occurs when multiple lenses are cemented together and mounted in close proximity with tightly fitting frames. Strain birefringence can also occur as a result of damage to the objective due to dropping or rough handling.
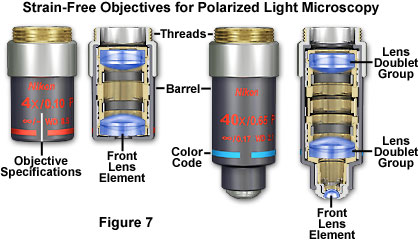
Those objectives that pass the stress test are marked P or POL, and are usually labeled with red engraved letters. Several manufacturers also use a flat black or dark gray barrel (with or without red letters) for quick identification of strain-free polarized light objectives (illustrated in Figure 7). When both the objectives and the condenser are stress and strain-free, the microscope viewfield background appears a deep solid black when observed through the eyepieces without a specimen between crossed polarizers. Any stress in these optical components can give rise to an appreciable degree of anisotropic character, termed internal birefringence. This results in a contribution to specimen interference effects by the microscope optical system itself, and can often make interpretation of images very difficult. Evidence for stress and/or strain in the optical system can be obtained by the presence a blue, gray, or brownish background when observing specimens that ordinarily would have a black background.
A pair of typical objectives designed exclusively for polarized light microscopy is presented in Figure 7. The objective barrels are painted flat black and are decorated with red lettering to indicate specific capabilities of the objectives and to designate their strain-free condition for polarized light. Cut-away diagrams of the objectives reveal internal lens elements, which are corrected for chromatic and spherical aberration. The objective on the left is a low-power 4x objective designed to view birefringent specimens at lower magnifications. The front lens element is larger than the 40x objective on the right because illumination requirements for the increased field of view enjoyed by lower power objectives. Polarized light objectives range in magnification from about 2x to 100x, with the most common being 4x, 10x, 20, and 40x, a selection that serves a majority of purposes for specimen examination in both orthoscopic and conoscopic modes.
Retardation and Accessory Plates
Almost all polarized light microscopes are equipped with a slot in the body tube above the nosepiece and between the polarizer and analyzer. The purpose of this slot is to house an accessory or retardation plate in a specific orientation with respect to the polarizer and analyzer vibration directions. Originally, the slot was oriented with its long axis directed Northeast-Southwest as observed from the eyepieces, but more recent microscopes have the direction changed to Southeast-Northwest. In older microscopes, the slot dimensions were 10 x 3 millimeters, but the size has now been standardized to 20 x 6 millimeters. When the accessory/retardation plates are not inserted into the body tube, a cover is often fitted to prevent dust from entering the microscope through the slots.
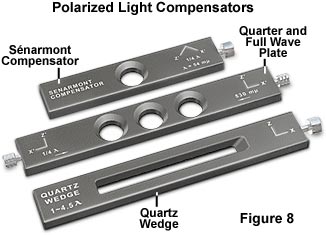
Retardation plates are composed of optically anisotropic quartz, mica, or gypsum minerals ground to a precise thickness and mounted between two windows having flat (plane) faces. These plates produce a specific optical path length difference (OPD) of mutually perpendicular plane-polarized light waves when inserted diagonally in the microscope between crossed polarizers. The three most common retardation plates produce optical path length differences of an entire wavelength (ranging between 530 and 570 nanometers), a quarter wavelength (137-150 nanometers), or a variable path length obtained by utilizing a wedge-shaped design that covers a wide spectrum of wavelengths (up to six orders or about 3000 nanometers).
The quartz wedge is the simplest example of a compensator, which is utilized to vary the optical path length difference to match that of the specimen, either by the degree of insertion into the optical axis or in some other manner. A whole-wave plate is often referred to as a sensitive tint or first-order red plate, because it produces the interference color having a tint similar to the first-order red seen in the Michel-Levy chart. Older compensators were made by cleaving gypsum to the appropriate thickness to achieve the first-order red color, and may be marked gypsum plate, Gips, Gyps, one l, or D = 530 nm on the frame housing. If the plate originated in Germany, it will probably be labeled Rot I. Quarter wave plates (sometimes referred to as a mica plate) are usually fashioned from quartz or muscovite crystals sandwiched between two glass windows, just as the first-order plates. Depending upon the manufacturer, quarter wave plates may be marked Mica, Glimmer, 1/4 l, or D = 147 nm. First-order red and quarter wavelength plates are usually mounted in long rectangular frames that slide the plate through the compensator slot and into the optical pathway. Late model microscopes combine these plates into a single framework that has three openings: one for the first-order red plate, one for the quarter wave plate, and a central opening without a plate for use with plane-polarized light without compensators. In addition, these plate frames have knobs at each end that are larger than the slot dimensions to ensure the plates cannot be dropped, borrowed, or stolen.
| Interactive Java Tutorial | |||||||||||
|
|||||||||||
A primary consideration when using compensation plates is to establish the direction of the slow permitted vibration vector. By convention, this direction will be Northeast-Southwest, in the image, and will be marked slow, z', or g, but it is also possible that the slow axis will not be marked at all on the frame. A convenient method of ascertaining the slow vibration axis of retardation or compensating plates is to employ the plate to observe birefringent crystals (such as urea) where the long axis of the crystal is parallel to the Northeast-Southwest direction of the plate. If the there is an addition to the optical path difference when the retardation plate is inserted (when the color moves up the Michel-Levy scale), then the slow vibration direction of the plate also travels parallel to the long axis. Alternatively, if there is a difference (subtraction) between the optical paths, then the slow axis of the retardation plate is perpendicular to the long axis of the framework.
Characteristics of Compensation Plates
|
||||||||||||||||||||||||||||||||||||||
Table 1
The most common compensators are the quarter wave, full wave, and quartz wedge plates. Other compensators that are available from various manufacturers are listed in Table 1, along with their optical path difference range and abbreviated comments. The Babinet, Wright, and Soleil wedge compensators are variations on the standard quartz wedge plate. In the quartz wedge, the zero reading coincides with the thin end of the wedge, which is often lost when grinding the plate during manufacture. To overcome this difficulty, the Babinet compensator was designed with two quartz wedges superposed and having mutually perpendicular crystallographic axes. The result is the zeroth band being located at the center of the wedge where the path differences in the negative and positive wedges exactly compensate each other, to produce a full wavelength range on either side. In contrast, the Wright wedge is mounted over a parallel compensating plate composed of either quartz or gypsum, which reduces the path difference throughout the wedge equal to the parallel plate contribution. Soleil compensators are a modified form of the Babinet design, consisting of a pair of quartz wedges and a parallel plate. Phase differences due to the compensator are controlled by changing the relative displacement of the wedges. The Brace-Köhler compensator enables precise measurements of exceedingly small retardation values found in weakly birefringent organic specimens and low-strain glasses. Sénarmont and elliptic compensators take advantage of elliptical polarization, by employing a rotating analyzer (Sénarmont) or with a quartz plate that rotates about a vertical axis (elliptic). The Berek compensator consists of a calcite plate cut normal to the optical axis that is tilted about the horizontal axis by means of a calibrated micrometer drum to enable precise measurements of retardation. Twin quartz plates are substituted for calcite in the Ehringhaus compensator, which operates in a manner similar to the Berek compensator. The Berek, and Ehringhaus compensators are standard tools for fiber analysis with polarized light microscopy.
The Bertrand Lens
Advanced polarized light microscopes are often equipped with a Bertrand lens (sometimes referred to as an Amici-Bertrand lens) positioned on a movable sliding or tilting mount that is located between the analyzer and the eyepieces. In some cases, there is also a provision for focusing the Bertrand lens. When coupled to the eyepiece, the Bertrand lens provides a system that focuses on the objective rear focal plane, allowing the microscopist to observe illumination alignment, condenser aperture size, and conoscopic polarized light images. In Köhler illumination, an image of the lamp filament is formed in the objective rear focal plane, together with the image of the condenser aperture, so the Bertrand lens is often utilized to adjusting the illuminating (condenser) aperture diaphragm for optimum specimen contrast. The primary function in polarized light microscopy, however, is to view interference figures (conoscopic images). These images appear in the objective rear focal plane when an optically anisotropic specimen is viewed between crossed polarizers using a high numerical aperture objective/condenser combination.
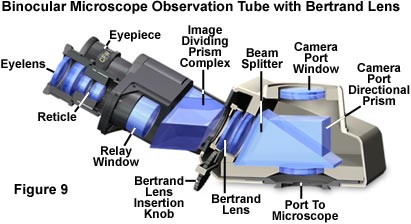
Older polarized light microscopes may have a provision for centration of the Bertrand lens to allow the center of the objective rear aperture to coincide with the intersection of the eyepiece crosshairs. Some of the older microscopes also have an iris diaphragm positioned near the intermediate image plane or Bertrand lens, which can be adjusted (reduced in size) to improve the clarity of interference figures obtained from small crystals when the microscope is operated in conoscopic mode. If the diaphragm is not opened again after conoscopic observations, the field of view is restricted when the microscope is returned to orthoscopic viewing mode. This diaphragm, if present, is operated by a lever or knurled ring mounted either in the microscope body tube or the viewing head (near or within the intermediate image plane; Figure 9). Later model microscopes often mount the Bertrand lens in a turret along with lenses that change the image magnification factor. Adjustment is made with a small knob that is labeled B or Ph for the Bertrand lens position, and 0 or some other number for the magnification lens. A Bertrand lens can also serve as a telescope for configuring phase contrast objectives by providing a magnified image of the objective rear focal plane with the phase rings superimposed over the condenser phase plate annulus.
Eyepieces (Oculars)
Early polarized light microscopes, like their brightfield counterparts, were often equipped with monocular observation tubes and a single eyepiece. Coupled to a reflecting substage mirror for illumination, these microscopes did not provide adequate illumination to visualize and photograph very weakly birefringent specimens. Although low-cost student microscopes are still equipped with monocular viewing heads, a majority of modern research-grade polarized light microscopes have binocular or trinocular observation tube systems. The eye tubes are usually adjustable for a range of interocular distances to accommodate the interpupillary separation of the microscopist (usually between 55 and 75 millimeters).
Many polarized light microscopes are equipped with an eyepiece diopter adjustment, which should be made to each of the eyepieces individually. Some microscopes have a graded scale on each eyepiece that indicates the position of the eye lens with respect to main body of the eyepiece. Other models hold the body of the eyepiece in a fixed position securely in the eye tube with a pin and slot. The first step in diopter adjustment is to either line up the graded markings (Figure 10) on eyepieces equipped with such markings or turn the eye lenses clockwise to the shortest focal length position. Next, focus the specimen with the 10x objective and then rotate the nosepiece until a lower magnification objective (usually the 5x) is above the specimen. At this point, refocus each eye lens individually (do not use the microscope coarse or fine focus mechanisms) until the specimen is in sharp focus. Rotate the 20x objective into the optical path and refocus the microscope with the fine focus knob. Repeat the diopter eye lens adjustments with the 5x objective (again not disturbing the microscope fine focus mechanism), and the microscope should be adjusted to the correct diopter settings. These settings will vary from user to user, so record the position of the eye lenses if the eyepiece has a graded scale for quick return to the proper adjustment.
| Interactive Java Tutorial | |||||||||||
|
|||||||||||
Best results in polarized light microscopy require that objectives be used in combination with eyepieces that are appropriate to the optical correction and type of objective. Microscopes with a fixed tube length often have eyepieces (termed compensating eyepieces) that help to correct for chromatic difference of magnification when coupled to objectives designed specifically for that purpose. Newer microscopes with infinity-corrected optical systems often correct aberrations in the objectives themselves or in the tube lens. Inscriptions on the side of the eyepiece describe its particular characteristics and function, including the magnification, field number, and whether the eyepiece is designed for viewing at a high eye point.
Modern microscopes feature vastly improved plan-corrected objectives in which the primary image has much less curvature of field than older objectives. In addition, most polarized light microscopes now feature much wider body tubes that have greatly increased the size of intermediate images. To address these new features, manufacturers now produce wide-eyefield eyepieces that increase the viewable area of the specimen by as much as 40 percent. Because the strategies of eyepiece-objective correction techniques vary from manufacturer to manufacturer, it is very important to use only eyepieces recommended by a specific manufacturer for use with their objectives.
Care should be taken in choosing eyepiece/objective combinations to ensure the optimal magnification of specimen detail without adding unnecessary artifacts. For instance, to achieve a magnification of 200x, the microscopist could choose a 20x eyepiece coupled to a 10x objective. An alternative choice for the same magnification would be a 10x eyepiece with a 20x objective. Because the 20x objective has a higher numerical aperture (approximately 0.45 to 0.55) than does the 10x objective (approximately 0.25), and considering that numerical aperture values define an objective's resolution, it is clear that the latter choice would be the best. If photomicrographs or digital images of the same viewfield were made with each objective/eyepiece combination described above, it would be obvious that the 10x eyepiece/20x objective duo would produce images that excelled in specimen detail and clarity when compared to the alternative combination.
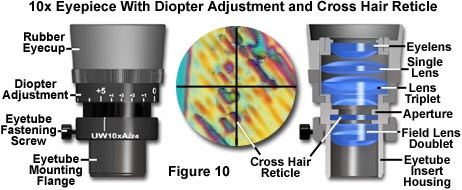
Eyepieces designed for polarized light microscopy are usually equipped with a crosshair reticle (or graticule) that locates the center of the field of view (Figure 10). A pin or slot system, described above, is often utilized to couple the eyepiece to a specific orientation in the observation tube so that the crosshairs may be quickly located and brought into a North-South and East-West direction with respect to the microscopist's view. These eyepieces can be adapted for measurement purposes by exchanging the small circular disk-shaped glass reticle with crosshairs for a reticle having a measuring rule or grid etched into the surface. Because the reticle lies in the same plane as specimen and the field diaphragm, it appears in sharp focus superimposed over the image of the specimen. Eyepieces using reticles must contain a focusing mechanism (usually a helical screw or slider) that allows the image of the reticle to be brought into focus. Each objective must be individually calibrated to the ruled reticle by comparison with a stage micrometer, which is a microscope slide containing an etched millimeter scale. The calibration is conducted by focusing the microscope on the stage micrometer and determining how many millimeters is represented by each division on the ocular reticle rule.
Many modern microscopes are designed with inclined observation tubes in an effort to position the eyepieces at an ergonomically reasonable height above the laboratory bench. The result is a convenient viewing angle that allows the stage to remain horizontal, but these designs require several prisms to be interpolated into the optical path. Depending upon the glass utilized in manufacture, the prisms may produce considerable depolarization effects, which are offset by inclusion of high-order retardation plates in the observation tube optical system.
Adjusting the Polarized Light Microscope
Crossing the polarizers in a microscope should be accomplished when the objectives, condenser, and eyepieces have been removed from the optical path. If the analyzer is restricted to a fixed position, then it is a simple matter to rotate the polarizer while peering through the eye tubes until maximum extinction is achieved. For microscopes equipped with a rotating analyzer, fixing the polarizer into position, either through a graduated goniometer or click-stop, allows the operator to rotate the analyzer until minimum intensity is obtained. If markings are not provided on either the analyzer or polarizer, the microscopist should remember that simply crossing the polarizers in order to obtain minimum intensity in not sufficient. It is necessary to restrict the permitted vibration directions of the polarizer in the North-South orientation, and the analyzer in the East-West direction.
As described above, a thin preparation of well-shaped prismatic urea crystallites can be oriented either North-South or East-West by reference to the crosshairs in the eyepiece. Then, the polarizers can be rotated as a pair in order to obtain the minimum intensity of background and crystal in combination. If both polarizers can be rotated, this procedure may yield either a North-South or an East-West setting for the polarizer. The former orientation is preferred because it can be set by comparison with a polarizer whose vibration direction is known.
The condenser can focused and centered by reducing the size of the illuminated field diaphragm (located in front of the collector lens), then translating the condenser so that the image of the diaphragm edge is sharp when observed through the eyepieces. Next, the field diaphragm should be centered in the viewfield by using the condenser adjusting thumbscrews mounted on the substage housing that secures the condenser. After the diaphragm (and condenser) is centered, the leaves may be opened until the entire field of view is illuminated.
The lamp filament should be focused into the front focal plane of the condenser (a requirement of Köhler illumination) by altering the focus of the collector lens so that the tungsten helices are visible. The condenser front focal plane lies in or near the plane of the illuminating aperture (condenser) diaphragm. Because the rear focal plane of the objective is in a plane conjugate to the condenser, it is possible to observe the filament image by removing the eyepiece or inserting the Bertrand lens. When viewing interference fringes in conoscopic mode, it is often convenient to employ a section of opal glass or a frosted filter near the lamp collector lens in order to diffuse the filament image in the objective rear focal plane.
In order to match the objective numerical aperture, the condenser aperture diaphragm must be adjusted while observing the objective rear focal plane. Again, the Bertrand lens provides a convenient mechanism of observing the relationship between the condenser illuminating aperture and the objective aperture. For most studies in polarized light, the diameter of the condenser aperture should be set to about 90 percent of the objective numerical aperture.
Although it is not essential, centering the rotating stage is very convenient if measurements are to be conducted or specimens rotated through large angles. The simplest method is to locate a small specimen feature (as a marker) and move the feature into the center of the rotation axis of the stage. This location may not coincide with the viewfield center, as defined by the eyepiece crosshairs. Using the centration knobs or keys near the stage, the marker feature can be translated (through trial and error) until its center of rotation coincides with the viewfield center. Some polarized light microscopes allow independent centering of the objectives in the nosepiece. If so, this task should be accomplished prior to attempting stage centration.
Conclusions
Microscopes dedicated for use with polarized light are very sophisticated instruments having components specifically designed to minimize strain and provide sharp, crisp, and clear images of birefringent specimens. For simple qualitative work, a standard microscope can be converted for polarized light studies. Typically, a small circle of Polaroid film is introduced into the filter tray or beneath the substage condenser, and a second piece is fitted in a cap above the eyepiece or within the housing where the observation tubes connect to the microscope body. Using the maximal darkening of the viewfield as a criterion, the substage polarizer is rotated until the field of view is darkest without a specimen present on the microscope stage.
Ensuring that the polarizer and analyzer have permitted vibration directions that are North-South and East-West is more difficult. If the orientation of one of the Polaroid films is known, then it can be inserted into the optical path in the correct orientation. It is then a simple matter to rotate the other polarizer (or analyzer) until the field of view achieves a maximum degree of darkness. Adding retardation plates to this setup is somewhat more difficult, because the "plates" must be located between the polarizer and analyzer, which are themselves often placed in tenuous locations. Several manufacturers sell thin films of retardation material, available in quarter and full wavelengths, but quartz wedges are difficult to simulate with thin films. The most convenient location for retardation films is above the objective (in the nosepiece), or before the analyzer in either the upper body housing or an eyepiece cap. Orientation of the retardation film should await polarizer and analyzer orientation efforts, because the film slow axis must be oriented at a 45-degree angle with respect to the polarizer (and analyzer) vibration direction.
A majority of standard microscopes lack a Bertrand lens, but a phase telescope may be substituted to observe conoscopic images appearing in the objective rear focal plane on microscopes retrofitted with thin film polarizers. There is no easy method to reproduce the 360-degree rotation of a circular polarized light microscopy stage. However, with practice, it is possible to achieve dexterity in rotating the slide itself while keeping the feature of interest within the viewfield.
Polarized light microscopy is often utilized by geologists for the study of naturally occurring minerals and rocks in thin section, and to mineralogists and ceramicists in both research and industrial environments. The technique is also heavily employed by scientists who study the various phase transitions and textures exhibited by liquid crystalline compounds, and polymer technologists often make significant use of information provided by the polarized light microscope. Forensic scientists take advantage of polarized techniques in the analysis of fibers, hairs, and other particles that are discovered at crime scenes. Recently, the advantages of polarized light have been utilized to explore biological processes, such as mitotic spindle formation, chromosome condensation, and organization of macromolecular assemblies such as collagen, amyloid, myelinated axons, muscle, cartilage, and bone.
Contributing Authors
Philip C. Robinson - Department of Ceramic Technology, Staffordshire Polytechnic, College Road, Stoke-on-Trent, ST4 2DE, United Kingdom.
Savile Bradbury - 61 Hill Top Road, Oxford OX4 1PD, United Kingdom.
Mortimer Abramowitz - Olympus America, Inc., Two Corporate Center Drive., Melville, New York, 11747.
Michael W. Davidson - National High Magnetic Field Laboratory, 1800 East Paul Dirac Dr., The Florida State University, Tallahassee, Florida, 32310.
BACK TO POLARIZED LIGHT MICROSCOPY
