
Creative Photomicrography
By employing multiple exposure photomicrography, we have succeeded in generating a series of unusual micrographs which we have termed microscapes. Microscapes consist of multiple exposures (usually from 2 to 9) fashioned on a single frame of 35 mm transparency film. These photomicrographs are intended to resemble novel, surrealistic alien-like landscapes and are designed to have the highest contrast and color saturation currently available with commercial photographic materials and processing techniques.
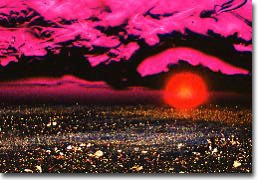
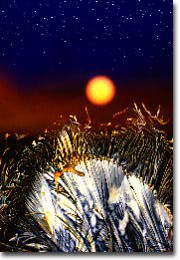 SIOUX CITY, IOWA |
The microscape collection of photomicrographs was constructed utilizing a variety of both classical and non-classical microscopy techniques. Each micrograph was fabricated using primarily the lower power 4x and 10x objectives where depth-of-field is maximized and the successive exposures remain in focus throughout the viewfield when thin crystalline samples are used. In certain instances, where the illusion of a great distance is intended, a thicker crystal sample or a higher (20x or 40x) power objective with decreased depth-of-field is employed. Under these circumstances, the crystals in the immediate foreground are brought into focus leaving a blurred (out of focus) background to simulate the actual effects generated by depth-of-field limitations with conventional photography equipment.
Selective masking of previously exposed areas is critical in multiple exposure photography to avoid undesirable overlap and washing out of successive exposures. Masks can be cut from a portion of black posterboard and are placed over a selected area of the field lens (the lens that allows light to enter the microscope).
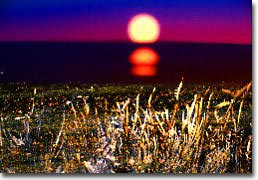
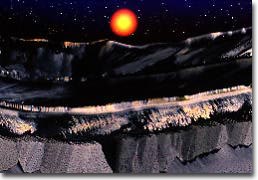 ICESTATION ZEBRA |
The first step in microscape construction is the exposure of a foreground which consists of a selected recrystallized chemical usually imaged with polarized light using the lower power objective and positioned so that only the bottom 30-50% of the film is exposed. Color transparency film is black when unexposed so the top half of the film remains black (unexposed) due to the crossed polarizers. A mask is then cut (from a portion of black poster board) to follow the profile of the first exposure and placed directly on the field lens (at the base of the microscope) to selectively cover and prevent the first exposure from receiving any additional light.
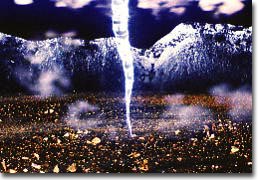
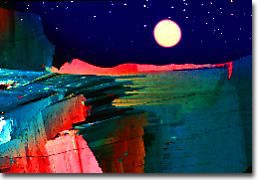
TORNADOLAND
The second exposure can be an additional overlap on the first exposure, a crystalline formation resembling mountains, a seascape created with filters, or simply a simulated sky. Mountains can be simulated using a variety of recrystallized chemicals, although certain formations are more realistic than others. For instance, a snow-covered mountain effect can be is obtained from a concentrated liquid crystalline solution of the polysaccharide xanthan gum in water. Other useful mountain backgrounds can be produced using crystals made from the organic buffer HEPES, from aspirin or sulfur crystallites, and from ampicillin dissolved then recrystallized from water. In some instances the foreground and mountain can be composed in a single crystal formation using recrystallized sulfur.
There are a variety of methods that can be applied to form diverse sky effects. After carefully cutting a mask to cover previous exposures, the microscope can be placed in the brightfield mode and a blue filter inserted into the light path. A very low-intensity (10 to 20 cc blue) filter will work best because the color saturation of the sky can be controlled by reducing or increasing exposure times. Very short exposures yield a dark blue sky while long exposures create a much lighter sky. It is extremely important here that the mask conforms to the topography of all previously exposed regions of the film.
LOVER'S LEAP
On exceedingly irregular boundaries like crystalline mountain formations, a very short exposure time will result in a deep blue sky and avoid overlap of blue regions in the white mountains. A striking alternative to the blue filter technique involves cutting a 1 x 2 cm portion of a polyethylene sandwich baggy and stretching it longitudinally to approximately 1 x 3 cm. This action tends to align the chain-like polyethylene molecules, which enhances their birefringence. When viewed through cross polarizers, the aligned molecules combined with the thickness gradient created by the stretching, induces the sheet of polyethylene to generate a prism-like effect.
When the field is defocused, the sharp lines diffuse resulting in a strikingly realistic yellow-to red-to blue morning sky effect. A third effect that we take advantage of is the stormy bluish-purple cloudy sky effect obtained by defocusing a bead of epoxy resin when imaged in polarized light with a 530 nm retardation plate positioned between the sample and the analyzer. Light diffracted by the mask accentuates the highlights producing an uncanny storm-like appearance. A blue filter can be added at the edge of the mask to make the effect more realistic.
NUCLEAR SUNRISE
At this point, a sun or moon can be added to the micrograph. This is accomplished by closing the field diaphragm of the microscope until the desired sun or moon diameter is reached. Next, the image of the shutter leaves is defocused until they merge to form a complete circle. After placing the appropriate filter (usually orange, yellow, or red) in the light path, the image of the field diaphragm can be relocated to any position in the view field simply by adjusting the centering thumbscrews on the substage condenser. Placing a mask over the bottom portion of the image will create a rising sun effect. With a yellow or orange filter, the exposure time length determines the outcome of color distribution. Very short exposures produce images with a reddish perimeter and a saturated yellowish interior while longer exposure times tend to wash out the image to yield more of a moon-like effect. Long exposure times when using a red filter will cause a yellowish center, while shorter times result in an even color effect.
DEL RAY BEACH, FLORIDA
To simulate the reflection of the sun or moon on water, two methods can be applied. After the diaphragm image is correctly placed, a diffraction grating can be inserted into the light path to spread out the image and shift the image colors to longer (redder) wavelengths. I typically use Polachrome HC instant 35mm transparency film exposed to intense daylight because the manufacturing process for this film results in a series of very finely space lines which serve as an excellent diffraction grating when the film is greatly overexposed. Alternatively, a fine tooth comb inserted into the light path will produce a nice reflected moonlight effect.
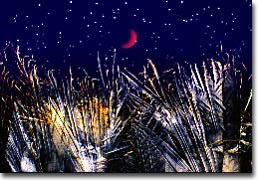
THE STAND
The new moon impression depicted in a microscape entitled "The Stand" is produced simply by inserting the tip of a ball-point in the light path. A yellow filter used here instead of orange produces a more realistic "moon" effect. After the field diaphragm exposure has been completed, a sealed microscope slide containing a solution of small liquid crystalline spherulites of the polypeptide polybenzyl-l-glutamate is placed on the microscope stage. At low magnifications (10x), the spherulites appear as point-sources of light. By leaving the field diaphragm closed, an area on the slide can be located that is devoid of spherulites and this area is placed directly over the previously exposed diaphragm image area. This prevents stars from being imaged in the center of the moon or sun. After recentering and fully opening the field diaphragm, the exposure is made. Almost any crystallite preparation that produces small isolated crystals can be substituted for the polypeptide preparation. We have found that ascorbic acid (vitamin C) will produce suitable isolated crystallites when dilute solutions in ethanol are evaporated quickly.
ASCORBIC ACID, IDAHO
Many other preparations will probably produce acceptable star candidates, although the best results are usually obtained from evaporation of dilute solutions of the appropriate chemical. Clouds are produced by defocusing colorless birefringent crystals of Cibachrome bleach. These crystals are usually imaged in the top-most portion of the view field and exposed for long times to wash out all color.
Perhaps the most difficult microscapes to produce are the beach scenes where the morning sky and ocean are created in a single exposure. This is accomplished by placing a blue filter over the mask at the field lens and defocusing the microscope until a sharp boundary occurs at the junction of the blue filter and the stretched polyethylene image. Correct positioning of the field diaphragm image to create a rising sun effect can be especially difficult when attempting to construct beach scenes.
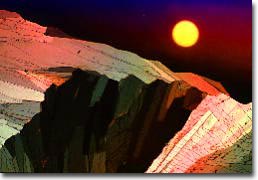
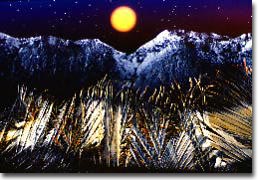
SULFUR CANYON
It is not necessary to follow this outline exactly in order to obtain nicely formed microscapes. For instance, when I observe an unusually promising crystalline formation I usually compose enough images to fill several 24-exposure magazines of film. In this case, I proceed through the sequence as outlined above for the first series of exposures (to produce the intended microscape), then reverse the procedure constructing another very similar microscape thus minimizing the number of substage condenser centering operations. Because the sun or moon is not relocated during recording of the two successive microscapes, almost identical copies are obtained. This is especially beneficial if the resulting arrangement of exposures is optimal. With the proper equipment on hand for the assembly of microscapes, the interested photographer is limited only by the boundaries of his (or her) own imagination.
Contributing Authors
Mortimer Abramowitz - Olympus America, Inc., Two Corporate Center Drive., Melville, New York, 11747.
Michael W. Davidson - National High Magnetic Field Laboratory, 1800 East Paul Dirac Dr., The Florida State University, Tallahassee, Florida, 32310.