
Cleaning, Care, and Maintenance of Microscopes
Microscopes often represent a significant investment of funds and are sophisticated optical instruments that require periodic maintenance and cleaning to guarantee production of high-contrast images equal to the quality of the optical, electronic, and mechanical components. When neglected by exposure to dust, lint, pollen, and dirt, failure to remove immersion oil in a timely manner, or when expensive objectives are abused, optical performance can experience a serious decline that increases over time.
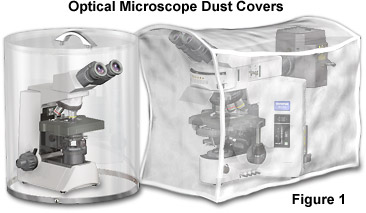
A microscope that remains unused for a lengthy period of time can accumulate dust and debris from the air (a condition that is only aggravated by leaving the instrument uncovered), which can lead to deterioration of image quality even though the instrument may be practically new. Proper use and regular maintenance of the microscope's mechanical components are equally important to prevent impairment of operation and eventual damage to the entire mechanical integrity of the instrument. The best instrument covers are designed to provide maximum protection from airborne contaminants for specific microscope types, as they are typically configured with their common attachments (see Figure 1). Even when carefully covered for protection during periods of inactivity, microscopes that are used regularly are subject to build up of contaminants. Some of these are unavoidably introduced from the environment and others by the microscopists themselves, especially in areas where the hands, eyelashes, and even moisture from breathing contact the instrument over time.
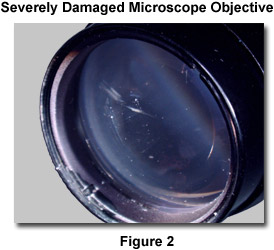
Blemishes such as dust, lint, and smudges on the optical components, as well as scratches, pinholes, and striae in the lenses, filters, prisms, mirrors, and faceplate of the image sensor, tend to degrade overall microscope performance. The objective front element illustrated in Figure 2 exhibits a variety of particulate contamination, as well as severe scratches that seriously degrade its performance. When the optical elements at or near the conjugate field (image) planes are dirty, damaged, or defective, artifacts are likely to appear in sharp focus superimposed on the specimen image. Ironically, the higher the quality of optical components, such as the condenser and collecting and relay lenses, the more these blemishes interfere and contribute to optical noise.
After a source of optical noise is localized to a given component (by turning or shifting the suspected components in turn), the dirt may be removed by a variety of procedures discussed in detail in subsequent paragraphs. The utilization of immersion oil is essential in maximizing microscope optical performance, but its improper use or the failure to immediately remove the oil after each use constitutes the most serious contaminant that must be dealt with in instrument maintenance. Because immersion oil is a known substance intentionally applied to the microscope to enhance optical performance, its clean-up is discussed separately from the removal of other debris that inadvertently accumulates on either the mechanical or optical microscope components.
Routine Removal of Loose Particulate Matter
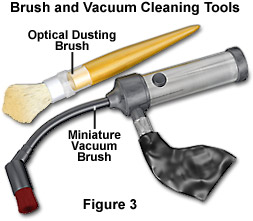
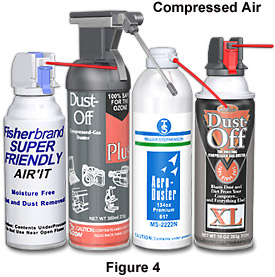
If the microscope has been idle and uncovered for a lengthy period of time, a significant amount of debris accumulation has probably occurred. In the typical laboratory environment, a surprising amount of particulate material can be seen to accumulate on an objective or other component that is left uncovered on a bench for even a short period, such as overnight. Because such debris is often highly abrasive, it must be removed from the microscope frame and mechanical parts with care, using a small vacuum cleaner or by dabbing with a moist paper towel. Dirt that is non-adherent may be removed from less delicate lens surfaces by gentle brushing with a clean camelhair brush. Figure 3 illustrates two of the basic cleaning tools commonly used in microscopy. Alternatively, an air blower or compressed gas duster can be employed, but it must be assured that no oil or similar spray is released from the compressed gas can.
Several manufacturers produce oil-free compressed gas cylinders that are ideal for dusting glass surfaces if appropriate precautions are followed (see Figure 4). The common small portable cans of compressed gas must absolutely not be tipped or shaken while spraying in order to avoid release of cold liquid propellant. Although it is difficult to resist the almost reflexive tendency to blow away dust by mouth when it is noticed on lenses and other areas of the microscope, this should be avoided. One should never attempt to blow the dust off lens surfaces with a strong breath because doing so risks spraying the lens surface with droplets of saliva that can mix with dirt to produce an abrasive slurry. A deliberate and systematic cleaning protocol is recommended for thorough contamination removal, and appropriate techniques are detailed in the following sections. While it is often suggested that a regular maintenance schedule be followed at periodic intervals, the necessity for cleaning is dictated by the use of the instrument and by the effectiveness of preventive measures taken to avoid build up of debris. Delicate components should only be cleaned when necessary, as most scratches and other damage to optical surfaces result from improper attempts to clean them.
Proper Use and Removal of Immersion Oil
Following proper procedures in the use of immersion oil will significantly ease the task of removing the oil from microscope components before it causes damage. It is important to recognize that immersion oils are not inert with respect to either optical or mechanical microscope components, and if left in contact with the instrument, oil will penetrate into gears and sliding mechanisms and into crevices between lens elements and their mounting structures, with the potential to cause irreversible damage. Even when employed properly, immersion oil must be removed immediately after use to prevent its accumulation in unwanted areas of the microscope, as well as to avoid optical degradation from dried oil residue on the objective. Oil that has been stored for more than one or two years may not perform optically the same as fresh oil, and a potential increase in viscosity often makes it more difficult to remove. Consequently, containers of immersion oil should be labeled with the date received, and discarded when necessary.
The full utilization of the microscope optical system numerical aperture when immersion objectives are used requires a double oiling technique in which immersion oil is applied to both the top and lower surfaces of the specimen slide. Placing immersion oil in the gaps between the objective and slide and between the condenser and slide provides a homogeneous optical medium from the condenser, through the specimen (in an appropriate mounting medium), and into the objective. Although the viscosity of immersion oil minimizes any immediate migration into unintended locations, if it is not removed promptly and is allowed to accumulate, the effects of gravity and capillary forces will ultimately result in the oil moving into parts of the substage mechanism and microscope stand, and perhaps even into the objective. This accumulation may not be readily visible, and can go unnoticed until mechanical or optical problems become severe enough to require service by a microscope repair facility.
Correct utilization of immersion oil requires placing a single drop on the top lens surface of the substage condenser and another single drop on the top of the specimen slide. The condenser is then raised just to the point that the oil drop contacts the lower surface of the slide, and the objective front lens is brought into contact with the oil drop on top of the slide. It should be stressed that the oil immersion technique is only to be used with a condenser equipped with an immersion-type top lens, and with immersion objectives. Any attempt to improve the performance of a dry objective by application of immersion oil will likely result in its destruction, as such objectives are optimized optically for use in air, and are not sealed against the intrusion of fluids into the lens barrel.
After each specimen has been studied, the immersion oil should be completely removed, even if additional slides are going to be observed. While it seems expedient to simply add additional drops of oil when changing to the next specimen, this practice results in excess oil accumulating on the microscope, which will eventually find its way into damaging locations in the substage assembly and even the microscope stand. Only a single drop of oil at each specimen-optical interface can be accommodated without producing contamination that may be impossible to remove without complex disassembly or factory servicing of the instrument.
Immersion oil is most safely removed using only lens tissue, without employing any solvents. After moving the stage away from the objective, and lowering the condenser away from the slide, the slide can be removed from the stage and set aside for subsequent cleaning. With most microscopes the objective that requires cleaning is most easily accessed by swinging the lens turret to position the objective toward the front of the microscope. Lens cleaning paper that is specifically for use on high quality optics must be employed, and it should be stored in a covered container to prevent contamination with airborne particulates. A folded piece of lens tissue is drawn across the objective front lens to absorb the oil, and repeated with a new area of the tissue. This gentle wiping of the lens surface should be repeated, with as many tissues as required, until no oil streaks are seen on the tissue, and each tissue discarded immediately to avoid inadvertently reusing contaminated tissues on the objective. The folded tissues can be held under light tension with two hands while wiping, or pulled across the lens like a paper swab.
Direct pressure from the fingers should never be applied to the glass lens surface through the paper in order to minimize the possibility of scratching the lens if any particulates are present on the tissue. It should be emphasized that using a number of fresh lens tissues is essential to the success of this procedure, and the natural tendency to minimize "waste" is definitely misdirected economy considering the relative cost of lens tissue compared to the potential of damaging an expensive objective. If 20 tissues are required to clean an optical component, then that many should be used and discarded without hesitation.
When no residual traces of immersion oil are apparent on the final tissue paper, another tissue should be employed to wipe the lens with moisture from the breath. As cautioned previously, one must not blow through closed lips onto the lens, but should breath gently on it with the mouth open, so that no saliva droplets are expelled. If possible, the mouth should be positioned beneath the level of the objective to further reduce any possibility of droplets landing on the lens. With moisture condensed from the breath as a lubricant and solvent, a fresh piece of lens tissue is used to wipe the lens surface in a circular motion. An effective method of preparing lens paper for this cleaning is to fold all four corners of a piece of tissue together, leaving the untouched center of the tissue bulging out. The corners can be twisted together slightly to form a stem for handling the tissue. When the tissue is held by this stem, and wiping performed with the puffed-out tissue center, the force that can be applied to the objective is limited by the springiness of the tissue. Circular wiping motion can be applied in this manner, with very little direct force on the lens surface.
The procedure of breathing on and wiping the objective front lens should be repeated several times with a new tissue each time. With high-magnification objectives, having very small front lens elements, the lens paper can be twisted into a sharper point if necessary, taking care not to touch the portion of tissue applied to the lens. The spring effect of the paper can still be exploited to limit the force that can be applied to the lens surface when cleaning. Removal of immersion oil without removing the objective from the microscope assumes that the structure of the instrument does not restrict access to the objectives. In the latter case, the objective must be carefully removed from the nosepiece and placed on a suitable protected surface on the lab bench for cleaning. In any instance, objectives that are regularly used should be removed (one at a time) for a thorough cleaning at periodic intervals. This allows each to be more carefully inspected, as described in a following section, for signs of any type of accumulated contamination. Figure 5 demonstrates cleaning and inspection of an objective that has been removed from the microscope. The small front element of the objective can be effectively cleaned with a tissue formed into a point (Figure 5(a)), and the effectiveness of the cleaning evaluated under magnification using a loupe or inverted ocular (Figure 5(b)).
Ideally, the removal of immersion oil from the objective is successfully accomplished only through the mechanical application of lens tissue, and a similar procedure is then applied to the condenser top lens. It may be advantageous to remove the top lens of the condenser to facilitate cleaning, especially if removing it minimizes the likelihood of dispersing oil into other parts of the condenser body. The procedure described for cleaning the front of the objective should be repeated with the condenser lens that was oiled, and the body of the condenser inspected for any stray oil, which must be removed. Following cleaning of the optics, immersion oil should be cleaned from both surfaces of the specimen slide using laboratory tissues (brand names such as Kimwipes or Micro-Wipes). It is not necessary to utilize lens tissue for removing oil from larger areas such as specimen slides, or from other portions of the microscope base or stand. All such areas on the instrument should be routinely checked for any traces of immersion oil, which if found, may be removed with laboratory towels or soft cotton cloth.
Inverted (tissue culture) microscopes present special problems with regard to the use of oil-immersion objectives because spilled or migrating oil can very easily intrude into the interior of the objective at the juncture between the body and the telescoping spring-mounted front lens barrel. If oil is allowed to accumulate, it can conceivably flow, under the force of gravity, even into the objective turret or nosepiece. Specially designed higher-viscosity immersion oils are available for use with inverted microscopes, and should be employed to prevent migration of oil from the objective front element.
Hazards of Solvent Cleaning
Numerous publications by respected authorities in microscopy, including several microscope manufacturers, recommend the use of various solvents as aids in removing immersion oil from objectives and other optics, as well as for routine removal of other contaminants. While this may simplify and accelerate the cleaning process, the variations in lens construction and the materials used in other microscope components, as well as the health and safety hazards presented in using most of the applicable solvents, make it inadvisable to recommend their general use. Extreme care must be exercised in applying solvents to components that may be irreparably damaged if solvent migrates into internal areas or if it is applied in excess and remains in contact with the surface for too long before evaporating. Many cleaning procedures that have been used successfully for decades have become unacceptable today for a variety of reasons, including additional knowledge of health and safety hazards associated with the solvents for organic non-polar compounds used in immersion oils. The issue of the use of solvents is complicated, and is confused by contradictory recommendations in the scientific literature, as well as by differences in manufacturers' technical publications. Some of the considerations relevant to solvent cleaning are discussed in more detail in the following sections.
In the past, solvents have been routinely employed for nearly any cleaning task in microscopy, and particularly for removal of immersion oil. Potential problems associated with solvent cleaning are sufficiently serious that the best current approach in cleaning the microscope is to use solvents only when absolutely necessary, essentially as a last resort rather than a first step. Information provided in instruction manuals of microscope manufacturers exemplifies the difficulty in selecting a cleaning solvent when one is required. Some manufacturers have for years warned specifically against the use of alcohol as a lens-cleaning solvent, while others recommended ethanol and mixtures of ethanol with other solvents. An ideal solvent would be miscible with organic non-polar compounds, not highly flammable, sufficiently volatile to evaporate quickly leaving no residue, and be non-hygroscopic and non-toxic. Most solvents that have been routinely used historically fail one or more of these criteria. With optics allowing use of alcohols, a mixture of ether and ethanol (50:50 by volume) is effective, as is the modified mixture of ether, ethanol, and chloroform (48:48:4 by volume), but both are dangerously flammable or explosive, and produce toxic vapors.
One of the most significant dangers with many of the solvents proven effective for cleaning microscope optics is that they have the potential to dissolve the cements utilized in lens assembly (as do the immersion oils themselves if allowed to remain on the optics). In the past, benzene was regarded as a highly effective lens cleaning solvent, but always required great caution to limit contact with the lens for no more than a second or two, due to the high solubility in benzene of balsam and some other cements used for lens mounting (and for mounting coverslips on specimen slides). The high volatility of benzene is an advantage in this regard, but the material is also highly flammable and toxic. It is now known that benzene is readily absorbed through the skin, and this as well as inhalation of the vapors can cause liver damage. As a consequence of the numerous hazards, benzene should never be used for cleaning. Xylene has been widely utilized for years, and is considered a less aggressive solvent than benzene, but because of its lower evaporation rate, residual liquid may be more likely to penetrate and damage a lens unless the xylene is used very sparingly. Xylene is, however, highly flammable, toxic and carcinogenic, and may cause skin contact sensitivity. Although alcohol and xylene are widely recommended as lens cleaning solvents, they are also named as being harmful to both the mechanical and optical components of many microscopes. The finish on portions of the microscope stand and the materials used in a number of the parts themselves can be severely damaged by exposure to either material.
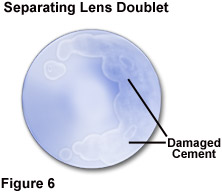
Because of the variation in solvent recommendations, and the likelihood that some of the materials used in the instrument components are not known to the user, it is prudent to restrict use of any solvent to an absolute minimum. Optical components should not be immersed in any solvent, and cleaning tissues should only be moistened, never saturated, with a cleaning solution. Minute gaps commonly exist at the glass-metal junctures of an objective front element, allowing the possibility of solvent migration into the interior of the optical component if excessive solvent is applied. Depending upon its composition, the optical cement used to join lens element combinations in objectives is commonly soluble in one or more of the solvents, alcohol, xylene, and acetone. The result of solvent penetration between lens elements is illustrated in Figure 6, in which the partial separation of cemented lens groups has occurred. Although most modern optical cements are not readily affected by xylene, some older objectives utilize cements that are totally soluble in xylene.
Alternative Cleaning Materials
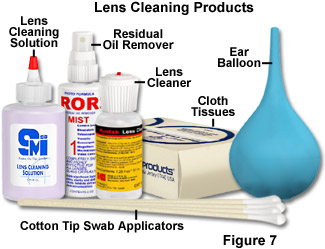
Several alternatives to hazardous solvents have been found to be effective in microscope cleaning, and a variety of cleaning agents, as well as cleaning materials, are recommended by different microscopists and manufacturers (see Figure 7 for examples). Safer alternatives to xylene have been widely pursued, in part because that solvent is commonly used in histopathology and cytology laboratories as a depariffinizing and clearing agent. The proprietary solvents Histolene and Histoclear are gaining popularity as replacements for xylene in microscopy laboratories, and have been found to be effective for instrument cleaning as well. These solvents are based on the naturally-occurring compound d-limonene, which is the major constituent of citrus peel oils and other ethereal oils, and which has been used extensively in the food and cosmetics industries for years. Although the limonene-based solvents require adequate ventilation and skin protection, they currently are thought to be safer overall than xylene. Pure distilled water is the safest cleaning fluid for any contamination that is water soluble; if that is inadequate, commercial photographic lens cleaning liquids are very effective and are safe for precision optics when used sparingly. This type of cleaning agent consists primarily of water to which is added a small percentage of surfactant and alcohol. Commercial window cleaning products (such as Windex and Sparkle) are used by some microscopists, with no reported damage to optical components, and isopropyl alcohol is employed successfully by others.

Great care must be taken in choosing materials for applying water or other cleaning liquids to precision optical components. Although many products are marketed as being suitable for lens cleaning, and other materials give the subjective impression that they would not be harmful, the suitability of specific materials for delicate optics is not always obvious. As an example, the laboratory tissues marketed under the name Kimwipes have been shown to be suitable for lens cleaning, although they feel quite coarse to the touch. In contrast, typical facial tissues are processed to feel soft to the skin, but contain hard particulates that are definitely harmful to optical surfaces. Lens tissues are available in varieties that feel relatively stiff and hard-surfaced, with tight fibrous texture, and others that are loosely textured and very flexible. The softer type is generally preferable for delicate optics, even though these tissues tend to leave residual loose fibers following cleaning, which must be blown off with air. Freshly laundered pure cotton or linen fabric is recommended by some microscopists for lens cleaning, but with any material that is reused, it is essential that no detergent residues or particulates remain after washing. Not only is this not a trivial requirement to meet, it is also important to ensure that if manufactured cloths such as handkerchiefs are used, they are not hemmed or otherwise sewn with polyester or other abrasive thread.
A common recommendation in the past for performing lens cleaning was to wrap small portions of cotton wool around the tip of an orangewood stick (an oil-free wood) for use as a cleaning swab. This is no longer advisable, due to the fact that cotton wool such as that now sold by pharmacies in rolls typically contains some proportion of synthetic fibers, and is not as suitable for delicate surfaces as is 100-percent cotton wool. Cotton swabs that are untreated are still considered to be suitable, although these are wound into very tight buds at the factory, and before use it is wise to loosen some of the cotton at the tip of the swab with clean forceps (not the fingers, which will deposit skin oils) so that less force is applied to the surface being cleaned. Applicators made by attaching small pieces of clean chamois to orangewood sticks are commonly used by optical technicians, and these are commercially available or can be made-up in special sizes, as desired.
Basic Cleaning of Mechanical Components
The primary concern in maintenance of the mechanical components of the microscope are areas of the instrument which are unavoidably exposed to skin oils from the hands and moisture from breathing, and the stage area, which is subjected to a variety of contaminants during imaging sessions. In addition to the stage, other components to be cleaned include controls such as knobs, levers, and movable control rods, the body tube, and the stand. Because many of the microscope controls, such as focusing knobs, are ribbed or milled in a fine crosshatch pattern, skin oils tend to collect in these areas and attract dust, which can become tightly bound to the control. Cleaning may be required frequently on microscopes that are heavily used. An effective cleaning liquid may be prepared by adding approximately 10 percent alcohol, by volume, to a commercial glass and surface cleaning product. A piece of terry cloth toweling moistened with the cleaner should be used to remove contamination from the ridges of every control by wiping in the direction of the ridges, or in multiple directions on milled surfaces. Prepackaged moistened wipes for optical components provide an alternative method of applying a controlled amount of cleaning fluid, which may be effective for cleaning many microscope surfaces (see Figure 8). Each cleaned control surface should be dried with a clean piece of toweling.
As a microscopist works with the eyes adjacent to the oculars, the close proximity of the facial areas around the eyes and nose to the cooler surfaces of the body tube result in vaporized moisture and skin oils condensing on these microscope surfaces, leading to a significant amount of contamination. Additionally, the breath impinges on both the body tube and objective nosepiece, contributing further to the collection of airborne contaminants on the moist surfaces that result. The use of an air deflection shield, commonly referred to as a breathshield, on the microscope is effective in reducing this source of contamination by diverting the breath away from the nosepiece and microscope stand. The body tube and other parts of the instrument stand can be cleaned with soft cotton cloth lightly moistened with the surface cleaner referred to previously. It is especially important to clean the area around the eyepiece interocular distance adjustment mechanism, which is particularly prone to the build up of contamination. In order to avoid getting any moisture inside the eyepiece tubes, they should not be wiped with the moistened cloth near the top at the mating surface where the ocular rests. After cleaning the body tube, it should be dried with another piece of cotton cloth, and this dry cloth can be used to clean the top portion of the eyepiece tube and the outer rims of the oculars, taking care to avoid touching the glass lens surfaces.
The microscope stage is cleaned in a similar manner to the body tube, first with a moistened cloth, then with a dry one. Because of the variety of contaminants that may be deposited on the stage from specimens and from constant handling and manipulation, it should be cleaned after every use of the microscope. Care must be exercised in cleaning around the edge of the center opening in the stage, and contact should not be made with the underside of the stage where there may be exposed grease from bearing surfaces. Any cloth contaminated with the special grease used on the instrument stage should be discarded to avoid transferring it to other parts of the microscope, as it may be virtually impossible to remove.
The remainder of the microscope stand should be cleaned carefully with the same procedure of a moistened cotton cloth followed by a dry cloth, taking care to avoid optical surfaces or any area that might be subject to moisture penetration that could damage internal mechanisms or electronic circuitry. Following complete cleaning of the mechanical components as described, and carefully wiping up any liquid spills in the vicinity of the instrument, a small vacuum cleaner (see Figure 3), with a flexible hose and soft brush attachment, can be employed to vacuum up any loose material on the stand and table area around it. Extreme care should be taken to avoid touching any optical surfaces with the vacuum brush.
Basic Cleaning of Optical Components
A systematic protocol for inspection and cleaning of microscope optical components is essential for several reasons. Not only are the optics the most crucial components in image formation and recording, they are the most expensive, as well as the most delicate and most subject to damage. Inspection of optical surfaces with magnification, provided by a loupe or an inverted ocular, is an important first step in cleaning. Evaluating whether contamination is present and determining the type of material is important both because unnecessary cleaning is counterproductive and because certain types of contamination are not obvious without careful inspection. In particular, the front elements of the objective and condenser should be regularly inspected with a magnifier under reflected light by carefully positioning a light source at an angle to the surface being examined so that any debris can be seen. In troubleshooting a blurry or low contrast microscope image, it can be assumed that the most likely cause is a dirty front objective element, debris on glass surfaces near the imaging sensor, or a dirty coverslip. High-magnification objectives, with very short working distances, are especially vulnerable to contamination, and require frequent inspection.
The presence of even minor dirt or smudging on an objective, no matter what the nature of the material, produces the same effect, which is a reduction of image sharpness. This is true for particulate material and for contamination with perfectly transparent material such as immersion oil. Oil traces, including greasy fingerprints on a dry objective front element, interfere with the transmission of light rays through the objective in the same manner as would a damaged lens or one having an optical manufacturing defect. Inspection of the front objective element is the best way to determine whether contamination is present, and if so, what course of action is required for its removal.
The cleaning procedures described below apply only to exposed surfaces of the various optical components of the microscope. No attempt should ever be made to clean internal optical surfaces of most microscope components, and cautions are given in each of the following sections pertaining to specific components in order to emphasize potential damage that can be caused by not strictly following this advice. The basic cleaning protocol for optical surfaces, which is generally followed for all optical components, should be undertaken in steps, as follows:
Inspection of the Lens Surface - The optical component to be evaluated is removed from the microscope and placed on a laboratory towel or similar protective surface on the instrument table. Before any cleaning is attempted, the optical surface should be inspected with magnification under reflected light to determine the condition of the component. Particular attention should be given to the presence of any particulate material, which must be assumed to be abrasive, and removed before any other cleaning is done. Additionally, the presence of any films, smudges, or stains should be noted. A magnifying lens of 2-3x is appropriate for examining larger optics such as oculars and condensers, while the smaller lens elements of objectives require approximately 5x to 10x magnification for proper inspection. It is crucial that particulate matter be removed from a lens surface as the first step in cleaning, because any particle can be abrasive and result in scratches if it is moved across the surface with even the most gentle lens tissue.
Removal of Non-attached Particles - If any dust, fibers, or other particles are observed on the lens surface, an attempt should be made to remove them in the least aggressive manner possible, which is by gently blowing air across (not perpendicular to) the lens surface. The safest method of air dusting is to use a rubber bulb or balloon, such as the ones intended for use as ear and enema syringes for infants (an ear syringe is illustrated in Figure 7). The larger enema syringe is appropriate for larger optics such as eyepieces, condensers, and prisms; the smaller ear syringe is better for small objective lens surfaces. The reason for not blowing directly toward the particle and surface is that this can force abrasive particles into delicate lens coatings, and possibly make them more difficult to remove, ultimately damaging the surface in the process. The cumulative effect of repeated abrasions of this type, though minor, can degrade the performance of the optic. Care is required to avoid touching the tip of the syringe to the lens surface. The best advice is to avoid any use of compressed air cans for lens cleaning. It is difficult with these to control the pressure of air impinging on the surface being cleaned, and there is always the risk of either extremely cold air or freezing liquid being expelled onto a lens surface and causing irreparable damage. Neither lens coatings, nor optical cement between lens elements can withstand localized freezing without damage. If, for any reason, a canned-air duster must be used, it should be stabilized in an upright position to avoid tilting (which will expel cold liquid), and fitted with a length of flexible plastic tubing to allow air to be directed in the desired direction onto the optical surface. It is far preferable to utilize the manual air bulb type duster to completely eliminate this risk.
Reinspection of the Lens Surface - Inspection of the lens again with a magnifier will reveal whether all particles have been removed, and if so, any contaminating films should be noted for subsequent removal. If particles remain after the initial air dusting, another attempt should be made to remove them with air alone. Any that are still present on another examination are most likely attached through direct interfacial tension between the particle and surface, or due to an intervening film of some type, and these must be removed before further cleaning of film contaminants can proceed.
Removal of Attached Particles - Particulate material that resists removal by air dusting alone is most likely held by a surface film through a minute contact area, and can be dislodged by delicately applying slight lateral force to the side of the particle. This procedure requires practice, and definitely must be done with adequate magnification to ensure that no damage is done to the lens. To devise a tool for nudging attached particles from their positions, a thin bamboo skewer or wooden toothpick can be cut off to a very fine square point with a razor blade. After breathing very gently onto the lens (with mouth open wide) to produce condensed moisture, which should loosen the particle from its adherent film, the point of the wooden tool is brought into contact with the side of the particle. It is gently nudged sideways, taking care not to touch the lens surface with the tool. This process is repeated for any other attached particles, and the small ear syringe is employed to blow across the lens surface to remove the freed material.
Reinspection of the Lens Surface - The lens is inspected again under magnification to determine if all particles have been removed. If any remain, the removal procedure is repeated, and the lens inspected again. When all particulates have been removed, if no additional contamination is present, the component can be reinstalled on the microscope. If any other film, streaking, fingerprints, droplets, or other contaminants are present on the optical surface, the following steps are performed.
Removal of Water-Soluble Films - Water-soluble materials can be removed from a lens surface using lens tissue and moisture produced by slowly breathing onto the lens. The tissue should be utilized in the manner previously described to limit the force applied to the lens, and never just rubbed on the surface directly with finger pressure. In addition to the puffed-out tissue technique, several other methods are suitable for limiting the force applied by the lens tissue. One that is effective for relatively small lens surfaces is to roll a folded lens tissue into a tight tube, and then to tear it in half forming two shorter tubes each having a frayed end. The frayed end of each tube is used to clean the lens surface. The tearing action not only should dislodge any particles on the paper in that area, but the torn end minimizes the force that can be applied to the lens. After gently and slowly breathing on the lens with the mouth opened wide to provide moisture, the lens is cleaned with a frayed tissue tube in a circular motion starting at the lens center and working outward toward the periphery. The tissue is discarded and the process repeated with additional torn pieces, until the lens appears clean or no more improvement is noted. The lens may not become completely clean if any contaminants are present that are not water-soluble.
Inspection of Lens Surface - The lens is again inspected using magnification, and if it is completely clean, the component can be returned to service on the instrument. If any film-like deposits or smudges remain on the lens, it is most likely a non-water soluble material, which must be removed with the following additional cleaning step.
Removal of Non-Water Soluble Films - Contaminants on an optical surface that are not readily removed with water (other than immersion oil, discussed previously) require an additional cleaning component. One of the safest materials that is effective on deposits of this type is one of the commercial lens cleaning fluids for precision optics, which are usually composed of distilled water to which small proportions of a surfactant and alcohol are added (see examples in Figure 7). A very limited amount of fluid should be utilized, and it should never be applied directly to the lens surface. An effective means of controlling the amount of fluid allowed to contact the lens is to use a cotton swab to which is applied a very small drop of cleaning solution. The tip of the cotton bud should be inspected for any particulates that are present, and as described previously, the tightly wound cotton can be loosened slightly by pulling the tip with clean tweezers or teasing out some of the cotton with a needle. The lens can be cleaned by lightly applying the swab in a circular motion starting at the lens center and moving out. As an alternative to the cotton swab, a soft lens tissue may be twisted into a point, being careful to not touch it at the end, and used as discussed regarding removal of immersion oil. When employing a cotton swab in this manner, extreme care must be taken to limit the force applied to the lens surface, and this technique should never be employed except as a final cleaning step immediately after complete removal of particulate materials.
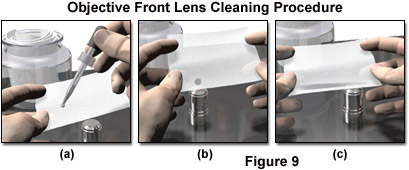
Still another effective method of utilizing a lens cleaning fluid so that very little force is applied to a small lens, such as an objective front element, is illustrated in Figure 9. With the component resting on a soft surface on the table, a single drop of cleaning fluid is placed on a folded tissue, and while supporting the tissue with both hands, the drop is brought into contact with the lens surface. The tissue is then drawn horizontally over the lens surface, which will leave a streak of fluid on the tissue. There should be no attempt to force the tissue into contact with the lens; in fact the surface tension between the lens and drop of fluid may make it possible to slightly pull the tissue away from the lens while moving it across, if this is not done with so much force that the tissue loses contact with the lens surface. The process should be repeated several times with a fresh drop of fluid and a new tissue each time. After cleaning with the moistened swab or tissue, the lens surface should be dried by repeated application of several torn lens tissue tubes, discarding each after use. An indication of the success of the cleaning can be obtained by breathing slowly on the lens to moisten it, noting whether the moisture film is even and without disruption. As a final step, the moisture is removed by wiping in a circular motion with a lens tissue tube.
Final Evaluation of Lens Surface - Inspecting the lens surface with magnification is the final step in determining whether the component is completely clean before replacing it on the microscope.
Notes and Cautions on Cleaning Specific Components
Modern, highly-corrected objectives may contain over 15 individual lens elements, some joined by optical cement into compound lens groups, which are assembled at precise separation distances within the objective barrel. Objectives should never be disassembled in an attempt to clean internal lens surfaces, or for any other reason. The component lens elements are precisely centered optically, and assembled with a precision that cannot be duplicated outside of the manufacturer's factory setting, and any attempt at disassembly will undoubtedly result in a damaged objective. Even if access to internal surfaces were possible, they could not be successfully cleaned without damage, due to the fragility of the anti-reflection and other lens coatings that are commonly utilized. Most precision lens surfaces employ one or more interference-film coatings that may be only a few atomic layers thick. These coatings are protected by hardened protective layers on external lens surfaces, to enable them to tolerate normal cleaning procedures, but the coatings on internal surfaces are much softer and very easily damaged.
Under no circumstances should the rear objective lens element be cleaned, other than to blow off dust that settles there with the ear-syringe blower. Due to the construction of the objective, which makes access to the rear element difficult, attempts to clean the rear element risk introducing tissue fibers or other contamination into the interior of the assembly. The interior can be checked for contamination by looking through the objective from the front, with a light source (such as a bare lamp) positioned close to the rear element. Unfortunately, if internal contamination is present, it can only be removed by qualified service centers.

One previous caution that bears repeating is the importance of not applying excessive pressure to the front lens surface of an objective. The front element of higher-magnification objectives is a very small, partially hemispherical lens that is held in place by minimal contact with the lens assembly. The large amount of metal surrounding the small glass element gives these objectives a robust appearance that is deceptive, as the front element can be easily moved out of alignment by excessive pressure, resulting in a damaged objective. Furthermore, even if the element is not forced out of alignment, applying too much pressure during cleaning or through accidental contact can produce minute gaps at the juncture between the lens and the surrounding metal barrel, causing oil or cleaning fluids to be drawn by capillary force into the objective interior, destroying the objective.
The top lens of most condensers is removable, and cleaning involves application of the basic optical cleaning procedure to the top and bottom surfaces of the top lens, as well as to the top lens surface of the middle assembly. The component parts of the condenser body should absolutely not be disassembled. They are assembled with similar precision to objectives, and cannot be realigned outside of the manufacturers' facilities. The same is true for phase contrast elements and differential interference contrast prisms, as well as for polarizing devices that are components of some condensers. These elements must be realigned at the factory if disturbed, and should never be removed or disassembled. Because of its location, the substage condenser collects a variety of contaminants, and must be cleaned more frequently than other components. Due to its relative inaccessibility on most microscopes, the condenser usually requires removal for proper cleaning, and should be handled with the same care given to objectives.
After removal of the condenser from the microscope, the top element can usually be removed by unscrewing. If a filter carrier is present beneath the condenser, it should be swung away from the condenser and any filters removed for subsequent cleaning. The surface of the top element may be contaminated with both particulate and film deposits, and is cleaned following the basic protocol of first removing particles, and then films or smudges. The lower surface of this lens will typically only have particulate debris, but should be inspected with a magnifier to confirm this, and cleaned accordingly. The next step is inspection and cleaning of the upper surface of the middle optical section of the condenser that is exposed when the top element is removed.
The condenser should next be turned over so that the bottom surface of the lower lens assembly can be inspected and cleaned if necessary. The primary caution at this stage is to avoid damaging the iris diaphragm if one is utilized beneath the lower optical combination of the condenser. If present, the diaphragm must be opened completely to allow access to the bottom lens surface and to protect the blades of the diaphragm. These blades are extremely fragile and should not be cleaned, touched, or exposed to any liquid. If opening the diaphragm does not retract the blades completely into the rim of the assembly, do not attempt to clean the lower lens by reaching through the iris opening, as damage to the diaphragm is likely. Cleaning of any filter removed previously must be done with the same care as exercised with other optical components. Interference filters are constructed utilizing very thin vacuum-deposited films similar to anti-reflection lens coatings, and filters of this type are commonly utilized in the condenser assembly and elsewhere in the microscope optical path. Particular caution must be used in handling and cleaning of such filters to prevent damage to the thin coatings.
The optical trains of modern microscopes contain a number of precision prisms and front-surface mirrors, most of which are housed within the microscope base and stand. As a general rule, none of these components should be cleaned unless they are accessible without disassembly of any part of the instrument. When internal components of this type are dirty, they require factory service to be cleaned without damage. The only exceptions are three external prism surfaces that are accessible in the body tube, and a mirror that is exposed (without any disassembly) in the base of some microscopes. Front-surface mirrors employ an unprotected reflective coating (usually silver) on the front of a glass base, and are very easily damaged. Removal of dust and fibers can be accomplished with gentle air dusting, followed by very gentle cleaning with lens fluid only when absolutely necessary. Cleaning with tissue should be done employing every effort to limit friction on the reflective mirror surface, which is easily abraded.
Binocular body tubes contain prisms for the right-eye and left-eye light paths that are precisely aligned using special collimating equipment, and no disassembly for cleaning should be attempted except by factory service facilities. Because the initial assembly is done under clean-room conditions to ensure a minimum of particulate contamination, any internal cleaning efforts would probably only introduce additional debris. The external prism surfaces that are visible when the eyepieces are removed from the body tube can be carefully cleaned by blowing off particulates, followed by use of cotton swabs that are softened on their tips as described previously for objective cleaning. Dust should be blown off with a large infant syringe after inverting the body tube so that dust falls away from the prism surfaces and out of the body tube. If further cleaning to remove smudges or films is required, it may be necessary to provide moisture for this procedure by breathing on the cotton swab tip instead of the prism itself, because of the recessed location of the prisms within the body tube. When the body tube is turned upside down, the lower opening reveals the third prism surface or an optical flat covering it, and this surface should be examined for signs of contamination and cleaned carefully if necessary.
Eyepieces require fairly frequent cleaning of their external optical surfaces, but do not generally become contaminated internally. The eye lens top surface is vulnerable to many types of contamination due to its proximity to the microscopist and its likelihood of collecting airborne particulates. Because the eyepieces are frequently removed for various reasons during use of the instrument, the lower field lens surface can become soiled and should also be examined for debris. Both of these lens surfaces should be cleaned as required following the basic protocol for optical components. In the rare circumstance that dust or fibers are seen in the interior of an eyepiece when it is inspected following external lens cleaning, it is possible in some cases to remove the eye lens in its mount and the field lens in it mount, and to clean the tube interior and the inner surfaces of the two lens components. They must be very carefully reassembled in their exact original configurations or the eyepiece will not perform properly. Particular care must be exercised with the finely threaded lens cells to avoid cross-threading the components upon reassembly. Note however, that under no circumstances should a Filar micrometer eyepiece, a measuring eyepiece containing an internal reticle, or any type of digital-readout eyepiece be opened or disassembled for any reason. Doing so will destroy the calibration, and require factory restoration.
Microscopes that are equipped with digital cameras may develop a degradation in captured image quality or exhibit image artifacts caused by accumulation of contamination either on filter elements that are sometimes utilized in the camera adapter or on the optical glass window that may be incorporated to seal the camera housing and protect the CCD or CMOS image sensor. In practice, if dark specks or similar in-focus artifacts are observed in digital images, and they are not in the specimen plane, their most likely cause is particulate contamination on the image sensor or an associated filter surface. Some digital cameras incorporate removable infrared filters in the camera system, while in others the required filtration is an integral part of the sensor window. Because of the variety of configurations encountered in scientific digital cameras, the manufacturer's recommendations regarding cleaning should always be followed. Some cameras, particularly those in which the sensor is cooled, are hermetically sealed, and the sensor is not directly accessible.
In general, the optical glass surfaces on sealed cameras should be inspected and cleaned, if necessary, following the standard cleaning methods for lens surfaces, always removing particulate debris before gently cleaning the glass surface with moisture from the breath, followed by lens tissue moistened with lens cleaning fluid for non-water soluble contamination. If the window is difficult to access with lens tissue (such as with torn tissue tubes), cotton swabs can be used provided that care is taken to limit pressure on the window surface. In some cameras, the sensor surface is directly exposed within the camera body, and is highly likely to attract dust and other debris. Special techniques may be required in cleaning the sensor to avoid static charge damage to the device, and the manufacturer's service personnel should be consulted for guidance on proper procedures.
Fungal Growth on Optical Surfaces
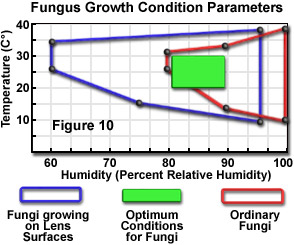
An especially serious problem that may plague microscope optical components is the development of fungal damage. Formation and growth of fungal colonies may occur rapidly in some climates, and when established on glass surfaces, it is unlikely that they can be removed before damage has been done to the surface. Unfortunately, fungal growth commonly occurs in the interior of optical components, and may be quite advanced before it is even noticed. At least one microscope manufacturer states that over 50 percent of deterioration in optical performance is attributable to cloudiness caused by certain fungus types. Although there are over 100,000 fungus species, two members of the genus Aspergillus are believed responsible for most lens deterioration. Optimum growth conditions for these fungi are relatively high temperature and high humidity, but they also are more adaptable to lower humidity levels than most other fungi. Figure 10 illustrates both the optimum and tolerable growth conditions for these fungi growing on lens surfaces, in comparison to the most favorable conditions for other common fungus species. Unfortunately, the conditions most conducive to proliferation of the lens-damaging fungi match very closely the most suitable environment for humans. This greatly complicates attempts to eliminate or inhibit growth of the fungi on optical components.
Fungi growing on lens surfaces reduce lens performance due to the lowered transmittance caused by the cloudiness, as well as by light dispersion from the thread-like filaments (hyphae) of the fungal colonies. Fungi growing on glass surfaces are not attached by roots and can be wiped off, but unfortunately, residual corrosion marks remain and the original lens performance cannot be recovered. The corrosion is a form of surface etching occurring when an organic acid produced by the fungus mixes with water vapor from the air that accumulates on fungus hyphae. Lenses with significant fungal growth usually must be replaced, since the only effective means to avoid fungal damage to optical components is to prevent its growth in the first place.

Favorable conditions for limiting the occurrence of fungal growth on surfaces such as lenses include a low-humidity environment, sufficiently low temperatures, good ventilation, and occasional exposure of the surface to sunlight. Climatic factors cannot be controlled completely, and the use of air-conditioning systems and dehumidifiers in warm and humid climates is beneficial and necessary, but does not eliminate the growth of the highly resilient fungus types, which can adapt to a wide range of conditions (see Figure 10). The strategy of storing optical components under desiccated conditions is sometimes suggested, but this is not an advisable practice, because extremely low (0 percent humidity) moisture levels can accelerate the breakdown of cements used to join optical elements. The geographical area in which the microscope is located determines, to a large extent, the seriousness of fungal growth as a factor in instrument care.
Figure 11 presents, in chart form, the seasonal variability of fungus growth conditions for a number of worldwide cities. It can be inferred from the chart that fungal growth is least likely in regions having consistently low humidity, or in regions that have relatively low average temperatures during periods of high humidity. In some climates, it is virtually impossible to inhibit fungal growth unless the microscope can be placed in a sterile environment. The major microscope manufacturers produce special versions of some equipment for use in tropical or other fungus-prone environments. Among preventive measures that have been developed are to enclose an antifungal chemical substance inside objectives, eyepieces, and the microscope base, and to improve the effectiveness of seals on any moving parts to minimize the entry of dust and fungal spores from the environment. The chemical is a solid substance designed to slowly sublimate and produce an antifungal vapor that is harmless to the microscope optical and mechanical components. The antifungal activity can be maintained over long periods of time by encasing the chemical in a material with only slight air-permeability, thereby strictly controlling the sublimation rate.
Benefits of Preventive Maintenance
The ideal microscopy room would be designed specifically for that purpose, and incorporate every mechanism available for limiting contamination by dust, chemical vapors, and other airborne contaminants, as well as isolating the instrument from acoustic and mechanical vibration and temperature variations. This ideal situation is seldom realized, and most microscopes are located in areas subject to a considerable number of environmental deficiencies. Some contamination is unavoidable, due to the rigors of daily use, but at the very least, the microscope should be protected as well as possible during periods of non-use by covering the entire instrument with a suitable cover. Instrument manufacturers and aftermarket suppliers offer a variety of specially designed dust covers (see examples in Figure 1). Of several types of plastic cover, those made of softer more flexible material are probably less prone to attraction of dust. Lint-free fabric covers are also available, and provide an effective dust barrier that can minimize the need for cleaning.
While the cost of a modern research grade microscope can range from approximately a few tens of thousands to several hundred thousand dollars, if properly used and maintained, the basic optical and mechanical components of the instrument can easily outlive several generations of microscopists. Only if the instrument is used correctly and maintained regularly is it capable of producing the best image data possible. Careless, incorrect operation and maintenance techniques not only result in unreliable and poor quality images, but cause productivity at the microscope to suffer, and the instrument's useful lifetime to be greatly reduced.
Contributing Authors
Thomas J. Fellers and Michael W. Davidson - National High Magnetic Field Laboratory, 1800 East Paul Dirac Dr., The Florida State University, Tallahassee, Florida, 32310.
BACK TO ANATOMY OF THE MICROSCOPE