
QX3 Interactive Software
Time-Lapse Cinemicrography
In our discussion of the digital movie creation feature in the Live View menu, we mentioned that the QX3 computer microscope software could also be used to create time-lapse movies (cinemicrography). Time-lapse cinemicrography is often employed by research scientists to "speed up" microscopic events that occur over very long time scales.
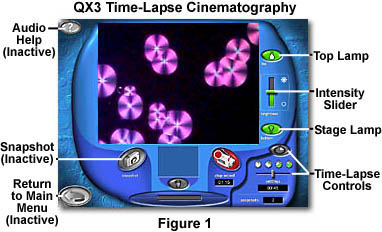
The QX3 time-lapse software (Figure 1) can be activated using the Time-Lapse button in the Live View menu screen. Clicking on this button displays a new sub-menu painted (by the software) over the lower right portion of the Live View menu, as illustrated in Figure 2. This sub-menu contains all of the necessary controls to record time-lapse sequences using the QX3 microscope. During time-lapse recording, the microscope should remain undisturbed, except for focus and adjustment of auxiliary illumination devices. Moving the specimen slide or Petri dish during the course of recording a time-lapse event will produce a playback in which sample features appear to be randomly relocated in the field of view.
A Time Interval slider (Figure 2) controls the interval between acquisition of successive digital images by the software. Allowable times range from one to five seconds in one second intervals, 10 seconds, 20-50 seconds in 10 second intervals, one minute, 1.5 minutes, 2-5 minutes in one minute intervals, 10 minutes, 15 minutes, 20 minutes, 30 minutes, 45 minutes, and one hour. This range of settings can accomodate a wide host of specimens, some of which will change more rapidly than others.
Crystallites of the pesticide DDT (illustrated in Figures 4-6) grow over a period of one to two hours, so 30 second to 1 minute intervals will be ideal for capturing the formation of these beautiful crystals. Alternatively, an ant crawling across the slide would require a much shorter time interval such as 1 second per image. Students should experiment with a variety of specimens and time intervals to determine the appropriate time interval for each specimen.
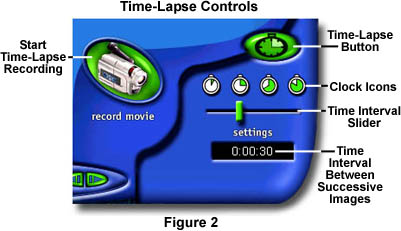
When the time interval is entered, the software is ready to record time-lapse image sequences. Click on the Record Movie button (Figure 2) to start recording. There is no software controllable upper limit for the number of frames captured in a time-lapse record feature, so you must click the Stop Record button (Figure 3) when the sequence has ended. The software limit for file size of movies and time-lapse sequences is approximately five megabytes per *.AVI file. When time-lapse or real time movie sequences reach this size, recording is automatically halted and the sequence is stored on the hard drive. During acquisition of the sequence, the time interval display counts down (in seconds) to the selected interval, then resets itself and starts again. The window under the Stop Record button displays the total time elapsed since recording began.
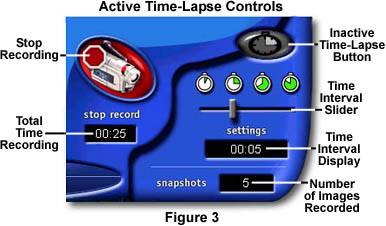
A window entitled Snapshots records the total number of images already captured in the time-lapse sequence. Thus, the screen in Figure 3 is recording an image every 5 seconds, and has already recorded five images in 25 seconds. The software captures the first image when recording begins and another image at every time interval that was configured with the slider.
The green image capture button on the microscope body can also be used to initiate and terminate time-lapse sequences. First, click on the Time-Lapse button and configure the time interval with the slider. Then remove the microscope body from the stand and place it over the specimen. When you are ready to record, depress and hold the image capture button for the entire length of the time-lapse experiment. This method requires more concentration than a specimen that is on the microscope stage, but it is useful for samples that are not close to the computer (but within 8 feet).

There are a wide variety of specimens that are good candidates for time-lapse cinemicrography. If the QX3 microscope has been configured for polarized light microscopy, then there are a variety of household chemicals that can be dissolved in water or melted and then recrystallized. Refer to our section on specimen preparation for polarized light to learn how to make samples. Other good specimens are the microscopic creatures, including protozoa, diatoms, worms, and algae, found in pond water. Many of these tiny animals are too fast to capture with time-lapse and are better candidates for recording real time (12 frames/second) movies, but some move slowly and will make nice time-lapse movies.
Other samples include small insects such as worms and ants, which move relatively slowly over a period of time. Dividing cells are also interesting, but require more preparation and are far more delicate than crystals or pond creatures. Part of the fun of playing with the QX3 microscope is experimenting with different specimens using time-lapse cinemicrography.
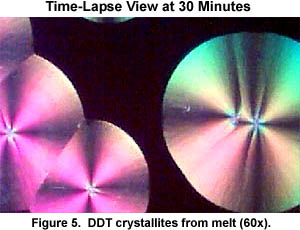
The DDT crystallites illustrated in Figures 4 to 6 illustrate slow growth of crystalline spherulites in polarized light. This chemical is very dangerous even though it produces beautiful crystals in the microscope. Do not touch pesticides and other hazardous chemicals without the supervision of an adult, and even then, handle these chemicals very carefully.
To prepare the DDT for crystal growing experiments, a few grains of the solid pesticide was carefully sandwiched between a microscope slide and coverslip and heated until melted with a Bunsen burner. When the chemicals are completely melted, they spread out filling the void between the coverslip and slide. After cooling, the slide is carefully transferred to the stage of the QX3 microscope and brought into focus. This can be difficult, especially if no crystals remain to establish focus. Try focusing the microscope on the coverslip edge, then move the slide until the edge is out of the field of view.
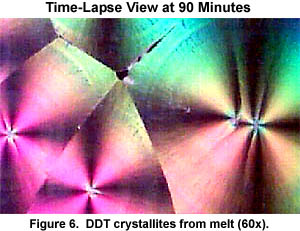
Over a period of a couple hours, circular spherulites spontaneously and randomly start to form from the melted pesticide. The small spherulites in Figure 4 have just started to grow. After 30 minutes, the spherulites have grown larger, but there is still plenty of dark space in between. Finally, after 90 minutes, the field of view is completely filled with beautiful spherulites of DDT.
Time-lapse sequences, like real time movies, are recorded and stored as *.AVI files in the Samples directory of the QX3 microscope software. When viewed in the Main collection window, these sequences have filmstrip borders and display the first image recorded in the sequence. When recording a number of time-lapse sequences in polarized light, it is sometimes difficult to distinguish between them, especially if they all start with a totally black field. We recommend using the Text tool in the Paint menu to list the contents of each time-lapse movie on the first frame. To do this, create a new image by erasing all contents of an expendable digital image with the eraser tool. Next, select a name for the time-lapse sequence and type it into the new white image with the Text tool. Go to the Slide Show menu and create a new movie by first adding the image containing the name, followed by the time-lapse sequence.
Time-lapse cinemicrography has long been a useful tool to research scientists studying a wide variety of specimens. Everything from chromosome condensation and separation, to stress cracks in metals has been the subject of these studies. The Intel Play QX3 microscope software adds a new dimension in science education with the remarkable capability to record time-lapse sequences.
BACK TO QX3 INTERACTIVE SOFTWARE
Questions or comments? Send us an email.
© 1995-2025 by Michael W. Davidson and The Florida State University. All Rights Reserved. No images, graphics, software, scripts, or applets may be reproduced or used in any manner without permission from the copyright holders. Use of this website means you agree to all of the Legal Terms and Conditions set forth by the owners.
This website is maintained by our
Graphics & Web Programming Team
in collaboration with Optical Microscopy at the
National High Magnetic Field Laboratory.
The QX3 microscope design is copyrighted © 2025 by Mattel, Inc. Intel® Play™ is a registered trademark of the Intel Corporation. These companies reserve all of their rights and privileges under copyright law. The material contained in this website is solely the opinion of the authors and is intended for eduational use only.
Last Modification Friday, Nov 13, 2015 at 02:18 PM
Access Count Since December 24, 1999: 34851
Visit the official Intel Play website:
![]()