QX3 Interactive Software
Software Live Video Feed
and Image Capture
Upon launching and during initialization, the Intel QX3 interactive software displays two successive splash screens. The first, illustrated in Figure 1, is a four-second *.AVI file (IntelPly.avi) that has a blue background with a set of printed circuit board interconnects behind the Intel logo in white letters and the word "play" in green outline (Figure 1, on the left).
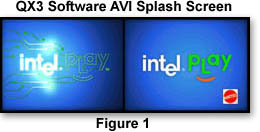
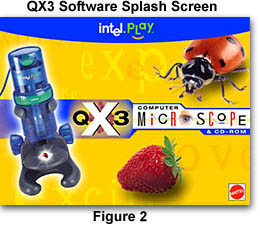
As the splash screen executes, flashes of light appear to be traveling through the interconnects and "light up" the word "play", turning it green with a red smile underneath (Figure 1, on the right). At this point, the letter "a" in the word "play" appears to wink and the Mattel logo appears in the lower right-hand corner. Clicking the mouse during the execution of the first splash screen will halt the screen and the second splash screen (Figure 2) will be displayed. During periods between splash screens, the display is black with the cursor turning into a small clock that is ticking away the time until the program is ready.
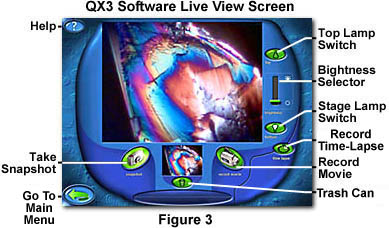
After initialization, the software displays what Intel and Mattel call the "Live View" screen that is illustrated in Figure 3. This screen displays the live video feed from the CMOS Active Pixel Sensor digital imaging circuitry housed within the QX3 microscope body. The microscopic video displayed in Figure 3 is a birefringent copper sulfate crystal imaged with an Intel QX3 microscope modified for polarized light. When the Live View menu initializes, the upper lamp in the microscope body is turned on and an image appears in the large window. This image is usually blurred and out-of-focus rendition of whatever object is positioned on the microscope stage.
| Interactive Java Tutorial | |||||||||||
|
|||||||||||
Always start viewing specimens at the QX3 microscope's lowest magnification. Adjust the microscope to position the 10x objective in the optical pathway and use the blue knobs to bring the image into focus. It may take some practice with the focus knobs, and there will usually be a delay between twisting the knob and the response of the image on the screen. We suggest making very small incremental changes to the focus and waiting a second or two until the video feed stabilizes. Always attempt to slowly "squeeze" the microscope into focus instead of moving the knob in rapid jerks. Finding focus will become increasingly more difficult as the magnification is increased. Light intensity will also drop when using the 60x and 200x objectives, possibly to the point of requiring auxiliary illumination sources to image the specimen.
Live video response time is a function with several variables. The most important factor is the quality and speed of the computer's video system. Video cards that use the Accelerated Graphics Port (AGP) bus will respond much more efficiently than those using the Peripheral Component Interconnect (PCI) bus. Also, the size of on-board video random access memory (RAM) and the card's random access memory digital-to-analog converter (RAMDAC) chip clock speed will affect the computer's refresh rate and video response, and thus the QX3 video response time. These hardware variables are a function of the computer architecture and nothing can be done to improve performance short of a hardware upgrade.
That said, the simplest way to increase the video response is to decrease the color depth of the video driver software. This is done by right-clicking on the computer desktop to launch the Display Properties control panel and choosing the Settings tab. The Color Palette pull-down menu will display the various color depths available with the software. We recommend a maximum choice of 32.8K colors to produce an adequate video response. Higher color depths (65.5K, 16.7M, and "True Color") unnecessarily increase the video overhead, slowing response and will not significantly improve the images displayed and captured by the microscope. Setting the color depth to the Intel recommended minimum of 256 colors may cause interpolation of video image colors and yield images that appear to have different colors than the specimen.
There are several control buttons displayed in the Live View menu that allow control of the software and microscope. Illumination of the microscope is controlled using the top lamp and bottom lamp switches illustrated in Figures 3 and 4. When the software is first launched, the default setting is the top (episcopic or reflected light) lamp on and the bottom lamp off (as illustrated in Figure 4).

Only one lamp can be on at any given time, and turning the other lamp on will automatically turn the first lamp off. When a lamp is off, the control button shows the outline of a light bulb in black on a green background. Turning the lamp on with a mouse click changes the control button to display a white light bulb, indicating which lamp is currently activated. Clicking the mouse cursor on a bulb button when the lamp is on will turn it off. A slider labeled "brightness" is used to modulate the light intensity on the sample. The individual lamp intensities do not change with this slider, only the sensitivity and response of the CMOS active pixel server is altered. Increasing the intensity increases the CMOS sensitivity and decreasing the intensity produces a corresponding reduction in apparent lamp intensity. The top lamp should be used to illuminate specimens that are opaque, such as a coin, large insect, button, or other object that light will not shine through. Alternatively, the bottom lamp is used to project light from the stage through a semi-transparent specimen such as a hair, carpet fiber, or stained thin section on a microscope slide.
When the microscope body is removed from the stand, the software defaults to the top lamp that is housed in the body beside the lens protective cover. Removing the body allows students to explore large objects that are too big to place on a microscope stand. The range of this exploration is limited to the length of the USB port cable, which is eight feet long. When imaging objects with the body, focus is achieved by moving the body closer or farther from the object until it is brought into a sharp and clear focus in the Live View window. This mechanism of imaging takes a considerable amount of practice, and the hand must be held very steady to achieve a good digital image. The best results are obtained when the side of the palm is resting on a steady surface with the fingers holding the microscope body and moving it slowly upward and downward to focus the image. The front of the body has a wrap-around shroud and lens cover to protect the microscope in rough territory.
Once the proper illumination is selected, it is time to focus the specimen so that it appears sharp and crisp in the live video view on the computer monitor. As we mentioned above, use very small adjustments to the focus knobs and allow the digital image to recover before re-adjusting the focus. With enough practice, the student will be able to quickly bring an object into correct focus.
The microscope has three magnifications of approximately 10x, 60x, and 200x, which are based on measurements using a 15-inch monitor. Larger monitors will increase the magnification. Every time that a new objective is selected, the specimen must again be brought into focus. As the magnification is increased, the requirement for auxiliary illumination becomes more critical. Objects that appear well-illuminated using the 10x objective and the microscope's built-in illumination will require additional light as the higher power objectives are used to increase magnification. Also, achieving correct focus becomes more difficult as the magnification is increased. At 200x, the image in the Live View window is very sensitive to microscope vibrations and small inaccuracies in focus adjustment.
Once an image has been focused and illumination has been optimized, the software can be used to capture a single digital image, conduct time-lapse cinemicrography experiments, or make a movie. Buttons for single image and movie capture are illustrated in Figure 5. The button on the left (with a digital camera icon), entitled "snapshot", records a single frame digital image, which is displayed in a small preview window beneath the larger Live View image window (illustrated in Figure 3). The image is simultaneously added to the image palette in the main menu. Depressing and releasing the green molded plastic image capture button on the body of the microscope will perform the same function.
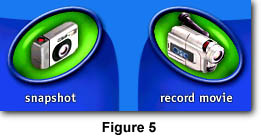
The button on the right in Figure 5 (with a camcorder icon) launches the software into record movie mode and will record digital movies at a frame rate of about 12 frames per second. The first frame of a digital movie is also displayed in the small preview window and added to the image palette in the main menu. Movies are differentiated from single image files by the addition of a dark gray band containing a set of film sprocket holes to the left and right of the image in the image palette. Pressing and holding the image capture button on the body of the microscope will record movies when the body is removed from the stand.

A recording status indicator (Figure 7, top bar) appears on the screen beneath the live image window when the software is recording a movie. A red bar in the indicator slowly progresses from left to right as the movie is recorded, and a counter beneath the record movie button (Figure 5) indicates how much time has elapsed since the movie was begun. The maximum length of a movie averages between two and six minutes, creating an *.AVI file that is limited to 5 Mb in size. The maximum number of frames in a movie is controlled by the 5 Mb size limit, however some movies will have more frames than others, depending upon what is happening in the images. While the movie is being recorded, all control buttons, with the exception of the lighting controls, are grayed out and inoperative. To stop recording, use the mouse to click on the stop record button (Figure 6), which is a red version of the green record movie button with a small stop sign superimposed over the camcorder.
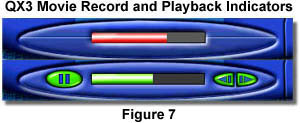
After the movie has been successfully recorded, the recording indicator changes to display playback controls, as illustrated at the bottom in Figure 7. These consist of a green play button with an arrow to activate playback (not shown in Figure 7) placed to the left of the indicator, and a forward and backward arrow button to the right of the indicator. When the movie is playing, a green status bar (Figure 7, bottom bar) inches slowly from left to right, and the play button now displays the double-bar stop sign. The forward and backward buttons advance or step back through the movie a single frame per mouse click.
The ability to capture images at periodic times is perhaps the most advanced feature of the Intel QX3 software. We have discussed time-lapse cinemicrography using the Intel QX3 in another section of this toy microscope primer.

Once an image, movie, or time-lapse sequence has been recorded, it appears in the small preview window beneath the larger live video screen (illustrated in Figure 3). If the image or sequence of images is unsatisfactory, it can be removed from the preview window (and computer hard drive) by using the trash can icon illustrated in Figure 8. Normally, the trash can icon appears as a black outline on a darker green background with the lid in place (left-hand side of Figure 8). When the mouse cursor moves over the trash can, the icon is highlighted by a brighter green color and the lid appears cocked to one side of the can (right-hand side of Figure 8). A simple click of the mouse will erase the image from memory and clear the preview window. The same sequence is used for digital still images, movies, and time-lapse sequences.

A small icon with a question mark appears in the upper left-hand corner of all six menus in the Intel QX3 interactive software. This is the help icon, which is used to obtain information about the software. When the mouse cursor rolls over the help icon, it becomes highlighted with a brighter intensity, and if the mouse button is clicked, the cursor becomes activated and turns into a question mark. To obtain help about any particular button, roll the question mark cursor over the item and an audio help will describe the function of the button. If the software was installed on a computer lacking a sound card, the audio help files will be of no use to the student. In this case, press the F1 key on the computer keyboard to activate the help software.

At the lower left-hand corner of most menus, an icon appears that has a reverse arrow, as illustrated in Figure 10. Like other icons, this icon is highlighted with a brighter intensity when the mouse cursor rolls over it. If the mouse button is clicked on the highlighted icon, the screen reverts to the main menu of the interactive software. Use this icon when image capture activities are finished and the image gallery must be viewed or edited.
When the sound is enabled on this software, a number of different sounds are made when the mouse rolls over an icon. Each icon has a slightly different sound, and each click of the mouse produces a corresponding change in sound. This can become annoying to adults, but should be very entertaining for the small children that are targeted by this toy microscope.
BACK TO QX3 INTERACTIVE SOFTWARE
