
Polarized Light Microscopy
Specimen Preparation
Preparing specimens for observation and digital imaging in polarized light is a relatively simple task. The easiest and fastest method is melt-recrystallization of common organic chemicals that undergo a melting phase without subsequent decomposition. The illustration in Figure 1 shows a scientist holding a pair of beaker tongs that are gripping a microscope slide during a melt-recrystallization specimen preparation experiment.
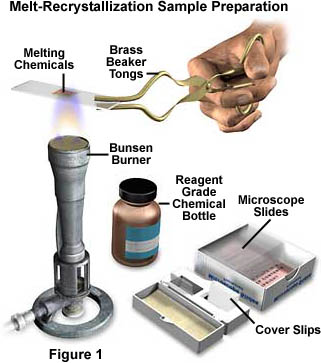
The microscope slide in Figure 1 is being heated with a Bunsen burner adjusted to produce a relatively low temperature. After the chemicals on the slide have completely melted, the slide is carefully placed on a cool surface (the bench top) and allowed to sit until crystallites reform from the melted chemical. This can take anywhere from a couple of seconds to a several years, but most chemicals will recrystallize in a time frame of a few minutes to an hour or two. When preparing samples using the melt-recrystallization procedure there are several tips that will save quite a bit of time and increase the chances of making good samples.
To begin with, use only very small amounts of the chemical to be recrystallized when you prepare a microscope slide. In most instances, a few grains (couple of milligrams) will be sufficient to produce beautiful patterns in polarized light. Too much of the chemical will lead to very thick layers of crystals that absorb most of the microscope light, and lack the vivid color of thin crystalline preparations. To start, carefully sandwich a couple of grains of the chemical (pure chemicals work best) between a microscope slide and coverslip, and do this at one end of the slide instead of in the center. Grab the end of the slide lacking the coverslip/chemical sandwich with a pair of beaker tongs or insulated pliers and slowly heat on the Bunsen burner.
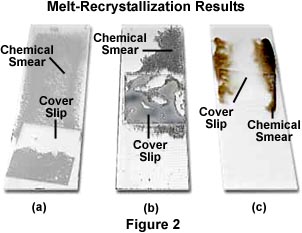
The grains of chemical will slowly start to melt when the temperature of the microscope slide approaches the melting point of the chemical. After the chemical has completely melted, quickly place the microscope slide down on a protected surface and use the tip of the beaker tongs or nose of the pliers to drag the coverslip from one end of the slide to the other. This produces a sheet of molten chemical across the surface of the microscope slide where the coverslip has passed. The chemical spreading action is done to produce flat sheets of crystals (Figure 2) that are formed on top of the slide but in areas that are not directly underneath the coverslip. We highly recommend this method for making samples for use with the QX3 microscope.
An alternative method for making samples with the melt-recrystallization technique is to press the coverslip on top of the melted chemicals without dragging it across the microscope slide. In this case, the pressure will flatten the melt, resulting in crystallites that are thinner and will have a better chance of displaying a wider spectrum of colors. Use this method for sample preparation when the specimens are to be imaged with a research-grade microscope that has objectives corrected for coverslip glass thickness and refractive index. Unfortunately, the QX3 microscope has no such correction, and specimens imaged through a cover glass tend to lose a significant amount of contrast. For this reason, we suggest making crystal preparations without a coverslip.
The laboratory chemicals found in high school and college chemistry stockrooms provide an excellent source of samples for recrystallization and imaging with polarized light. Most crystals are anisotropic and birefringent, which means they will cause interference between doubly refracted light rays passing through. Both constructive and destructive interference occurring at the microscope analyzer will cause the formation of beautiful patterns that can be captured as digital images by the QX3 microscope.
Many chemicals available at local drug stores and supermarkets can also be effective specimens under polarized illumination. These chemicals include vitamins, moth balls and crystals, aspirin and other painkillers, pharmaceuticals, darkroom chemicals, sugars, and some dairy products.
Occasionally, chemicals decompose upon heating and will be poor subjects for examination under the microscope. Salts are notoriously bad candidates for the melt-recrystallization process. The melting point of most salts is usually very high and any organic portion of the molecule undergoes degradation before melting, and this is often accompanied by rapid oxidation (burning) of the salt.
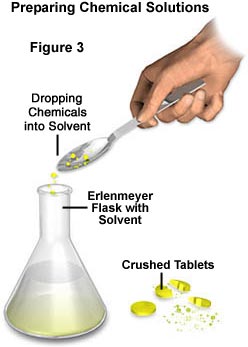
Another very effective method of preparing recrystallized chemicals for observation with polarized light microscopy is to allow soluble chemicals to slowly form crystallites while undergoing radical concentration increases during solvent evaporation. This method is especially useful when trying to prepare salts for examination under crossed polarized illumination.
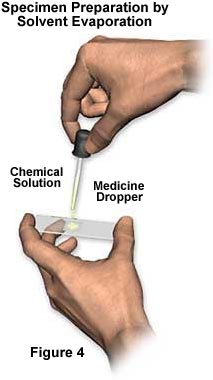
To prepare samples using this method, first dissolve the chemical sample in a suitable solvent (illustrated in Figure 3) such as water, ethanol, isopropyl alcohol (rubbing alcohol), acetone (fingernail polish), or mineral spirits. After the chemical has completely dissolved, place a drop onto a microscope slide (Figure 4), and then carefully form a sandwich by placing a coverslip over the solution. Often, chemicals can be made to dissolve much more quickly by applying some heat to the solvent, either through the use of a hot plate or stove.
The solution containing dissolved chemicals will flow underneath the coverslip and fill the entire volume between the coverslip and microscope slide. If too much solution is placed on the slide, then excess solution will gather at the edges of the coverslip. Alternatively, when the drop is too small, the entire volume between the microscope slide and coverslip will not be completely filled. When the solvent overruns the edges of the coverslip, large quantities of crystallites often form in areas that contain the excess solvent. These crystallites usually occur at the boundary between the coverslip edge and the glass slide, where they often form very beautiful crystalline aggregates.
After the sandwich of solution between the microscope slide and coverslip has been made, set the slide away for a day or two while the solvent slowly evaporates. These specimens are also ideal candidates for time-lapse cinemicrography using the QX3 microscope. Evaporation times will vary depending upon the vapor pressure of the solvent, with highly volatile solvents, such as acetone, evaporating very rapidly (30 minutes to an hour) and less volatile solvents (water) taking a few days to completely evaporate.
To record time-lapse sequences of crystallite formation due to evaporation, first prepare the specimen and then place it onto the microscope stage and configure the software for the proper time interval using the QX3 Time-Lapse feature. If the solvent is acetone or another volatile , set the interval time at 30 seconds to a minute. This setting should allow between 30 and 100 images to be captured for the time-lapse sequence. When a less volatile solvent is used, increase the time interval for image capture to anywhere from five minutes to an hour.
It is often difficult to find the correct microscope focus when starting the time-lapse sequence, because there are no crystals upon which to focus the microscope, and the field of view is very dark due to the presence of crossed polarizers. The best solution is to focus on the edge of the coverslip and then move the slide until the center of the coverslip is being imaged by the microscope. As the time-lapse sequence is recorded, crystals will spontaneously form at nucleation centers and they will grow with time as the solvent evaporates. These sequences can be very dramatic as they unfold.
A number of other types of birefringent specimens can also be imaged with the QX3 microscope under crossed polarizers. These include rock thin sections that are commercially available from Ward's. A variety of hairs, furs, natural and synthetic fibers, and mineral reference sets are also available on the Web from The McCrone Group. Bone thin sections display beautiful patterns when imaged in polarized light, and can be purchased from either Ward's or Carolina Biological Supply. There are no companies selling pre-prepared crystal slides (of which we are aware), but purified chemicals are available from many distributors directly through their websites. The companies mentioned above are also good sources of other supplies, such as microscope slides, solvents, and coverslips.
BACK TO INTEL QX3 SPECIALIZED TECHNIQUES
Questions or comments? Send us an email.
© 1995-2025 by Michael W. Davidson and The Florida State University. All Rights Reserved. No images, graphics, software, scripts, or applets may be reproduced or used in any manner without permission from the copyright holders. Use of this website means you agree to all of the Legal Terms and Conditions set forth by the owners.
This website is maintained by our
Graphics & Web Programming Team
in collaboration with Optical Microscopy at the
National High Magnetic Field Laboratory.
The QX3 microscope design is copyrighted © 2025 by Mattel, Inc. Intel® Play™ is a registered trademark of the Intel Corporation. These companies reserve all of their rights and privileges under copyright law. The material contained in this website is solely the opinion of the authors and is intended for eduational use only.
Last Modification Friday, Nov 13, 2015 at 02:18 PM
Access Count Since December 24, 1999: 64245
Visit the official Intel Play website:
![]()