
QX3 Interactive Software
Slide Show Menu
After you have made digital single images, movies and time-lapse cinemicrography sequences with the QX3 microscope, you can launch the Slide Show menu to create slide shows and add music that will play while the movies are being shown. From the Main menu, select the third button from the top on the right side of the Main Activity Window to load the Slide Show menu.
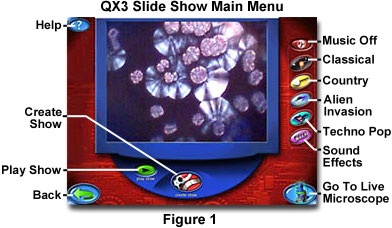
When Slide Show initializes, the screen illustrated in Figure 1 is presented on the computer monitor with the last image transferred from the Main menu activity window loaded into the Slide Show Activity window. In addition to the usual Audio Help, return to Live View, and return to Main menu buttons, the Slide Show menu includes several choices for sound tracks to be played while movies are being shown.

The menu also contains a button entitled Play Show (Figure 2, left) that can be used to play the current movie or new movies created with the Create Show menu (Figure 5). When the Play Show button is clicked it turns into a Pause Show button (Figure 2, right), and the movie begins to play in the Slide Show window. To momentarily pause the movie, click on the Pause Show button. Click on it again to resume the movie where it was interrupted. You can also pick a sound effect to be played along with the movie in the Slide Show window.
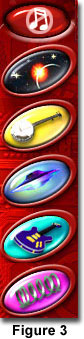
Music is added by selecting one of the buttons to the right of the Slide Show window, each of which contains an icon indicating the type of music in the sound track, as illustrated in Figure 3. The sound tracks associated with each sound button can be previewed by simply clicking on that button. Intel and Mattel software designers have created clever names reminiscent of the music for each of the sound tracks. If you mistakenly add a sound track that is not appropriate or does not match the movie, you can halt the track by clicking on the Music Off button, which has a universal "No" symbol superimposed over a set of music notes (top button in Figure 3). Sound tracks are not actually interleaved into the video *.AVI file, but are simply meant to accompany movies and time-lapse sequences while they are being viewed with the QX3 software in the Slide Show window. After exiting this menu, the movies will no longer have any sound tracks associated with them.
The sound track buttons are named as follows:
Wow - An orchestra sound track (second button from top in Figure 3) featuring uplifting symphonic music that soothes and is designed to accompany momentous movies and time-lapse sequences.
Hoedown - This high-spirited sound track (third button from top in Figure 3) is a take-off on the popular "Dueling Banjos" song done with a banjo, base guitar, and a set of drums. Hoedown is an upbeat country-style track can be applied to movies having some degree of periodicity to achieve a light and lively atmosphere.
Alien Invasion - An eerie New Wave sound track to remind you that the aliens are coming soon (fourth button from top in Figure 3). Use this track to accentuate unusual or futuristic movies made with the QX3 microscope.
Techno Pop - Resembling hard rock tailored to a dance music theme, this guitar-screeching sound track (fifth button from top in Figure 3) will go will with psychedelic movies made with colorful Polarized Light microscopy.
Wacky Sound Effects - Straight from the Rap gallery, this funky sound track (sixth button from top in Figure 3) is a composite of individual effects usually heard on Rap music stations. The wacky sound track mixes well with jerky stop-motion videos produced with the QX3 microscope.
As we mentioned above, if you decide not to accompany a movie with a music sound track, use the No Music button (Figure 3) to stop the sound. To preview each sound track, click on a music button while no slide show or movie is playing, and a short version of the sound track will play for a few seconds. To select that track, click on it and then start the movie. You can also change the sound track without stopping the movie by clicking on another music button.

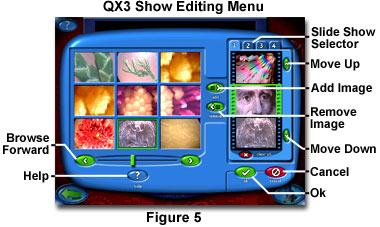
The Slide Show menu can also be used to create new slide shows from existing digital still images, movies, and time-lapse sequences from the microscope collection. Use the Create Show button illustrated in Figure 4 to navigate to the QX3 Show Editing Menu (Figure 5). This menu contains tools for browsing through the collection, and adding or subtracting images and movies from the collection to create a new slide show. The collection navigation buttons and slider are similar in function to those described in the Main menu discussion.
The first step in creating a new slide show is to select and click on a Slide Show Numbered Tab positioned on the right side of the screen (Figure 6). Every time a new slide show is made, you should start it in a new numbered tab until you have filled all four tabs. When all four tabs are filled with slides, each tab must be individually cleared in order to make room for additional slide shows.
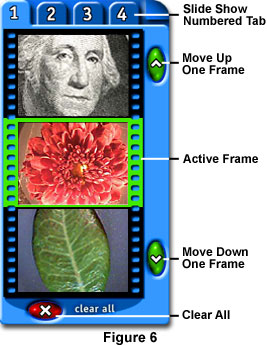
To create a slide show, first select an empty tab or a tab containing unwanted slides, then use the mouse to click on the red Clear All button (Figure 6) below the sprocket-enclosed frame window. A message box will pop up and ask whether your are sure you want to delete this slide show. Click the OK button if you want to delete it or the Cancel button to return to the Show Editing menu. Clicking OK will remove all images from the tab, freeing it for further use. Deleting a tab is not reversable, so be careful not to remove a slide show that you want to keep.
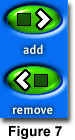
The next step is to scroll through the collection and find images and movies to add to the new slide show. When a new image is to be added to the show, click on the image in the collection window to select it (with a green bounding box) and click on the Add button (Figure 7, top) that lies between the collection window and the numbered tab window (Figure 5). A total of 50 movies and digital still images can be added to compose a new movie, but be careful not to add more than one or two movies (especially if they are long) to keep from slowing down the computer with excess video overhead. Slides that compose a slide show can be reviewed by scrolling through a tab using the Up and Down arrow buttons to the right of the tab window. After all images and movies have been added to the new show, click the green OK button below the numbered tab window to return to the Slide Show menu.
To add a new image or movie to any frame of a slide show made previously and stored in one of the numbered tab windows, select the tab and scroll to the frame where the new image is to be added using the Move Up or Move Down buttons to the right of the numbered tab window in Figure 6. Select the frame that you want to place the new image behind in the sequence and move that frame to the green Active Frame window (Figure 6). Highlight the new image from the collection by clicking on it and then click on the Add button to add the image to the slide show. The image in the Active Frame window will be moved forward one frame and the new image will now appear in the active window. An image can be removed from a slide show by scrolling through the show until the image appears in the Active Frame window, and then clicking on the Remove button (Figure 7). You can also remove a slide from the show by double clicking on its window (Figure 6) when it becomes visible in the show scroll. A slide can also be added to a show (in the Active Frame) when you double click on it from the collection window.
During playback, slide shows display single images for a period of three seconds before going to the next image in the que. When a movie is encountered, it is played to completion before the next image is displayed. When a slide show reaches the last slide, it loops back to the beginning and starts to play the slide show over again. The effect can be quite dramatic when thoughtfully composed with a nice sound track. Our compliments go out to the creative software engineers from Intel and Mattel who created this marvelous feature in the QX3 software.
BACK TO QX3 INTERACTIVE SOFTWARE
Questions or comments? Send us an email.
© 1995-2025 by Michael W. Davidson and The Florida State University. All Rights Reserved. No images, graphics, software, scripts, or applets may be reproduced or used in any manner without permission from the copyright holders. Use of this website means you agree to all of the Legal Terms and Conditions set forth by the owners.
This website is maintained by our
Graphics & Web Programming Team
in collaboration with Optical Microscopy at the
National High Magnetic Field Laboratory.
The QX3 microscope design is copyrighted © 2025 by Mattel, Inc. Intel® Play™ is a registered trademark of the Intel Corporation. These companies reserve all of their rights and privileges under copyright law. The material contained in this website is solely the opinion of the authors and is intended for eduational use only.
Last Modification Friday, Nov 13, 2015 at 02:18 PM
Access Count Since December 24, 1999: 31293
Visit the official Intel Play website:
![]()