Digital Image Capture and Processing
Time-Lapse Cinemicrography
Time-lapse cinemicrography is a valuable tool for studying a wide variety of dynamic events, ranging from protracted particle motion and slowly recrystallizing chemicals to cellular movement and division. Many of these events occur over a period of many minutes or hours, a time scale that does not readily lend itself to being recorded with full-motion video. Instead, capturing sequential images at distinctly spaced time intervals followed by playback in real time can often enable the microscopist to observe relatively slow events on a much faster time scale.
A majority of the published time-lapse studies are concerned with the dynamics of living cells in tissue culture experiments. Basically, the technique involves sequential recording of a stationary viewfield at fixed or variable time intervals to monitor events that occur at high magnification in the microscope. After being collected, the sequence of images can then be played back as a full-motion video (movie) to reveal movements that occur so slowly as to be unnoticeable in a single, momentary observation. In many cases, structural features that appear fixed in a still image are observed in dynamic motion during sequential playback. For example, monolayer cells attached to the plastic surface of a culture vessel appear stationary and motionless when viewed through the microscope. When a single viewfield of cells is repeatedly imaged over a period of time, the cells are observed to interact with their neighbors and often relocate into different regions of the viewfield. When imaging living cells, the most significant problem is maintaining a healthy environment for the cells in terms of temperature, atmospheric gas composition, and hydrogen ion (pH) concentration.
Before the widespread adaptation of analog (film) camera systems to the microscope, early investigators obtained information about sequential cellular motion by producing detailed drawings (often with the assistance of an optical drawing tube) while observing seemingly stationary cells. This method is complicated by the amount of time required to produce accurate drawings, coupled to the necessity for some artistic skill, and can be severely compromised by bias of the observer. The first cameras attached to microscope were utilized to capture events on film at crudely timed intervals, followed by assembly of the resulting photomicrographs into a collage in an effort to demonstrate motion as a series of still images.
The first sophisticated time-lapse sequences were recorded when 16-millimeter movie cameras were attached to the microscope, along with support instruments that controlled the time interval between sequential images (intervalometers) and automatically turned the illuminator on and off to avoid overheating the specimen or subjecting it to excessive light. These techniques were often dependent on outside photo processors, which led to delays in observing the results of individual experiments and some variability in film processing quality. In addition, the experiments were often complicated by slowly drifting stages (producing focus changes), inaccurate film exposure times, differential heating of the specimen, and vibrations originating from a variety of sources. Many of these problems still plague modern investigators who attempt to conduct time-lapse studies using digital video equipment.
Another major advance in time-lapse cinemicrography occurred when video cameras and their sophisticated electronic accessories were first coupled to the microscope. Although video cameras produce lower resolution than film, they eliminated exposure problems associated with film cameras, and the results could be reviewed at the end of the experiment by playback of tapes produced on video recorders. This feature enabled microscopists to rapidly determine the success of an experiment and repeat the sequence capture, if necessary. In addition, the overall cost was reduced because film processing was eliminated and video tapes could be reused.
As video time-lapse technology progressed, real-time image processing hardware and software was employed to further increase the accuracy and quality of image sequences. Computers were added to the ensemble of microscope accessories (for image processing), and the technique of background subtraction emerged to further enhance image quality. Coupled to differential interference contrast (DIC) imaging techniques, video cameras made possible a methodology termed video-enhanced DIC microscopy, which enabled scientists to record time-lapse sequences of structures not previously visible in the optical microscope. For example, the intracellular movement of microtubules was observed for the first time, and the translation of motor proteins, such as kinesin, could be recorded.
The entry of relatively low-cost digital cameras and high-speed personal computers has catapulted time-lapse cinemicrography to a new level of sophistication. Today, image sequences can be captured and stored locally on the host computer hard drive at time intervals specified by associated software. Hardware interfaces to the computer are capable of controlling a host of variables, including stage motion (x, y, and z), the illumination wavelength and shutter position, specimen temperature, atmospheric composition and pressure, and support systems that maintain living cells. In addition, advanced fluorescence microscopy techniques enable investigators to observe events utilizing a wide spectrum of fluorophores targeted at specific cellular receptors. Multiple events can often be simultaneously recorded in four dimensions (laterally, axially, and temporally) to provide a three-dimensional view of intracellular activity over a period of time. These techniques have helped to lead the current revolution in cell biology, which is providing scientists with dynamic information that was previously unavailable with older and less sophisticated methodology.
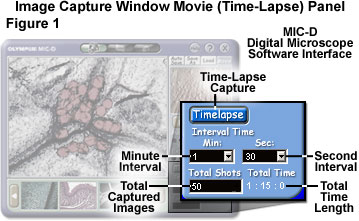
The Olympus MIC-D digital microscope interface software contains a time-lapse capture settings panel, as illustrated in Figure 1, which can be utilized to build video files of specimens displaying sequential motion. This panel is adjacent to the Load settings panel tab of the capture window and is entitled Movie on the panel tab. Clicking on this tab launches the menu presented in Figure 1, which can be utilized to configure the software to collect digital video sequences in timed intervals. In order to set the time-lapse capture parameters, use the Minute Interval pull-down menu to select the number of minutes between the capture of each individual image in the sequence. The allowed range is from 0 to 60 minutes. Next, select the number of seconds to be added to the total number of minutes, between a range of 0 and 59 seconds, using the Seconds Interval pull-down menu. These two values are added together to arrive at the target time interval. For example, in Figure 1, the Minute Interval box is shown with 1 minute selected, and the Second Interval menu selection is 30 seconds for a total interval time of one minute and 30 seconds.
After the interval period has been selected, type the total number of images to be captured in the Total Shots (or Total Captured Images) text input box. This input box does not have a pull-down menu, so the value must be input from the keyboard. The software automatically calculates the total time necessary to complete the sequence and displays this value in hours, minutes, and seconds beneath the Total Time text line, adjacent to the Total Shots text input box. To initiate time-lapse capture, click on the Timelapse button in this settings panel. The target storage directory, file name prefix, and storage format must have been previously selected using the Auto Save settings panel. When the Timelapse button is activated, it turns red in color, then back to blue upon deactivation or premature termination of the capture sequence.
Time-lapse and full-motion video sequences are automatically stored with an associated *.thm data file that contains image information necessary for displaying a thumbnail image of the video sequence in the Thumbnail Image panel of the MIC-D software Capture Window. The first frame of full-motion video and time-lapse sequences appears in both the Preview Box and the far right-hand frame of the Thumbnail Image panel. In addition, a small movie camera icon is positioned in the lower right-hand corner of the image.
Time-lapse and full-motion video sequences can be saved in either MPEG (Moving Picture Experts Group) or audiovisual (AVI) file formats. These are selected through pull-down menus in the Capture Window, as are the image pixel sizes (640 x 480 or 320 x 240) for all capture and storage formats. Time-lapse and full-motion video sequence files are not limited in size by the software and can range up to hundreds of megabytes in size, restricted only by the hard drive space available on the host computer.
The Save As settings panel of the MIC-D software Capture Window can be accessed by clicking on the appropriately labeled tab above the Preview Box in the image capture window. This configuration panel can be utilized to rename and save a video (movie or time-lapse) sequence previously captured into another file format. Video sequences can only be converted from AVI format to MPEG format using this panel. Note that it is not possible to save a single image in a video sequence format (AVI or MPEG), nor is it possible to save a video sequence in a single image format (TIFF, JPEG, or BMP).
There are a wide variety of specimens that are good candidates for time-lapse cinemicrography. If the MIC-D digital microscope has been configured for polarized light illumination, then several readily available chemicals, such as sucrose, vitamin C, and naphthalene (moth balls), can be dissolved in water or melted and then recrystallized to form beautiful patterns in the microscope. Additional specimens are the microscopic creatures, including protozoa, diatoms, worms, and algae, found in pond water. Many of these tiny animals and plants move too fast to capture with time-lapse techniques, and are better candidates for recording real-time movies. In some cases, the creatures can have their motions slowed by adding specially designed commercially-available chemicals ("retarders") to the pond water prior to undertaking time-lapse sequence experiments. Larger specimens include worms and ants, which move relatively slowly over a period of time. Dividing cells are also interesting, but require more preparation and are far more delicate than chemical crystals or pond creatures.
An example of time-lapse sequence capture with the MIC-D software is presented in Figures 2-5 for a slowly recrystallizing sample of pure cholesteryl acetate. This synthetic chemical is the acetate ester of cholesterol, and has a relatively low (and convenient) melting point of 112 degrees Celsius. A small quantity of the ester (approximately 5 milligrams) was sandwiched between a microscope slide and coverslip and heated with a hot plate until the crystallites had melted and formed a confluent layer of liquid between the glass plates.
After allowing the molten chemical to cool for a few minutes, the microscope slide was transferred to the stage of a MIC-D microscope equipped for polarized light observation with a polarizer (the analyzer) mounted beneath the stage and a second polarizer secured into the threaded mount of the illumination arm. Crystallites of cholesteryl acetate grow slowly over a period of 5-10 hours, so 2-5 minute intervals will be ideal for capturing the formation of these beautiful crystals. In general, investigators should experiment with a variety of specimen preparations and time intervals to determine the appropriate time interval for each specimen.
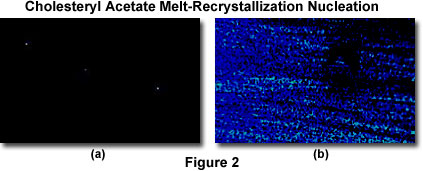
When the cholesteryl acetate exists as a melt, polarized light passing through the specimen is not separated into orthogonal components, and is blocked by the analyzer to produce a dark viewfield (Figure 2(a)). Focusing the microscope on can be difficult under these circumstances, especially if no birefringent crystals are present to establish a focus position. A good solution is to focus the microscope on the edge of the coverslip, then move the slide until the edge is removed from the field of view.
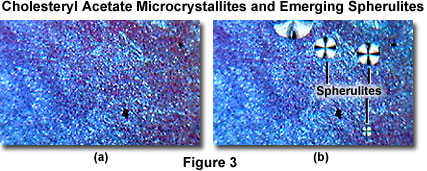
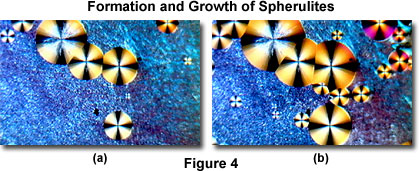
The MIC-D time-lapse feature (in the Capture Window) was set to collect sequential images in 5-minute intervals for this experiment. Upon cooling, tiny crystallites begin to form after about 15 minutes (Figure 2(b)), which ultimately spread to cover the entire viewfield (Figure 3(a)) over a period of an hour (during which 12 sequential images were captured). After 2 hours, tiny spherulites begin to form (Figure 3(b)), which slowly grow (Figure 4(a) and 4(b)) and ultimately merge into a confluent layer (Figure 5(a) and 5(b)) over a 5-hour period.
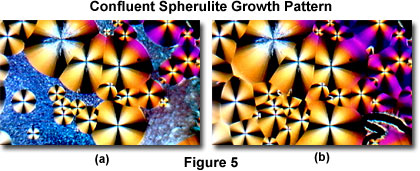
Time-lapse cinemicrography can reveal important details about how chemicals crystallize. As an example, examine Figures 3 through 5(a), which reveal a hint of higher order interference colors in the lower right-hand portions of the images. In this case, the colors are due to a specimen thickness gradient as evidenced by the higher order interference colors in Figure 5(b). The transition from miniature crystallites to large spherulites in this specimen suggests a second-order kinetic process that occurs over a rather long time span.
During time-lapse recording, the microscope should remain stationary and undisturbed, except for focus and adjustment of illumination intensity (if necessary). Moving the specimen slide or Petri dish during the course of recording a time-lapse event will produce a playback in which specimen features appear to be randomly and suddenly relocated in the field of view. Maintaining microscope focus is critical for producing acceptable time-lapse sequences, and should be checked often to ensure that important specimen details do not drift out of the focused field depth.
The increasing use of time-lapse cinemicrography in optical microscopy is evidenced by the numerous reports of cellular activity monitored in tissue culture using fluorescence labeling techniques coupled to time-lapse sequence capture. A variety of contrast-enhancing techniques, such as differential interference contrast, phase contrast, Hoffman modulated contrast, brightfield, and darkfield can be utilized for recording a wide variety of specimens with time-lapse sequences. Other examples of time-lapse candidates are crystal formation in biological, chemical, and geological systems, as well as liquid crystalline phase transitions and structural analysis of new materials in metallography.
Contributing Authors
Thomas J. Fellers and Michael W. Davidson - National High Magnetic Field Laboratory, 1800 East Paul Dirac Dr., The Florida State University, Tallahassee, Florida, 32310.
BACK TO DIGITAL IMAGE CAPTURE AND PROCESSING
BACK TO THE OLYMPUS MIC-D DIGITAL MICROSCOPE
Questions or comments? Send us an email.
© 1995-2025 by Michael W. Davidson and The Florida State University. All Rights Reserved. No images, graphics, software, scripts, or applets may be reproduced or used in any manner without permission from the copyright holders. Use of this website means you agree to all of the Legal Terms and Conditions set forth by the owners.
This website is maintained by our
Graphics & Web Programming Team
in collaboration with Optical Microscopy at the
National High Magnetic Field Laboratory.
Last Modification Friday, Nov 13, 2015 at 01:19 PM
Access Count Since September 17, 2002: 15002
Visit the website of our partner in introductory microscopy education:
|
|
