Anatomy of the MIC-D Digital Microscope
Polarized Illumination Mode
The polarized light microscope is designed to observe and record images of specimens that are visible primarily due to their optically anisotropic character. These specimens have polarizable intramolecular bonds that interact with polarized light in a direction-sensitive manner to produce phase retardations that are monitored through interference-dependent alterations in amplitude at the primary image plane.
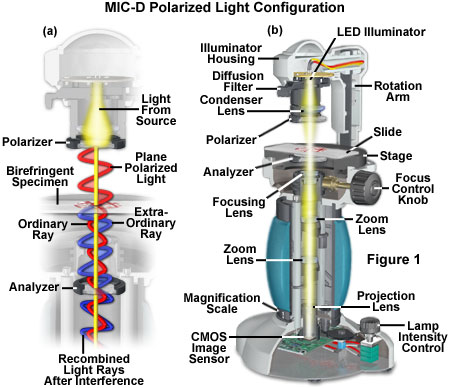
In order to view anisotropic birefringent (having two distinctive refractive indices) specimens, the microscope must be equipped with both a polarizer, positioned in the light path somewhere before the specimen, and an analyzer (a second polarizer), placed in the optical pathway between the specimen and the observation tubes or image sensing device. Image contrast arises from the interaction of plane-polarized light with a birefringent specimen to produce two individual wave components that are each polarized in mutually perpendicular planes. The velocities of these components are different and vary with the propagation direction through the specimen. After exiting the specimen, the light components propagate out of phase with each other, but are recombined through constructive and destructive interference when they pass through the analyzer.
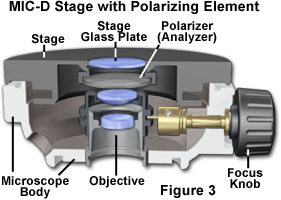
The polarized light configuration for transmitted light mode with the Olympus MIC-D digital microscope is presented in Figure 1. Two identical polarizer elements, housed in a circular frame with a threaded flange, are secured into the illumination head and beneath the glass plate in the stage (see Figures 1(b), 2 and 3). When initially setting up the microscope for polarized light, one of the polarizers is screwed into the threaded nose of the illumination head (Figure 2). The stage must be removed from the microscope in order to attach the second polarizer (analyzer). This can be accomplished with two screws that are positioned just beneath the stage in front of the strap mounts. Removing the screws enables the stage to be lifted from the microscope body (be careful not to scratch the objective front lens element, or to crash the stage into the illuminator). After the stage has been removed, turn it over and secure the second polarizer into the threaded mount on the rim of the stage aperture (under the stage glass plate; see Figure 3).
Reverse the steps to re-attach the stage on the microscope and turn on the light source (a white light-emitting diode). In order to ensure the polarizers are crossed, the lamp voltage must be adjusted to the highest (brightest light) position by turning the Lamp Intensity Control knob to the extreme right-hand rotation stop position (see Figure 1(b)). Next, launch the MIC-D software interface and view the Live Image screen without a specimen on the stage. Rotate the stage (and the analyzer) until the blank image on the screen turns dark and then light again. The stage position corresponding to the darkest screen will be very close to the correct orientation for crossed polarized illumination. Place a birefringent specimen on the stage, adjust the Exposure slider and observe the Live Image screen to ensure the microscope is properly adjusted. Once the correct stage position has been determined, do not rotate the stage during specimen observation to avoid uncrossing the vibration axes of the polarizing elements.
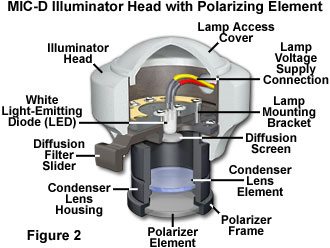
The polarizer attached to the illumination head acts to produce linearly-polarized light from the non-polarized light projected by the light-emitting diode (LED) source when the diffusion filter is removed from the optical path. This plane-polarized light passes through a birefringent specimen (on the stage), where it becomes separated into two components, termed the ordinary and extraordinary light waves or rays (Figure 1(a)). These waves leave the specimen propagating out of phase with one another and also having the electric vector components oriented orthogonally. When the separated light waves encounter the analyzer, which is attached to the stage underneath the glass plate, they undergo interference to again produce light polarized in a single plane. The recombined light rays then pass through the objective and the rest of the MIC-D optical train to form an image on the CMOS image sensor.
When an anisotropic specimen is brought into focus on the MIC-D microscope in polarized mode, and then rotated through 360 degrees (be careful not to rotate the stage), it will sequentially appear bright and dark (extinct), depending upon the rotation position. If the specimen long axis is oriented at a 45-degree angle to the polarizer vibration axis, the maximum degree of brightness will be achieved, and the greatest degree of extinction will occur when the two axes coincide. During rotation over a range of 360 degrees, specimen visibility will oscillate between bright and dark four times, in 90-degree increments. This phenomenon is due to the fact that when polarized light impacts the birefringent specimen with a vibration direction parallel to the optical axis, the illumination vibrations will coincide with the principal axis of the specimen and it will appear isotropic (dark or extinct). If the specimen orientation is altered by 45 degrees, incident light rays will be resolved by the specimen into ordinary and extraordinary components, which are then united in the analyzer to yield interference patterns.
Because interference only occurs when polarized light rays have an identical vibration direction, the maximum birefringence is observed when the angle between the specimen principal plane and the analyzer permitted electric vector vibrational direction overlap. Interference between the recombining white light rays in the analyzer vibration plane often produces a spectrum of color, which is due to residual complementary colors arising from destructive interference of white light. The colors observed under illumination with white light in the MIC-D software interface Live Image screen can be utilized to quantitatively draw conclusions about path differences and specimen thickness values when the refractive indices of the specimen are known.
Polarized light microscopy is utilized to distinguish between singly refracting (optically isotropic) and doubly refracting (optically anisotropic) media. Anisotropic substances, such as uniaxial or biaxial crystals, oriented polymers, or liquid crystals, generate interference effects in the polarized light microscope, which result in differences of color and intensity in the image. This technique is useful for orientation studies of doubly refracting media that are aligned in a crystalline lattice or oriented through long-chain molecular interactions in natural and synthetic polymers and related materials. Also investigated in polarized light are stresses in transparent singly refracting media (for example, glass) and the identification and characterization of a wide spectrum of anisotropic substances through their refractive index and birefringence.
For quantitative studies in polarized light microscopy with the MIC-D digital microscope, the polarizers must be oriented in known directions with respect to the main body of the microscope. Because the attachable MIC-D polarizing elements are not marked with the permitted vibration direction, an alternative method must be employed to configure the microscope for analytical investigations. It is possible to use the properties of a known birefringent specimen to adjust the orientation of the polarizer and analyzer. Recrystallized specimens of the simple organic chemical, urea, are excellent for this purpose, because the chemical forms long dendritic crystallites having vibration directions that are both parallel and perpendicular to the long crystal axis.
In order to prepare urea crystals for microscope polarizer orientation, place a small quantity (about 5 milligrams) of the purified chemical between a microscope slide and cover glass, and then carefully heat the sandwich with a Bunsen burner or hot plate until the crystals melt. Once liquefied, the cover glass can be pressed onto the slide to minimize the thickness of the urea sandwich, which is then allowed to cool. After recrystallization, the slide is placed on the stage of the MIC-D microscope with installed polarizers, and the long axes of the crystals are oriented East-West using marks placed on the stage with a pen as a reference. The polarizer and analyzer are then rotated as a pair until both the crystal and background are equally dark. Because the analyzer is secured beneath the stage and cannot be conveniently rotated, set the position of this component first, then rotate the polarizer in the illumination head to achieve crossed polarized illumination. Once the East-West and North-South orientations of the polarizer and analyzer become established, do not rotate the stage or the polarizer frame in the illumination head.
Polarized light microscopy can be conducted with both reflected and transmitted light, but the MIC-D optical configuration restricts this microscope to illumination only with transmitted light. Specimens prepared for polarized light observation must be carefully scrutinized for their suitability to produce the desired information. In general, the preparation methodology chosen will be dependent upon the type of material under investigation. In geological (petrographic) applications, the standard thickness for rock or mineral thin sections is 25 to 30 micrometers, although thinner or thicker preparations are useful for quantitative birefringence studies and reflected light observation, respectively. Specimens are ground with diamond-impregnated wheels and then hand finished to the correct thickness utilizing abrasive powders of successively decreasing grit size. Biological and other softer materials can be sectioned with a microtome and layered onto microscope slides. Mounting media should be chosen that will optimize the observation of birefringence, which will depend upon the chemical and physical nature of the specimen.
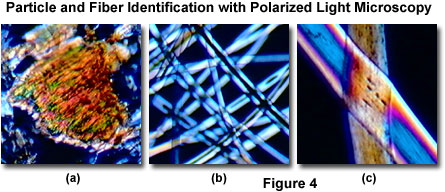
Polarized light microscopy is useful in particle analysis and for examining hairs, cloth, synthetic textiles, and fibers, as illustrated in Figure 4. A variety of birefringent particles, such as chemical crystals, ash, ground minerals, dust and debris specimens, and similar materials are often examined in polarized light for analytical purposes. Figure 4(a) illustrates miniature birefringent sawdust particles imaged with the MIC-D microscope equipped for polarized light observations. Plane-polarized light also produces information about gross fiber morphology (Figure 4(b) and 4(c)), as well as helping to identify pleochroism and refractive index. Isotropic glass fibers are not affected by polarized light, and will remain dark when placed between crossed polarizers. In contrast, nylon fibers (Figure 4(b)) display some pleochroism and reveal refractive index differences between the fiber and the mounting medium. Human hair can also be examined under polarized light (Figure 4(c)) to reveal characteristics specific to race, age, and hair styling (resulting from heat treatment or shampoo damage). Forensic scientists take advantage of polarized light techniques in the analysis of fibers, hairs, and other particles that are discovered at crime scenes.
In addition to naturally birefringent particles and fibers, laboratory chemicals found in high school chemistry stockrooms provide an excellent source of specimens for polarized light observation. Most crystals are anisotropic and birefringent, which facilitates their examination with the polarized light microscope. In order to prepare crystals for examination in the microscope, deposit a few milligrams of the appropriate chemical on a glass microscope slide and carefully place a coverslip over the powder. Next, heat the bottom side of the slide with a Bunsen burner or hot plate as described above for urea crystals. Some chemicals recrystallize very rapidly (within a few minutes) while others may recrystallize slowly over a period of days, weeks, or even months. Urea, sulfur, and benzoic acid are excellent examples of common laboratory chemicals that will recrystallize rapidly enough to be examined directly after melting. Many chemicals form more interesting crystalline patterns when cooled slowly over a period of hours or days. This can be accomplished by placing the microscope slide with its melted chemical sandwich on a hot plate at 50 to 70 degrees Celsius, followed by slow reduction in the temperature at 5-10 degree increments over a period of several hours.
Another very effective method of preparing crystals is to dissolve the chemical in a suitable solvent, such as water, ethanol, acetone, or mineral spirits. A drop of the solution is then sandwiched between the microscope slide and coverslip, and the solvent allowed to evaporate, resulting the formation of crystalline patterns. This method is especially useful for chemicals in the salt family that usually decompose upon heating, leaving a tar-like mess. In some instances, increasing the time for solvent evaporation will result in a dramatic increase in crystallite size. The evaporation time can be controlled by partially sealing the coverslip with a bead of polymethylmethacrylate mounting medium leaving only a small edge of the coverslip exposed to the atmosphere. This action will retard solvent evaporation to allow a slower recrystallization process to occur, usually resulting in larger, better formed crystallites.
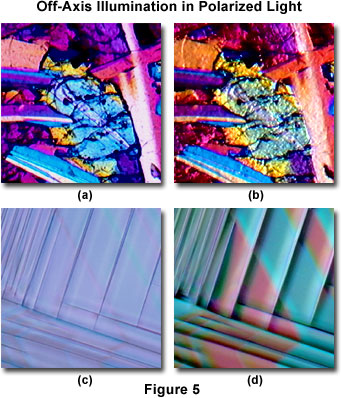
Polarized light investigations are often utilized by geologists for the study of naturally occurring minerals and rocks in thin section, and to mineralogists and ceramicists in both research and industrial environments. Figure 5(a) presents a polarized light digital image (obtained from the MIC-D microscope) of a lunar-impact breccia (Moon) rock thin-section specimen collected from the Descartes highland plains region by Apollo 16 astronauts. This specimen is 3.8 to 4.2 billion years old and provides evidence that the lunar highland plains were formed by meteorite impacts. In addition to rocks and minerals recovered from the Moon, the wide spectrum of rocks originating from planet Earth is widely investigated by polarized light techniques. The same lunar breccia viewfield, when observed in oblique polarized illumination, is presented in Figure 5(b), and was recorded with the MIC-D illumination head tilted at a 10-degree angle from the vertical axis. This type of illumination produces a pseudo three-dimensional relief effect in images, often revealing details that are not apparent with on-axis observations.
Presented in Figure 5(c) is a transmitted polarized light digital image of a one-millimeter thick wafer cut from a single crystal of the perovskite, lanthanum aluminate. Stairstep twinning, very evident in this image, interferes with confluent thin-film formation of epitaxially deposited high-temperature superconducting ceramics. The same specimen illuminated with oblique polarized light is illustrated in Figure 5(d). Note that many of the specimen fine details present in the oblique image are very difficult to distinguish in polarized light mode alone. The comparison between lanthanum aluminate crystal morphology in polarized light with and without the assistance of oblique illumination highlights the unique versatility of the MIC-D digital microscope.
Polarized light microscopy is also heavily employed by scientists who study the various phase transitions and textures exhibited by liquid crystalline compounds, and polymer technologists often make significant use of the information provided by this form of optical microscopy. Presented in Figure 6 are several materials that are commonly studied in polarized light. Figure 6(a) reveals one of the many cholesteric liquid crystalline textures exhibited by the vast array of synthetic chemicals utilized in display systems, such as watches, gauge panels, and computer displays. Phase transitions occur in liquid crystalline systems as a result of thermal, electrical, or molecular concentration variations and can be reproducibly controlled in order to investigate the properties of each system.
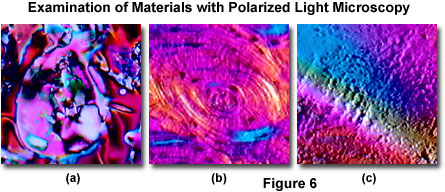
Bones and fossils are also extensively investigated utilizing polarized light techniques. Presented in Figure 6(b) is a digital image of a human bone thin section captured by the MIC-D microscope in oblique polarized light mode. The digital micrograph clearly depicts minute structural details, as well as providing information about birefringence and optical path differences produced by the specimen. Synthetic polymers, which are often birefringent, are also the subjects of investigation with polarized light microscopy. Illustrated in Figure 6(c) is a polystyrene membrane that has been subjected to stress and strain, revealing a multi-colored texture when examined in oblique polarized light. The advantages of polarized light have been utilized to explore biological processes, such as mitotic spindle formation, chromosome condensation, and organization of macromolecular assemblies such as collagen, amyloid, myelinated axons, muscle, cartilage, and bone.
Microscopes dedicated for use with polarized light are very sophisticated instruments having components specifically designed to minimize strain and provide sharp, crisp, and clear images of birefringent specimens. For simple qualitative work, a standard microscope can be converted for polarized light studies. Typically, a small circle of polarizing film is introduced into the filter tray or beneath the substage condenser, and a second piece is fitted in a cap above the eyepiece or within the housing where the observation tubes connect to the microscope body. Using the maximal darkening of the viewfield as a criterion, the substage polarizer is rotated until the field of view is darkest without a specimen present on the microscope stage.
Ensuring that the polarizer and analyzer have permitted vibration directions that are North-South and East-West is more difficult. If the orientation of one of the polarizing films is known, then it can be inserted into the optical path in the correct orientation. It is then a simple matter to rotate the other polarizer (or analyzer) until the field of view achieves a maximum degree of darkness. When the polarizers are slightly uncrossed (the permitted vibration directions overlap to a small degree), the viewfield observed in the Live Image screen often ranges from a deep to pale blue. This background color can permeate polarized light images and render them with unwanted color casts that deviate from those observed when the polarizers are properly positioned.
Adding retardation plates to the MIC-D microscope polarized light configuration is difficult because the plates must be located between the polarizer and analyzer, leaving only the area between the illumination head and stage as a possible location. Several manufacturers sell thin films of retardation material, available in quarter and full wavelengths, but quartz wedges are difficult to simulate with thin films. The most convenient location for retardation films is just beneath the polarizer secured to the illumination head beneath the condenser lens. After determining the proper orientation, the film can be attached to the polarizer frame with tape. The slow axis of the retardation film must be oriented at a 45-degree angle with respect to the polarizer (and analyzer) vibration directions. Note that the images presented in Figures 5(a) and 5(b), as well as those in Figures 6(b) and 6(c) were captured with a full-wave retardation plate attached to the MIC-D illuminator.
Contributing Authors
Thomas J. Fellers and Michael W. Davidson - National High Magnetic Field Laboratory, 1800 East Paul Dirac Dr., The Florida State University, Tallahassee, Florida, 32310.
BACK TO MIC-D MICROSCOPE ANATOMY
BACK TO THE OLYMPUS MIC-D DIGITAL MICROSCOPE
Questions or comments? Send us an email.
© 1995-2025 by Michael W. Davidson and The Florida State University. All Rights Reserved. No images, graphics, software, scripts, or applets may be reproduced or used in any manner without permission from the copyright holders. Use of this website means you agree to all of the Legal Terms and Conditions set forth by the owners.
This website is maintained by our
Graphics & Web Programming Team
in collaboration with Optical Microscopy at the
National High Magnetic Field Laboratory.
Last Modification Friday, Nov 13, 2015 at 01:19 PM
Access Count Since September 17, 2002: 25128
Visit the website of our partner in introductory microscopy education:
|
|
