
Rheinberg Illumination
Rheinberg illumination is a form of optical staining first demonstrated to the Royal Microscopical Society of London by Julius Rheinberg in the late 1890s. This technique is a variation of low to medium magnification darkfield illumination, but instead employs colored gelatin or glass filters in place of an opaque light stop to provide rich color from both the specimen and background.
The Intel Play QX3 computer microscope can be readily modified to capture images using a modification of the original Rheinberg technique. Standard microscope configuration for Rheinberg illumination involves replacing the darkfield opaque stop with a colored gel (central filter) to change the background color from black to a more pleasing deep blue, red, or green.
A second filter, termed the annular filter is placed outside and surrounding the central filter to change the color of light rays striking the specimen at oblique angles. The net effect of these filters is to render the specimen optically stained with color from the annular filter on a uniform background colored by the central filter. Learn more about the theory and practice of Rheinberg illumination by visiting the Specialized Microscopy Techniques section of the Molecular Expressions Microscopy Primer.
| Interactive Java Tutorial | |||||||||||
|
|||||||||||
Rheinberg illumination is ideal for specimens that display little contrast when imaged under normal brightfield illumination conditions. This includes living organisms such as protozoans in pond water, living cells in tissue culture, hairs and fibers, mineral thin sections, and a host of other specimens lacking inherent contrast. We have developed an alternative method of reflected light Rheinberg illumination for the Intel QX3. This technique greatly improves the quality of images obtained from this microscope when compared to the traditional Rheinberg method using the QX3 described later in this section.
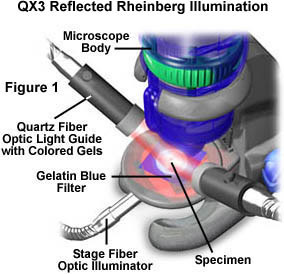
Illustrated in Figure 1 is the microscope configuration for reflected light Rheinberg illumination. The specimen is placed on a colored gel positioned over the frosted diffuser screen on the microscope stage. This gel acts as the central Rheinberg filter. An auxiliary lamp is used to illuminate the sample with transmitted light by aiming a fiber optic light guide into a quarter-inch hole drilled into the substage mixing chamber. This produces a diffuse, but vastly more intensified, illumination through the central filter on the stage. Without the auxiliary illumination, the tungsten lamp in the microscope's mixing chamber is unable to provide enough light intensity to adequately change the background color from black to blue.

Oblique illumination is also provided by a quartz-halogen lamp through fiber optic light guides covered with filter gels, as illustrated in Figure 1 using red gels. High-intensity tensor and desk lamps can also be used for oblique illumination with this technique. Light rays from the oblique illuminators are reflected, refracted, and diffracted from the specimen and some of these enter the front lens of the microscope objective. Thus, the specimen is optically stained with color from the oblique illuminator gel and appears with highlights from this gel over a darker background provided by the transmitted illuminator gel on the microscope stage.
Changes in the colors used for optical staining is simply a matter of selecting new gel colors. An example of a microscopic insect wing stained with reflected Rheinberg illumination is presented in Figure 2. In this photomicrograph, the wing appears yellowish with bright red highlights from the red oblique illumination gel. The background is a rich blue color provided by a navy blue gel taped over the diffusion screen on the microscope stage.
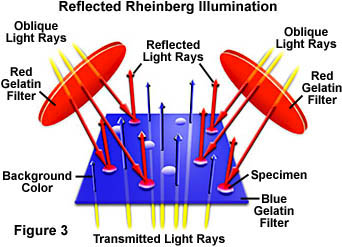
A schematic diagram of reflected oblique Rheinberg illumination is presented in Figure 3. The specimen is represented by a series of white ellipsoids resting on a blue gelatin filter. Light rays from the transmitted auxiliary illuminator (beneath the stage) pass through the blue filter and illuminate the underside of the specimens. Most of these light rays pass on to the objective to produce a blue background color, but those striking the bottom of the specimen are reflected down towards the filter, although some may be absorbed to a degree by transparent specimens. Oblique illumination passing through the red filters strikes the upper surface of the specimens and some of it is reflected, refracted, and diffracted into the objective bestowing red highlights to the specimen. This is the basis for reflected light Rheinberg illumination.
When choosing gel colors, make certain the central filter color is darker than the oblique filter gel. For instance, use dark blue, green, purple, or red gels for the central filter and lighter yellow, magenta, cyan, or orange gels for the oblique annular filter. This ensures that the specimen will have sufficient contrast to overcome the differences in illumination between transmitted and reflected light. When a lighter gel, such as yellow or cyan, is chosen for the central filter and darker gels are used obliquely, illumination from the central filter will tend to wash out specimen detail and contrast, resulting in poor image quality.
The QX3 microscope can also be configured for transmitted Rheinberg illumination without the aid of oblique auxiliary illuminators as illustrated in Figure 4. This method uses classical Rheinberg filters cut from gelatin sheets similar to those presented in Figure 6. One of the drawbacks of transmitted Rheinberg illumination arises from the lack of a substage condenser on the QX3 microscope. Without the condenser, oblique light rays emitted from the mixing chamber are not directed toward the specimen as they are in a typical laboratory microscope. Instead, the background central filter dominates the image (see Figure 5) and the specimen is only weakly illuminated by the annular filter.
The microscopic mite illustrated in Figure 5 was digitally imaged using the QX3 microscope in transmitted Rheinberg illumination mode. The central filter is royal blue and the annular filter is red. The legs are barely visible along the periphery of the mite's body, which itself is dark compared to the brightly illuminated insect wing in Figure 2. This occurs because red light from the annular filter is very diffuse and not directed towards the specimen, an inherent problem when the microscope is configured in this manner.
With transmitted Rheinberg illumination, as the magnification is changed, the size of the central filter must be changed as well. The largest central filter size is about 10 to 15 millimeters (one-half to three-quarters inch) in diameter. This size is useful only with the 10x objective, the microscope's lowest magnification. As the magnification is increased to 60x and 200x, the corresponding central filter size is decreased. At 60x magnification, the central filter should be between 6 to 10 millimeters in diameter and, at 200x magnification, the central filter should only be a half centimeter or slightly smaller in size. These variables in central filter size should be the topic of an experiment when first undertaking optical staining with the QX3 microscope.
We are attempting to improve the results with transmitted Rheinberg illumination by adapting a hemispherical lens beneath the frosted diffusion screen in the stage. By placing the planar side of the lens facing the objective, peripheral light rays may be directed through the curved lens towards the specimen. In this configuration, the ideal location for the Rheinberg filter pack is beneath the substage in place of the mixing chamber, which is easily removed. Without the mixing chamber, microscope transmitted illumination quality will suffer unless the auxiliary lamp is positioned directly on the optical axis of the microscope facing upward. Light rays from the illuminator will first travel through the Rheinberg filters, then through the stage lens and onto the specimen.
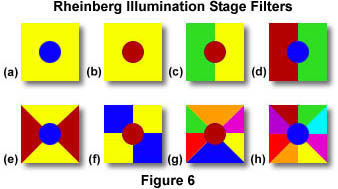
Optical staining with Rheinberg illumination offers a wide spectrum of possibilities for the creative mind. Children can experiment with different filter combinations to produce unique blends of colors that will increase contrast and color saturation of digital images acquired with the QX3 microscope. The Rheinberg filter suggestions illustrated in Figure 6 are just a small set of the numerous combinations that are possible.
The blue central/yellow annular and red central/yellow annular filters illustrated in Figure 6(a) and (b) are similar to those used to produce the digital images presented in Figures 2 and 5. The filter in Figure 6(a) produces specimens stained bright yellow on a deep blue background and the filter in Figure 6(b) acts in a similar manner, but with a red background. By replacing one half of the annular filter with a different filter color, you arrive at combinations like those illustrated in Figure 6(c) and (d). During use, the filter in Figure 6(c) would stain the background a deep red color with the specimen appearing yellow on one side and green on the other. To vary the colors even further, the annular filters can be configured as illustrated in Figure 6(e) and (f), where the colors are interlaced. This effect produces an even more striking appearance for the specimen. At the extreme, a variety of annular filter colors can be interlaced to produce the filters illustrated in Figure 6(g) and (h). Beyond this point, the colors start to mix and optical staining effects are defeated.
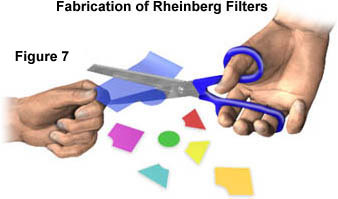
Acetate gel filters can be obtained from art supply houses locally or over the web, and many science suppliers like Edmund Scientific, Ward's, and Carolina Biological Supply can provide filter kits. These filters are only a few mils thick and easily cut like a pair of scissors, as illustrated in Figure 7. It is difficult to evenly cut a circular filter, but if a circular outline is drawn on the filter with a button or thimble, the job is much easier. We cut Rheinberg filters with a set of brass cork borers that are also available from many science supply houses. A good set of cork borers will cut circular filters in diameters ranging from 2 to 18 millimeters.
The Rheinberg illumination technique allows microscopists to obtain beautiful images of specimens that would otherwise lack contrast and make poor candidates for photomicrography. Experimenting with different filter combinations makes this form of microscopy all the more interesting. By adapting the QX3 for Rheinberg illumination, parents can provide hours of fun and entertainment for young children and both get to learn a little about optics and microscopy in the bargain.
BACK TO INTEL QX3 SPECIALIZED TECHNIQUES
Questions or comments? Send us an email.
© 1995-2025 by Michael W. Davidson and The Florida State University. All Rights Reserved. No images, graphics, software, scripts, or applets may be reproduced or used in any manner without permission from the copyright holders. Use of this website means you agree to all of the Legal Terms and Conditions set forth by the owners.
This website is maintained by our
Graphics & Web Programming Team
in collaboration with Optical Microscopy at the
National High Magnetic Field Laboratory.
The QX3 microscope design is copyrighted © 2025 by Mattel, Inc. Intel® Play™ is a registered trademark of the Intel Corporation. These companies reserve all of their rights and privileges under copyright law. The material contained in this website is solely the opinion of the authors and is intended for eduational use only.
Last Modification Friday, Nov 13, 2015 at 02:18 PM
Access Count Since December 24, 1999: 42316
Visit the official Intel Play website:
![]()