
QX3 Interactive Software
Software Installation
(Part 1)
After you have determined that your Windows 98 computer meets the minimum system requirements, it is time to install the Intel Play software. The microscope package has a compact disk containing software that is configured to AutoPlay after being inserted into the CD-ROM drive. Insert the CD into the drive and wait a few seconds for the AutoPlay to initiate.
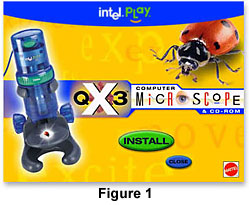
When the CD starts AutoPlay, the first menu will be the install screen illustrated in Figure 1. If AutoPlay does not launch automatically, double click on the My Computer icon on the desktop to open a file menu and find the icon for the CD-ROM or DVD drive. Double click on that icon to jump-start AutoPlay. Sometimes even this does not work, and double clicking on the CD drive icon will instead open a file menu containing a list of files contained on the CD, as illustrated in Figure 2. Look for the file named Setup.exe and double click on that icon to launch the installation Setup program.

When Setup first launches, it scans the computer searching for installed components necessary to support the microscope hardware and software. The diagnostic program run by Setup first creates a file named QX3Diag.log and stores it in the QX3 root directory (default is C:\Program Files\Intel Play\QX3 Microscope). This file is a text log file containing the results of the system scan, which includes the universal serial bus qualifications, a check of the minimum system requirements, a review of the available monitor display resolutions and color depths, and a scan of pre-installed dynamic link libraries in the Windows system directory. After software installation is completed, the Setup program runs a final check of installed files and writes this data into the log file.
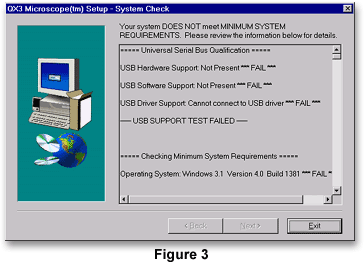
When the system check is finished, and before the software installation is started, the Setup program displays a dialog box containing the results of the system scan (illustrated in Figure 3). If the hardware and software meet the minimum system requirements, use the mouse to click on the Next button of the dialog box to proceed with installation. If the computer is missing a non-vital hardware or software feature, Setup diagnostics will fail that portion of the system check and will ask whether you want to proceed with software installation. Several components are not critical to the software (for example, a sound card) and the microscope will operate without them. However, if the computer is missing a vital component necessary to operate the microscope software and/or hardware, the Next button will be grayed out and you must exit installation (Figure 3). This is the case for computers lacking the USB port, Windows NT systems, and pre-release betas of Windows 2000.
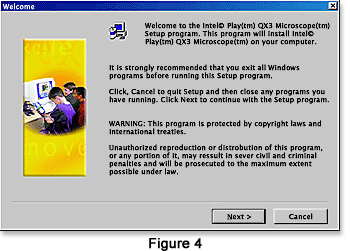
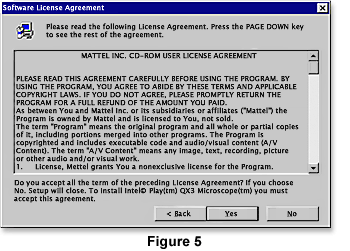
Before Setup proceeds further with software installation, it displays a Welcome dialog box (Figure 4) that strongly recommends exiting all Windows programs before continuing with the installation. This dialog box also has a warning message about copyright protection and unauthorized reproduction or distribution of the software. Clicking on the Next button takes you to the software license agreement dialog box (Figure 5) containing the legal information and terms for installing the software. At this point, the dialog box suggests you read the information in the Mattel license agreement and gives you a choice of yes or no to the agreement or going back a step. Clicking on the No button terminates Setup.
Clicking on the Yes button takes you to the Setup type dialog box (Figure 6) that asks which of three Setups to install: Minimal, Typical (the default), and Full. When one of these installation types is selected (by clicking on it with a mouse), a description of the items to be installed appears in a window below the install type choice window. A Minimal installation contains only the components necessary to run the microscope. A Typical installation contains all the components of the minimal installation with the addition of sample images and some other support files. A Full installation contains all the contents of the CD, so the microscope can be run from the hard drive without requiring occasional retrieval of data or images from the CD.
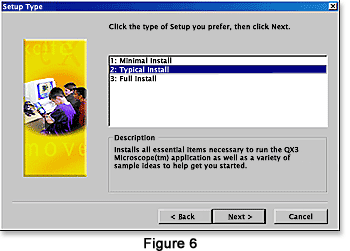
We recommend a full installation if there is sufficient disk space. Otherwise choose the typical setting in order to get the sample images collected by Intel and Mattel microscopists.
Continue to Part 2 of the software installation tutorial.
BACK TO QX3 INTERACTIVE SOFTWARE
Questions or comments? Send us an email.
© 1995-2025 by Michael W. Davidson and The Florida State University. All Rights Reserved. No images, graphics, software, scripts, or applets may be reproduced or used in any manner without permission from the copyright holders. Use of this website means you agree to all of the Legal Terms and Conditions set forth by the owners.
This website is maintained by our
Graphics & Web Programming Team
in collaboration with Optical Microscopy at the
National High Magnetic Field Laboratory.
The QX3 microscope design is copyrighted © 2025 by Mattel, Inc. Intel® Play™ is a registered trademark of the Intel Corporation. These companies reserve all of their rights and privileges under copyright law. The material contained in this website is solely the opinion of the authors and is intended for eduational use only.
Last Modification Friday, Nov 13, 2015 at 02:18 PM
Access Count Since December 24, 1999: 39499
Visit the official Intel Play website:
![]()