
QX3 Interactive Software
Paint Menu
(Part 2)

In the first section of our tutorial on the QX3 microscope Paint menu, we discussed the Paint Brush tool and its control palettes, the Scissors tool and its options, the Copy and Paste buttons, and the Flip and Undo buttons. The Paint Bucket tool (illustrated in Figure 1) is used to color or paint unselected regions of a digital image that are within approximately 25 pixels of a specific color value.
To operate the Paint Bucket tool, first select the proper button (turning the button background color to green), then select the color from a color palette similar to the Paint Brush color selection palette. The opacity (or transparency) for this tool can be configured in a manner similar to that described for the Paint Brush tool. After the Paint Bucket has been selected, the cursor turns into a spilling bucket icon when rolled over the Paint Activity Window. The very tip of the spilling paint serves as the active part of the cursor and is used to select the area to be painted.
| Interactive Java Tutorial | |||||||||||
|
|||||||||||
Select an area to paint by carefully placing the spilling paint cursor over a specific area on the digital image. Click the left mouse button and the area within 25 pixel colors of the target area will become painted with the color and transparency set by the option palettes. If you choose to paint a solid or area of very similar colors, the Paint Bucket tool will often turn the entire image into the color selected in the palette. Quite a bit of practice is necessary with this tool to produce the best quality images.
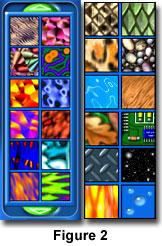
In addition to the color palette, the Paint Bucket tool is also equipped with a set of texture options that act in a manner similar to the Paint Brush texture set. The options appear to the right of the Paint Activity Window when the Paint Bucket tool is selected. There are a total of 24 textures to select from, with 12 being available from each of two window sets in the option menu. Use the green and white arrow buttons to toggle between the two windows.

The Eyedropper tool (Figure 3) is used to select a specific color from within a digital image. When this tool is activated with the mouse, the cursor turns into an eyedropper icon when rolled across the Paint Activity Window and the color selection palette. Clicking anywhere within this window will fill the color option palette with the pixel color of the pixel that was chosen by the tool. The active selection area of the Eyedropper tool is the very tip of the eyedropper icon.
Selecting the Eyedropper tool removes all texture and brush palette menus from the right side of the Paint Activity Window, leaving only the color selection menu. While the Eyedropper tool is selected, the cursor can either select a color from within the digital image or a color from the palette can be chosen. After the proper color and transparency are selected with the eyedropper, they become the default settings when the next paint or text tool is selected. This allows the choice of a color from the digital image to be loaded into any of the tool palettes.

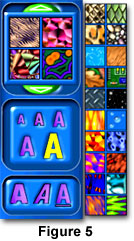
The Text tool button (illustrated in Figure 4) can be selected when you wish to add text to your digital images. When the Text tool is selected, the brush palettes are replaced by a text pattern palette illustrated in Figure 5. The text palette has a combination of typeface styles and sizes, along with a texture palette for choosing one of 24 textures to fill the font area. The only typeface available is Arial, with options to make the font either regular, bold, italics, or underlined. The typefaces can be sized at 12, 30, 40, 50, and 80-point fonts, and filled with a color selected from the color or texture palettes.
To use the text tool, select the text tool button and first choose the font size, face, color, or texture from the palettes on the right of the Paint Activity window. If the opacity of the text is to be less than 100 percent, now is the time to adjust that value with the transparency slider. Next, move the cursor into the Paint Activity Window and click anywhere within the window to launch the text dialog box illustrated in Figure 6 which will prompt you to type in a line of text. After the text has been correctly entered, click on the green checkmark button or hit the enter key to paste text (with a colorful selection border) into the digital image window. Click on the red Cancel button if you make a mistake or change your mind, or the blue question mark if you have a question about the text dialog box. In most cases, you should click the mouse on the area in the image where you want the text to begin. If you forget to select the desired color or texture before you place text into the image, choose the Paint tool while the text is still selected to add color or textures.

When the text selection is first added to the image, the Text tool palette is replaced by the Scissors palette and the cursor turns into a pair of scissors. At this point, clicking anywhere outside of the text selection will de-select the text and it is then pasted into place on the image. If the cursor is moved over selected text, the cursor will change from a pair of scissors into a hand that can move the text around on the image. Use this method to locate text in a specific part of the image. After moving the text to its proper location, click anywhere outside the text selection and it will be fixed into place. When the Text tool is chosen and the cursor clicked within an image already having a selection, the selected area is flattened when the text selection is added to the image.

The Eraser tool (Figure 7) can be used to remove paint, textures, stamps, or text added to a digital image from the Paint Activity Window. Select this tool with the cursor and the button will turn green and a new palette of eraser options will appear on the right side of the Paint Activity Window (Figure 8). This palette contains options for eraser brush sizes that are identical to those for the Paint Brush tool. A second palette contains options that allow the user to selectively erase portions of the added images, text, textures, and paint strokes.
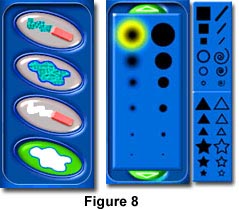
The eraser tool can't be used to erase the original digital image captured by the microscope, only those effects subsequently added in the Paint menu can be erased. There are four selections in the eraser option palette, shown on the left in Figure 8. The first selection is called the Erase Area to Original option (top button in Figure 8, left), which allows the user to erase a portion of the added effects using a brush configured from the palette on the right side of Figure 8. As an example, if you have heavily modified an image with text and lines from the Paint menu, use the eraser with the properly configured brush size to modify the text and lines. The brush shapes and sizes conform to those used by the Paint Brush tool.
The second option in the brush palette is called Erase to Original, and is activated by clicking the button with the aqua-filled pattern surrounded by a wavy blue border (second button in Figure 8, left). This option allows the user to erase all added effects and obtain the original image with a single mouse click.
The eraser tool can also be used to erase to white using the bottom two buttons on the left palette in Figure 8. The button containing the eraser and a white wavy line is called Erase Area to White, and is used to cover the image and effects with a white brush whose shape and size is chosen in the brush styles palette. This is similar to using the Paint Brush tool to paint white over an image. To completely cover the image with white, use the lowest button in the palette (termed Erase to White), which will render the contents of the entire window white. Use the Erase to Original options to remove unwanted white color fill added by the Erase to White option.
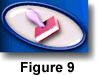
The Stamp tool (illustrated in Figure 9) is used to add or spray stamps onto your digital images. When selected, the Stamp tool turns green and a new Stamp palette (Figure 10) is added to the right side of the Paint Activity Window. There are 28 individual stamps available with the Stamp palette, consisting of kid-friendly images such as eyeballs, skulls, flies, space ships, planets, etc. After selecting the tool and a stamp pattern, roll the mouse cursor into the Paint Activity Window, and the cursor will turn into a rubber stamp.
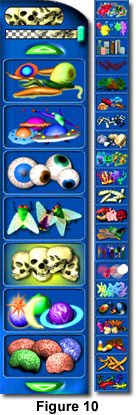
Depressing and holding the left mouse button while dragging around in the activity window will spray the selected stamp in a pattern that follows the cursor. Each stamp has several individual images that are randomly sprayed by the stamp tool. For example, the eyeball stamp deposits variations of five or six different eyeballs, some larger than others and each having either a blue, brown, or green iris. Other stamps behave in a similar manner. By rolling the mouse over the activity window and randomly clicking, the user can deposit only a single or couple of eyeballs (or other stamp image) in strategic locations around the image. This tool is perhaps the most fun to use because of the wide variety of interesting stamps available. To toggle between menus, click on the green and white arrow buttons at the top and bottom of the Stamp palette.
Images created with the Stamp tool can be erased as discussed above with the Eraser tool. The Stamp tool should be especially useful for training small children on the QX3 microscope software. The interesting assortment of creatures, vehicles, buildings, scary things, and people available with this tool will captivate the kids and help prolong their interest in working with the computer.

The Zoom tool, located to the lower left of the Paint Activity Window (Figure 11), can be used to increase the size of selected areas in the digital image by a factor of approximately two times. Click the tool button with the mouse and roll the cursor over the area of the image to be magnified. A single click of the mouse magnifies this area and displays it using the entire Paint Activity Window. To return to the original size, click the Zoom button again.
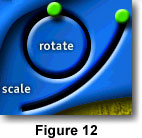
The final tools in the Paint menu are the Scale and Rotate sliders illustrated in Figure 12. These tools can be used to change the size (scale) and rotate digital images or selections in the Paint Activity Window. To scale an image, use the Scale slider, and move the green knob to adjust the image to the desired dimensions. By default, the Scale slider is positioned at the maximum scale size and moving from upper right to lower left reduces the size of the image or selection. Once an image has been scaled down to a smaller size or rotated, it becomes a selection and acquires the undulating color border. You can then select the Scissors button to view selection options and move the selection around the window with the cursor to place it into the desired position.
The Rotate slider can be used to rotate a selection or the entire image through 360 degrees. After the image has been rotated, it becomes a selection that can be moved around the screen and pasted into any position within the Paint Activity Window (be sure to select the Scissors options to do this). After rotating, scaling and relocating the image selections, a mouse click anywhere outside of the selection border will paste the scaled or rotated image onto that position of the digital image. Alternatively, clicking on the Scissors button with a universal "No" symbol in the Scissors option menu will also de-select and paste the image.
This completes Part 2 of the QX3 Paint menu. Part 1 of the Paint menu tutorial discusses the scissors and paint brush tools in addition to the copy, paste, flip, and undo buttons.
BACK TO QX3 INTERACTIVE SOFTWARE
Questions or comments? Send us an email.
© 1995-2025 by Michael W. Davidson and The Florida State University. All Rights Reserved. No images, graphics, software, scripts, or applets may be reproduced or used in any manner without permission from the copyright holders. Use of this website means you agree to all of the Legal Terms and Conditions set forth by the owners.
This website is maintained by our
Graphics & Web Programming Team
in collaboration with Optical Microscopy at the
National High Magnetic Field Laboratory.
The QX3 microscope design is copyrighted © 2025 by Mattel, Inc. Intel® Play™ is a registered trademark of the Intel Corporation. These companies reserve all of their rights and privileges under copyright law. The material contained in this website is solely the opinion of the authors and is intended for eduational use only.
Last Modification Friday, Nov 13, 2015 at 02:18 PM
Access Count Since December 24, 1999: 28778
Visit the official Intel Play website:
![]()