
Digital Image Capture and Processing
Interface Software Library Window
The MIC-D digital microscope interface software contains a Library Window that enables the operator to quickly navigate through large image groups, to compare and print images, play video sequences, delete image files, or launch the Image Processing Window with a selected image. In addition, images can be saved with different names and file formats and image files collected during previous sessions can be loaded into the software for examination and comparison purposes.
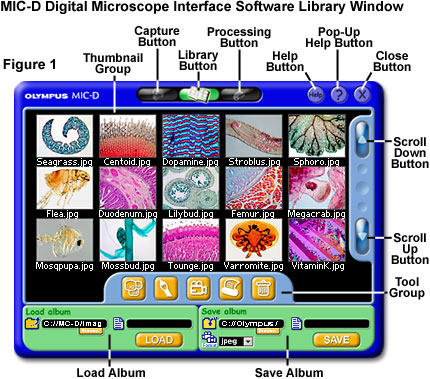
After an image capture session, the Library Window (Figure 1) can be launched directly from the Capture Window or Image Processing Window by clicking on the appropriate button nested at the top center of each window. The Library Window button contains an icon that resembles a photograph album, and is the center button in the three-button series of navigational aids (see Figure 1). As the software exits either the Capture Window or Image Processing Window, a launch splash screen is displayed while the Library Window utility initializes.
Any images loaded into the Auto Save directory (either from the default directory or a user-specified directory) from the Capture Window will appear in the Library Window in numerical order (according to the appendage), or in the sequence from which they were captured. If one of the images appearing in the Thumbnail Image panel was selected in the Capture Window, then this image will also be selected when the collection is loaded into the Library Window. However, if no images were selected in the Capture Window when the Library Window is initialized, then the last image in the collection will be the one selected.
The Library Window will display a total of 15 thumbnail images that are 120 x 90 pixels in size and arranged in 5 columns having 3 rows each. The actual image size (640 x 480 or 320 x 240) does not affect the displayed size of the thumbnail images. As images are loaded into the Library Window, they fill the first row, starting with the left-hand side position and proceeding to the right until the row is complete. If more than 15 images are loaded into the Library Window, the first loaded row is displaced into an off-screen image buffer to make room for the next images, followed by sequential rows as necessary, until the last image loaded appears at some position in the lowest row. In order to scroll through all the images in the library, two navigational buttons are provided on the right-hand side of the window (see Figure 1). Clicking on the Scroll Down button displaces the entire library of images down by a single row. Likewise, clicking on the Scroll Up relocates each row of images up by a single row. These buttons can be utilized to view all of the images loaded into the Library Window.
Single images, time-lapse sequences, and full-motion video sequences loaded into the Library Window interface can be viewed, compared, printed, deleted, loaded into the Image Processing Window, or in the case of video sequences, played back, through the Tool Group control panel (see Figure 2). This panel is located beneath the thumbnail display window panel and is the central control unit for images housed in the Library Window. The Tool Group contains five icon buttons that are utilized to perform the listed functions.
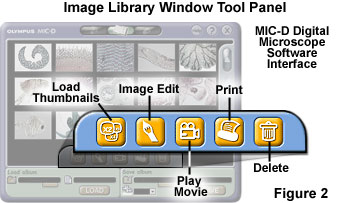
Depressing the Load Thumbnails button in the Tool Group control panel will enlarge a single selected image to a size of 460 x 345 pixels and display the image in the center of the window with the other thumbnails absent. The actual size (in pixels) of the image does not affect the display size, and images having pixel dimensions smaller than 460 x 345 are still stretched to this size. Two images can be selected simultaneously by first selecting one, and then holding the Control key while clicking on a second image. When the Load Thumbnails button is depressed with two images selected, the images will be presented in the window side-by-side at a size of 360 x 270 pixels each. This display motif is ideal for quickly comparing between two and nine single images.
If three images are simultaneously selected (using the Control or Shift keys), they can be compared at a size of 220 x 165 pixels by depressing the Load Thumbnails button. The images are arranged in an orderly format with two images placed on top and the third in the lower left-hand corner. Likewise, four images (at the same size) can be displayed with two on top and two underneath. Selecting and displaying five images with the Load Thumbnails button produces an array of 144 x 108 pixel images having three distributed on top and two underneath, but positioned to the left, in the upper portion of the Library Window. The image size of 144 x 108 pixels is retained when five to nine images are selected, with the images stacked in rows of three (or portions of rows if there are not enough images selected to completely fill a row). Selecting 10 or more images results in comparative displays where the images are the same size as the default image size (120 x 90) in the Library Window.
Selecting a time-lapse or full-motion video sequence and then depressing the Load Thumbnails button will launch a pop-up dialog box that warns the operator a video sequence is selected and cannot be compared. If a video sequence is selected within a group of single images, answering Yes to the dialog box when it queries about whether to continue will produce comparison displays of the single images while ignoring the video sequence. Double clicking on a single image thumbnail will launch a display of the image at 460 x 345 pixels. In a similar manner, double clicking on a video sequence thumbnail (denoted by a small movie camera icon in the lower right-hand corner) will produce a display of the first image in the sequence at 460 x 345 pixels, and then proceed through playback. The Load Thumbnails button can be utilized to return to the thumbnail view after displaying either a single image or movie by double clicking.
The Image Edit button (containing a paintbrush) will launch the Image Processing Window with a single selected image from the Library Window loaded into the Processing Image Screen. If two or more images are selected in the Library Window, the image closest to the beginning of the library (sorted either by load sequence or alphabetically) will be loaded into the Processing Image Screen. When time-lapse or full-motion video sequences (MPEG or AVI files) are selected in the Library Window, the Image Edit button is deactivated (these file types cannot be edited in the Image Processing Window software).
If a time-lapse or full-motion video sequence is selected and the Play Movie button is depressed, the sequence is displayed at 460 x 345 pixels and the frames are played back at a speed of 30 frames per second. Rolling the mouse cursor over this button will cause the icon to change from a movie camera to a Play Forward symbol superimposed over a smaller camera. While the sequence is being played, the Play Movie button icon changes from a movie camera into a Pause icon. At any time during playback, clicking on the Pause button will stop playback at the frame rendered when the button was clicked. Another click on the Pause button restarts playback from the point at which it stopped. After viewing the video sequence, clicking on the Load Thumbnails button will return the Library Window to the thumbnail display window.
Images can be printed by utilizing the Print button in the Tool Group control panel, which is the only portion of the MIC-D software having printing capabilities for multiple images (single images can be printed from the Image Processing Window). After selecting an image, depress the Print button (containing a printer icon) to launch the Windows Print dialog box, which queries the operator with choices about printer configuration (properties) and the number of copies to print. The printer installed by default is employed to print the image by the software, unless an alternative printer is selected by the operator. Images are stretched to the edges of the paper when printed, and only a single image is printed on each page.
In order to print multiple single images in a consecutive sequence, begin by clicking on the thumbnail of the first image in the sequence then, while holding the Shift key, click on the thumbnail of the last image in the sequence. All images between the first and last will be selected by this action. To print multiple single images that are not consecutive, click the thumbnail of the first image then, while holding the Control key, click the thumbnails of other images individually. Only the selected images will be printed. The Print button is deactivated when the Library Window is displaying a selected thumbnail or group of thumbnails at larger sizes using the Load Thumbnails button. Time-lapse and full-motion video sequences cannot be printed.
Selected single images and video sequences can be deleted from the Library Window and host computer hard drive by depressing the Delete button (identified by a trash can icon). When this button is activated by clicking with the mouse, a dialog box appears to query the operator whether the image(s) should be deleted from the library. If the operator clicks on the Yes button when confronted by the dialog box, the selected image(s) are deleted from both the Library Window the host computer's hard drive. Answering No to the dialog box will return the software to the Library Window without removing the selection boxes. More than one image can be deleted simultaneously by selecting a group of consecutive or non-consecutive images with the Shift or Control keys, respectively.
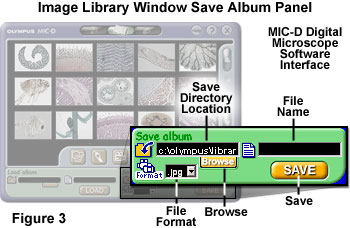
Single images, time-lapse sequences, or full-motion video sequences can be saved in a different file format or under a new name with the Save Album control panel. After selecting an image or video sequence, type the Windows directory pathway to the target directory into the Save Directory text input box, or use the Browse button to navigate to the directory through the Windows tree listing. Next, type the new file name into the File Name box, and select a format from the File Format pull-down menu. When all of the parameters have been correctly entered into the Save Album text input boxes and pull-down menu, click on the Save button to write the image to the host computer hard drive.
Regardless of their current file format, single images can be saved in JPEG, TIFF, or BMP format using the Save Album control panel. Image sequences (time-lapse and full-motion video) can also be saved either as AVI or MPEG files using this panel, provided they were imported in the respective formats. Video sequences that were imported in MPEG format cannot be saved in AVI format, and vice versa. In addition, single images cannot be saved in video formats (AVI and MPEG), and video sequences cannot be saved in single image formats (TIFF, JPEG, and BMP) with the Save Album feature.
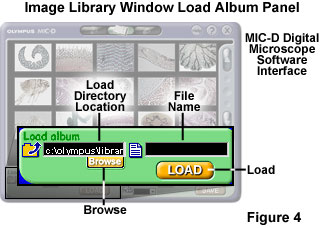
Images and video sequences having appropriate file formats (JPEG, TIFF, BMP, AVI, and MPEG) can be loaded into the Library Window from the host computer hard drive or a network drive using the Load Album control panel. The first step is to select an appropriate directory containing image or video sequence files by either manually typing the directory pathway into the Load Directory text input box, or using the Browse button to navigate to the directory through the Windows directory tree listing. After the directory has been selected, click the Load button to load all eligible image and video sequence files from the directory into the Library Window. Individual files can be specified and loaded exclusively by typing the file name in the File Name text input box prior to activating the Load button. Files from more than one directory can be sequentially loaded into the Library Window. In this case, the loaded images are not arranged alphabetically in the Library Window, but are grouped sequentially according to the order in which they were loaded from the target directory or directories. However, each group of images within a single directory is first ordered alphabetically, then sequentially by numerical appendages in the Library Window.
The help and program termination tool group, common to all three program windows (see Figure 1), can be utilized to obtain help or exit the software. Positioned in the upper right-hand corner of the Library Window are three round buttons containing either the word Help, a question mark, and an X symbol. Clicking on the Help button launches the Windows program help files associated with the MIC-D digital microscope hardware and software (the Help button will turn yellow when the mouse cursor rolls over). This program contains a directory tree with information about all aspects of the microscope, including a section dedicated to the Library Window, and should be used for obtaining information about the basic operating procedures and troubleshooting.
The question mark button, which turns green when the mouse cursor rolls over, launches Pop-Up help screens that enable the operator to determine the function of various software features. Clicking on the button changes the cursor into a question mark and arrow pointer, which can then be placed over a button, text box, window, or other area of interest to determine the function. Clicking on the area of interest while the software is in Pop-Up help mode will display a small text dialog box that explains the function of the particular software component.
Clicking on the Close Application button (see Figure 1) will terminate the software interface program instance. When the mouse cursor rolls over this button, it turns red to alert the operator that program termination will commence upon clicking. If images have been captured in the default folder (in the program directory on the system drive) during the software session, the program queries the operator with a message warning that these files will be deleted during the next software session and asks whether the software should be closed. If the operator clicks on the No button in response to this query, the software does not exit. However, if the operator clicks on the Yes button, then the software will terminate without removing the image files from the default directory. During the next software launch instance, a dialog box appears to determine whether the operator wants to delete the files remaining in the default storage directory.
Contributing Authors
Thomas J. Fellers and Michael W. Davidson - National High Magnetic Field Laboratory, 1800 East Paul Dirac Dr., The Florida State University, Tallahassee, Florida, 32310.
BACK TO DIGITAL IMAGE CAPTURE AND PROCESSING
BACK TO THE OLYMPUS MIC-D DIGITAL MICROSCOPE
Questions or comments? Send us an email.
© 1995-2025 by Michael W. Davidson and The Florida State University. All Rights Reserved. No images, graphics, software, scripts, or applets may be reproduced or used in any manner without permission from the copyright holders. Use of this website means you agree to all of the Legal Terms and Conditions set forth by the owners.
This website is maintained by our
Graphics & Web Programming Team
in collaboration with Optical Microscopy at the
National High Magnetic Field Laboratory.
Last Modification Friday, Nov 13, 2015 at 02:19 PM
Access Count Since September 17, 2002: 14935
Visit the website of our partner in introductory microscopy education:
|
|