Optical Aberrations
Interactive Tutorials
Chromatic Aberration
Chromatic aberrations are wavelength-dependent artifacts that occur because the refractive index of every optical glass formulation varies with wavelength. When white light passes through a simple or complex lens system, the component wavelengths are refracted according to their frequency. In most glasses, the refractive index is greater for shorter (blue) wavelengths and changes at a more rapid rate as the wavelength is decreased.
Blue light is refracted to the greatest extent followed by green and red light, a phenomenon commonly referred to as dispersion. The inability of a lens to bring all of the colors into a common focus results in a slightly different image size and focal point for each predominant wavelength group. This leads to colored fringes surrounding the image. When the focus is set for the middle of the wavelength band, the image has a green cast with a halo of purple (composed of a mixture of red and blue) surrounding it.
The tutorial initializes with an image of the specimen (as seen through the microscope) appearing in a window on the left-hand side of the applet. Beneath the image window is a pull-down menu labeled Choose A Specimen, which can be used to select a new specimen. The Image Position slider is utilized to control the tutorial by shifting the focal plane along the optical axis of the virtual lens system illustrated as a ray trace pattern on the right-hand side of the applet. The initial position of the slider is the center of the focus range. When the slider is moved to the left, the focal plane is shifted to longer (red) wavelengths and the microscope image and point spread functions simultaneously change to illustrate the effect of chromatic aberration. Moving the slider to the right shifts the focal plane to shorter (blue) wavelengths and produces corresponding changes in the microscope image and point spread functions. A set of radio buttons positioned beneath the ray trace pattern allows the visitor to toggle between an uncorrected virtual optical path and one that has been corrected to simulate achromatic, fluorite, or apochromatic optical elements. Note that clicking on and activating a radio button other than the one labeled Uncorrected will deactivate the Image Position slider.

Chromatic aberration is very common with single thin lenses produced using the classical lens-maker's formula that relates the specimen and image distances for paraxial rays. For a single thin lens fabricated with a material having refractive index n and radii of curvature r(1) and r(2), we can write the following equation:
where s and s' are defined as the object and image distance, respectively. In the case of a spherical lens, the focal length (f) is defined as the image distance for parallel incoming rays:
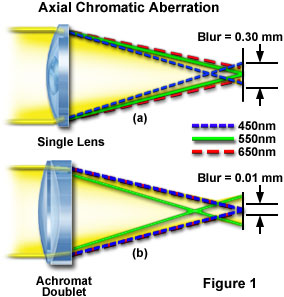
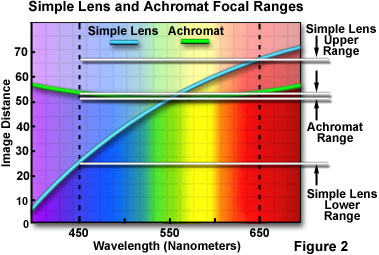
The focal length f varies with the wavelength of light as illustrated in the tutorial window and Figure 1(a), which demonstrates the effects of chromatic aberration on a beam of white light passing through a simple lens. The component colors (wavelengths) are focused at varying distances from the lens (Figure 2) to produce an image having an arbitrary blur radius approximately 0.3 millimeters in diameter. It is relatively simple to demonstrate chromatic aberration using a thick, simple converging (bi-convex, positive meniscus, or plano-convex) lens illuminated with a polychromatic point source, such as a flashlight or candle. When observing an image produced by the simple lens, the periphery of the image will appear blurred and tinted with an orange-red halo when the lens is close to the eye. At greater distances, the halo will become blue-violet.
Lens corrections were first attempted in the latter part of the eighteenth century when John Dollond, Joseph Lister and Giovanni Amici devised ways to reduce longitudinal chromatic aberration. These pioneers introduced achromatic lenses to microscopy, dramatically reducing axial (longitudinal) chromatic aberration, and made bacteria visible for the first time in the optical microscope. By combining crown glass and flint glass (each type has a different dispersion of refractive index), they succeeded in bringing the blue rays and the red rays to a common focus, near but not identical with the green rays. The dispersion of flint glass is about twice that of crown, so by pairing a positive crown element with a negative flint element, the combined dispersions will be approximately equal and opposite, thus eliminating axial color spread (Figure 2). Note that the magnifying power of the crown glass is twice that of the flint in this combination, yielding a net power about half that of the crown element alone. Another advantage to this lens marriage is the correction for spherical aberration, which often occurs when a positive and negative element are utilized together in a lens group.

The crown/flint combination is termed a lens doublet where each lens has a different refractive index and dispersive properties. Lens doublets are also known as achromatic lenses or achromats for short, derived from the Greek terms a meaning without and chroma meaning color. This simple form of correction allows the image points at 486 nanometers in the blue region and 656 nanometers in the red region to now coincide (Figure 1(b)). Defocus between the central wavelength (550 nanometers) and the common focus (blue and red) is residual aberration that is termed secondary axial color. Even though blur is reduced by a factor of 30 with bichromatic correction using flint and crown glasses (Figure 1(b)), the aberration cannot be completely eliminated with common glass formulations, which limits the image quality of achromatic objectives. Achromats are the most widely used objective lenses and are commonly found on both teaching and research-level laboratory microscopes. Objectives that do not carry a special inscription stating otherwise are likely to be achromats. Achromats are satisfactory objectives for routine laboratory use, but because they are not corrected for all colors, a colorless specimen detail is likely to show, in white light, a pale green color at best focus (secondary axial color).
A proper combination of lens thickness, curvature, refractive index, and dispersion allows the doublet to reduce chromatic aberration by bringing two of the wavelength groups into a common focal plane (Figure 2). If fluorspar is introduced into the glass formulation used to fabricate a lens, then the three colors red, green, and blue can be brought into a single focal point resulting in a negligible amount of chromatic aberration. Such lens elements are known as apochromatic lenses and they are used to build very high-quality chromatic aberration-free microscope objectives.
Modern microscopes utilize this concept, and today it is common to find optical lens triplets made with three lens elements cemented together, especially in higher-quality objectives. For chromatic aberration correction, a typical 10x achromat microscope objective is built with two lens doublets. Many fluorite objectives, which are intermediate in correction between achromats and apochromats, are built using fluorspar (or a similar formulation) combined with an appropriate glass element to form a doublet that is achromatized at three wavelengths. Apochromat objectives usually contain two lens doublets and a lens triplet for advanced correction of both chromatic (up to four wavelengths) and spherical aberrations.

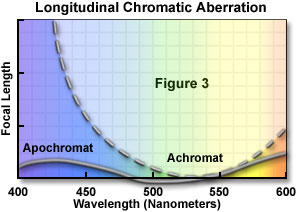
A comparison of the longitudinal chromatic correction of an achromat with that of an apochromat objective is presented in Figure 3. Glasses of normal dispersion, which have an almost linear decrease in refractive index with increasing wavelength, are used to produce achromat objectives. Only two wavelengths can have the same focus (see Figure 3), and the remaining secondary spectrum produces greenish or purple fringes on images of sharp edges. The higher quality apochromat objectives use glasses having a partial dispersion where the refractive index changes with wavelength more rapidly in either the blue or red region. As a result, apochromats have a high degree of chromatic correction in which up to four wavelengths can have the same image location.
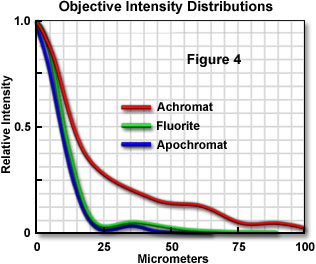
With apochromat and fluorite objectives, the diffraction-induced spreading of the intensity distribution can also be virtually eliminated, as illustrated in Figure 4. An achromat still has substantial intensity in the first fringe, while the apochromat approaches the theoretical resolution limit where the longitudinal chromatic aberration is greater than the wave-optical depth of field.
Because apochromatic objectives require elements of abnormal dispersion, their characteristics may not be ideal for some specific applications, such as fluorescence excitation in the near ultraviolet, differential interference contrast, and other forms of microscopy utilizing polarized light. For this reason, a fluorite objective is often more suitable, and Figure 4 illustrates how close these objectives are to the performance of apochromats.
In addition to longitudinal (or axial) chromatic aberration correction, microscope objectives also exhibit another chromatic defect. Even when all three main colors are brought to identical focal planes axially (as in fluorite and apochromat objectives), the point images of details near the periphery of the field of view are not the same size. This occurs because off-axis ray fluxes are dispersed, causing the component wavelengths to form images at different heights on the image plane. For example, the blue image of a detail is slightly larger than the green image or the red image in white light, resulting in color ringing of specimen details at the outer regions of the field of view. Thus, the dependence of axial focal length on wavelength produces a dependence of the transverse magnification on wavelength as well. This defect is known as lateral chromatic aberration or chromatic difference of magnification. When illuminated with white light, a lens with lateral chromatic aberration will produce a series of overlapping images varying in both size and color. In a non-corrected system, the blue component at 436 nanometers may be imaged 1.4 percent larger than the red component at 630 nanometers. Lateral chromatic aberration is greater for objectives of short focal length and can range from 1.1 to 1.9 percent of the radial distance from the optic axis.

In microscopes having a finite tube length, it is the compensating eyepiece, with chromatic difference of magnification just the opposite of that of the objective, which is utilized to correct for lateral chromatic aberration. Because this defect is also found in higher magnification achromats, compensating eyepieces are frequently used for such objectives, too. Indeed, many manufacturers design their achromats with a standard lateral chromatic error and use compensating eyepieces for all their objectives. Such eyepieces often carry the inscription K or C or Compens. As a result, compensating eyepieces have build-in lateral chromatic error and are not, in themselves, perfectly corrected. In 1976, Nikon introduced CF optics, which correct for lateral chromatic aberration without assistance from the eyepiece. Newer infinity-corrected microscopes either correct chromatic aberration fully in the objective or take advantage of the system objective plus tube lens to render a fully corrected intermediate image.
Finally, it is interesting to note that the human eye has a substantial amount of chromatic aberration. Fortunately, we are able to compensate for this artifact when the brain processes images, but it is possible to demonstrate the aberration using a small purple dot on a piece of paper. When held close to the eye, the purple dot will appear blue at the center surrounded by a red halo. As the paper is moved farther away, the dot will appear red surrounded by a blue halo.
Contributing Authors
H. Ernst Keller - Carl Zeiss Inc., One Zeiss Dr., Thornwood, NY, 10594.
Kenneth R. Spring - Scientific Consultant, Lusby, Maryland, 20657.
John C. Long and Michael W. Davidson - National High Magnetic Field Laboratory, 1800 East Paul Dirac Dr., The Florida State University, Tallahassee, Florida, 32310.
BACK TO LENSES AND GEOMETRICAL OPTICS
