Olympus DP-10 Digital Camera
In 1998, the Olympus corporation introduced one of the most innovative electronic cameras ever designed for digital photomicrography. The DP-10, illustrated in Figure 1, is designed to fit onto a standard C-mount adapter that is a common accessory for most modern microscopes (Figure 2) equipped with a trinocular head for photomicrography. Controlling the camera is a "hand switch", which is actually an electronic interface to the camera connected through a serial-type computer cable.
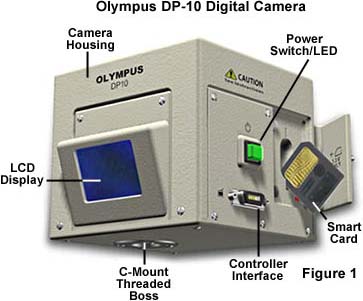
Olympus provides serial connectors that allow the DP-10 to be interfaced to both Macintosh and PC computers, and the camera can also be connected directly to an Olympus P-300 digital printer that yields superb photomicrographs in dye-sublimation photorealistic quality.
This remarkable camera has a unique 1.8-inch color liquid crystal (LCD) monitor that displays a real-time preview of the viewfield under consideration with 61,000 display pixels. The LCD monitor allows the microscopist to achieve accurate, sharp focusing as well as perfect framing for every shot. This is a marked deviation from typical digital cameras that require a bulky and space-filling television or digital monitor, which is necessary for the microscopist to view the sample and frame photomicrographs.
A 2/3-inch primary color progressive scan charge-coupled device (CCD) with 1.41 million pixels and on-chip RGB primary color filters provides crystal-clear true 24-bit color reproduction and sharp resolution equivalent to 1280 x 1024-pixel quality in optical photomicrography. The chip camera system features a Through-The-Lens (TTL) central measuring/spot measuring metering mode that allows exposure control through a programmable auto exposure setting with a white balance control. Exposure times can range from a quarter second to 1/10,000 second with the sensitivity of an ISO 200 film equivalent. Digital images are recorded and compressed using JPEG (Joint Photographic Experts Group) format at a resolution of 72 or 144 dpi.
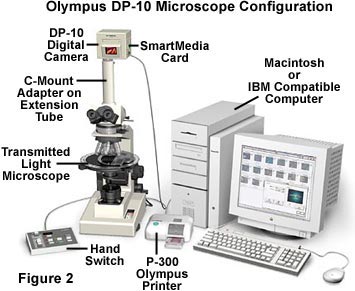
Digital images can also be recorded directly onto the hard drive of a PC or Macintosh computer connected to the DP-10 through a RS-232 serial port. Any TWAIN-compliant imaging program is capable of controlling the DP-10 using proprietary Direct PC connection-TWAIN software that resides on a CD-ROM disk accompanying the digital camera.
The following procedures outline use of the Olympus DP-10 with an optical microscope.
First, perform all necessary optical adjustments on the microscope, including configuration for Köhler illumination and any specialized contrast enhancing optical techniques.
Place a specimen on the microscope stage, choose an objective, and adjust the focus in the viewfield.
Ensure that the digital camera LCD is parfocal with the microscope's eyepieces. This may require adjustment of the C-mount adapter on trinocular microscopes. In many cases, it is difficult to focus the specimen using only the DP-10 LCD monitor, particularly at lower magnifications. In this case, mount a focusing telescope on the LCD monitor and adjust the parfocality, which will allow using the eyepieces to focus the specimen prior to capturing digital images.
Insert a smart card into the DP-10 SmartMedia insertion slot or make a connection to a computer using the PC or Macintosh connection cable(s). If a computer is used to capture the images, load the image capture software using the accompanying CD-ROM prior to initiating photomicrography.
Depress the green plastic switch on the right-hand side of the camera body to activate the electronics. When the camera is on, a green light inside the switch will glow, indicating the camera is ready to record images.
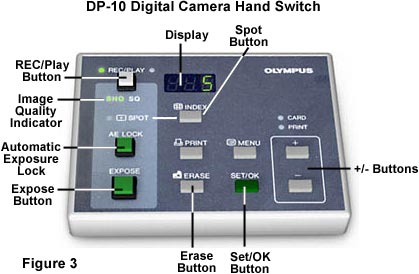
Check the control electronics hand switch to ensure the camera is in record (REC) mode and make certain the microscope light path is set to send images to the digital camera CCD. There is usually a slider labeled TV on the microscope head that performs the latter function.
Adjust the microscope brightness by setting the voltage indicator to the optimum range and place any necessary filters (polarizers, color temperature balance, color compensation, etc.) into the light path.
If brightness is too high, reduce it using neutral density filters (preferred) or by reducing the lamp voltage. When the brightness is too low, increase the lamp voltage. Note that adjustment of the brightness control may alter the color temperature of the illumination light.
Depress the Menu button on the control electronics (termed Hand Switch by Olympus; See Figure 3) and a blue menu screen will appear on the camera LCD panel with the following choices:
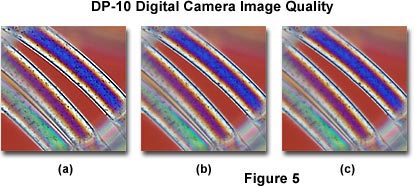
SHQ, HQ, SQ - Abbreviations for super high quality (SHQ), high quality (HQ), and standard quality (SQ). An eight megabyte SmartMedia card (Figure 4) will record eight or nine digital images using SHQ mode, 24-30 images using HQ mode, and 98-120 images using SQ mode. A 32 megabyte memory card, which will allow up to four time the image capture capability, is available as an upgrade. The control electronics panel has indicator LEDs to indicate which mode is being used by the DP-10. Digital images are compressed into JPEG format by the camera system and display at the following resolutions: SHQ, 1280 x 1024 at 144 dpi; HQ, 1280 x 1024 at 144 dpi (with a higher level of JPEG compression); and SQ, 640 x 520 at 144 dpi (with the highest level of JPEG compression). Samples of digital images produced by the DP-10 are illustrated in Figure 5. The specimen in this figure is birefringent nylon fibers imaged under polarized light with a first order retardation plate inserted between the analyzer and the digital camera. At the highest resolution and image quality (SHQ, Figure 5(a)), nylon fibers display vivid detail with respect to microstructures in the individual fibers. Images taken in High Quality (HQ) mode (Figure 5(b)), which have the same resolution as SHQ images with a higher degree of JPEG compression, are almost indistinguishable from those in SHQ mode, but this will vary depending upon individual details of the image. At the lowest image quality (SQ, Figure 5(c)), images are starting to degrade and specimen detail is not as crisp. Images captured in this mode have the lowest resolution and highest JPEG compression.
AE +/- - Autoexposure compensation, used to adjust the automatic exposure settings of the camera. Compensating the auto exposure in the (-) direction should be effective for reducing exposure when using very light specimens in brightfield illumination. Dark specimens with polarized light, darkfield illumination, or other specimens using contrast enhancing techniques (Hoffman modulation contrast, phase contrast, DIC, etc.) should be exposed using the (+) direction to increase exposure times. Each step (either (+) or (-)) increases or decreases the exposure by a single f-stop. The autoexposure control is reset to the default (no compensation adjustment) when the main camera switch is turned off.
Erase All - Use this selection to erase all digital images from the SmartMedia card. When this option is executed, "Erasing" appears on the blue LCD screen while images are being erased from the card. No other operations are possible during the erase procedure, and the amount of time required for this operation is dependent upon the amount of information stored on the card. If no digital images are stored on the card, "Erased" appears at the bottom of the LCD menu screen. When the card is write-protected (with a protective adhesive seal attached), the letter -P- blinks in the error code display of the hand switch and the Erase All condition is not accepted.
Format Card - This option can be used to format the SmartMedia card after it has been inserted into the slot on the side of the DP-10 digital camera housing. When the SET/OK button is depressed and this selection is highlighted, the term "Formatting" appears on the menu screen while the card is being formatted. When completed, the Menu mode is exited automatically, and the camera is ready to capture digital images. Formatting a card erases any existing data stored on the card, and no other operations are possible during card formatting. When the write protect adhesive seal has been applied to the card, formatting is not possible and the letter -P- blinks in the error code display of the hand switch. Under these circumstances, the Format Card condition is not accepted.
Next - Select this option to navigate to page two of the Menu screen.
Date - Use this option to set the date in terms of year, month, day, hour, minute, and to choose a date display format. The (+) and (-) buttons on the hand switch can be used to toggle to the desired item, and it can be selected with the SET/OK button. At this point, the value for the desired item will start blinking and it can be reset using the (+) and (-) buttons. After setting, the value stops blinking. In the minute setting, counting of seconds starts from 00 at the moment the SET/OK button is depressed. The date Format can appear according to the following schemes: JP (Japanese), Year-Month-Day; US (United States), Month-Day-Year; and EU (Europe), Day-Month-Year. In addition, the time can be set to display along with the date and this data can be recorded on the digital image using the Print selection.
End - Use this selection to exit the Menu and return to the microscope viewfield.
Adjust focus using the DP-10 LCD monitor until the image appears sharp and crisp. If the microscope has been configured for parfocality between the eyepieces and the DP-10, use the eyepieces or focusing telescope to focus the image.
Adjust the image quality (resolution) selection for digital image capture using the appropriate selection (SHQ, HQ, SQ) on the hand switch. At this time, choose whether to use the spot meter, the automatic exposure lock, or adjust the over/under exposure settings in the Menu.
Press the Expose button on the hand switch to record a digital image. If the terms Over or Under are displayed on the LCD monitor superimposed over the image, use the appropriate Menu controls to adjust camera exposure.
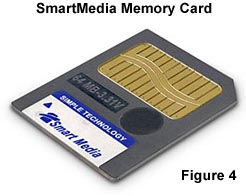
Images recorded on a SmartMedia card can be reviewed by placing the card into the DP-10 and depressing the REC/Play button until the Play indictor LED is activated. At this point, the last image recorded on the card will be displayed on the LCD monitor. Use the +/- buttons to toggle the screen display to other images stored on the card. Individual images can also be erased using this display mode. To erase an image, first use the +/- buttons to find and display that image. Next, depress the Erase button and two options are displayed on the screen: Go will erase the image when the SET/OK button is depressed, and Cancel will cancel erasure when (oddly enough) the Erase button is depressed. If the SET/OK button is depressed, the term "Erasing" appears on the screen, the image is erased, and the previous image is displayed on the screen. It is important not to open the card cover during erasure. Doing so may destroy data stored on the card.
In the Play mode, up to nine images can be displayed simultaneously on the LCD monitor. This is accomplished by depressing the Index button while the camera is in Play mode. When displaying indexed images, the currently selected image is assigned to position number five (5), or the center image if there are less than nine stored images, and is displayed with a small numeral indicating the position in the lower right-hand portion of the image. Other images stored on the card are also displayed in a similar manner. The four preceding images are displayed and numbered 1-4 in the corner and the subsequent four images are also displayed and numbered 6-9 (provided there are nine images stored on the card). The currently selected image has a red image number and the others are displayed with black numbers. Use the +/- buttons to toggle between images and select an image for display on the LCD monitor. Once the chosen image has been selected (has a red image number), depress the Index button to display the image full-size on the LCD monitor. Pressing the Print or Erase button in the Index mode allows printing or erasure of the selected image.
When the optional Olympus P-300 printer is connected directly to the camera box, the hand switch can be used to direct images to the printer. Under these circumstances, all printing operations are controlled from the camera box, and the buttons, print count setting dial and other controls on the printer are defeated completely. If the printer is connected to a computer, the print operation must be controlled by that host computer.
If printing errors occur, they are displayed on the camera LCD monitor. The Printer Offline error message is displayed in red characters when no printer is connected and the print button is depressed, or when the printer's main power switch is turned off. A Printer Error (also in red characters) is displayed when the printer paper jams or the transfer roll is exhausted. When an error occurs during a print cycle, printing stops immediately. After the error has been corrected, depress the SET/OK button to resume printing. Depressing the Print button on the hand switch evokes a print menu with the following selections:
Single Print - Selecting the Single Print option in the print menu launches the Single Print submenu on the LCD monitor. Three choices appear in this menu: Go will print the currently displayed image when the SET/OK button is depressed; +/- allows the user to toggle between image choices stored on a SmartMedia card; and Cancel returns to the Print menu. An image selected with the + or - button can be printed by pressing the SET/OK button.
Index Print - When this option is selected, the Index Print menu screen appears on the LCD monitor. The menu has two options: Go allows printing of up to 30 thumbnail-sized frames/sheet when the SET/OK button is depressed, and Cancel returns to the print menu. If a SmartMedia card contains more than 30 images, the remainder are spread onto a second or third page, if necessary.
Multiple Print - Selecting this option opens the Multiple Print menu on the LCD monitor with two options: Go allows printing of up to 16 frames per sheet. This makes it possible to print images on a sticker sheet that has been pre-cut into 16 sections. The +/- buttons enable the user to toggle to the next image (+) or display the previous image (-). The last option is Cancel, which will return the Print menu.
Mirror Print - This feature will print a mirror image of the currently displayed image. Selecting Mirror Print launches a menu on the LCD monitor that contains three options: Go prints the mirrored image when the SET/OK button is depressed; +/- toggles between the next image (+) and the previous image (-), and; Cancel returns to the Print menu.
Print All - Choosing this option takes the user to a menu screen that allows printing of all images stored on a SmartMedia card. The menu has a Go selection that starts printing and a Cancel selection that returns to the print menu.
Select Image - This menu allows selection of multiple images for simultaneous printing with a simple menu: YES/NO selects or rejects the currently displayed image. The print mark appears on the top left of the current image, and with each press of the SET/OK button, the user can select double print, triple print, or cancellation. Use the +/- buttons to toggle to previous and next images. When using this feature, up to 16 images can be selected for printing.
Select Print - This choice is used to print images selected in the Select Image menu. From the menu, press Go to print the selected images and specified number of prints, or Cancel to return to the Print menu.
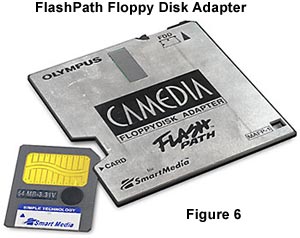
An optional Flash Path floppy disk adapter (Figure 6) is available for transfer of data from the SmartMedia card into a computer. The adapter contains a slot into which the card is inserted to allow file transfer through the floppy disk drive present on almost all personal computers. A CD-ROM disk containing driver software for the Flash Path adapter accompanies the DP-10 digital camera hardware. When loaded and running properly, double-clicking on the floppy drive icon opens a directory containing a single subdirectory named Imolym, which contains the stored images in JPEG format. These images can be copied to the host computer's hard drive and viewed in any image editor or a Web browser.
Connection cables are also included with the DP-10 camera system to interface the camera to an IBM-compatible or Macintosh computer. After loading the accompanying software, images can be recorded directly onto the host computer or another computer residing on the local area network. For more information, consult the instruction manual for the DP-10 microscope digital camera system.
The area of the microscope viewfield that is imaged by the DP-10 LCD monitor and captured by the camera is dependent upon the C-mount adapter and projection lens configuration. If a TV-relay (1x) projection lens is used with the digital camera, a good portion of the viewfield available to the eyepieces will be imaged with the camera. Other adapters, depending upon their relative postion with respect to projection lenses and the type of lens used, will capture varying percentages of the viewfield.
Digital images produced by this camera are on display at various locations on the Molecular Expressions website. All of the images utilized in our virtual microscopes and the Silicon Zoo were captured using the Olympus DP-10 digital camera.
Contributing Authors
Mortimer Abramowitz - Olympus America, Inc., Two Corporate Center Drive., Melville, New York, 11747.
Michael W. Davidson - National High Magnetic Field Laboratory, 1800 East Paul Dirac Dr., The Florida State University, Tallahassee, Florida, 32310.
BACK TO DIGITAL IMAGING IN OPTICAL MICROSCOPY
