
QX3 Microscope Stand Disassembly
In order to perform modifications to the microscope stand, it must first be disassembled. Although this is not a complex task, some components of the microscope must be taken apart very carefully to avoid damage. The following discussion reviews our experiences with disassembly of the QX3 microscope stand (Figure 1) and what we feel is the best approach to this project.
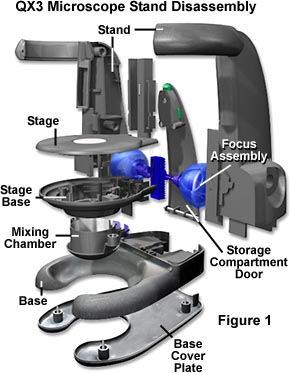
The only tools required to completely disassemble the microscope stand are a Phillips-head screwdriver and a small flat-blade screwdriver with a blade width approximately one-quarter inch and a blade thickness less than a millimeter. The following steps delineate the necessary steps to the stand disassembly. Refer to Figure 1 for an exploded view of the QX3 microscope stand during the disassembly procedure. For the purposes of this discussion, we will define the front of the microscope as the orientation where the stage and body are facing the observer. When the observer is facing the storage compartment door, he is viewing the rear of the microscope. The left-hand side of the microscope is the side containing the focus knob to the left when the observer is facing the front of the microscope. The right-hand side is opposite the left.
- First remove the four Phillips-head screws located on the base plate that covers the bottom of the microscope stand.
- Remove the base plate to expose the two remaining Phillips-head screws that secure the base assembly to the microscope stand. Note the two molded tabs at the rear of the base plate interior that hold the compartment door hinge pin in place.
- Open the rear storage compartment door and tilt it down and away from the stand until it is free of the stand. The stainless steel hinge pin at the base of the compartment door is attached to the door with four molded and drilled plastic bearing tabs. The pin is wider than the door and fits into a pair of cradles in the base. When the door latch is opened, the entire compartment door assembly can be easily removed the microscope base. Set it aside until the microscope is reassembled.
- Remove the screws holding the base to the stand and gently pull the base away from the stand.
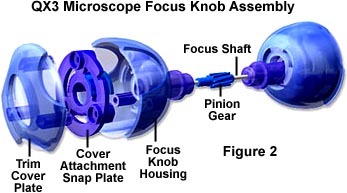
- Remove the right blue focus knob by first taking the thin flat-blade screw and gently prying off the knob trim cover. Be careful with this maneuver or you might damage the focus knob trim cover. The trim cover has a three-pronged attachment snap plate (Figure 2) that is fastened to the outer portion of the cover with three Phillips-head screws. The snap plate is more complex than necessary to hold the trim cover to the knob housing. It is also visible through the transparent focus knob outer housing and fits the overall design motif of the microscope, which centers around being able to view the complex array of internal components through a transparent plastic housing. Snap plates do not require removal from the outer trim cover.
- Use a Phillips-head screwdriver to remove the screw that secures the focus knob to its shaft bearing. Grip the knob with one hand while removing this screw to keep the focus mechanism from turning. After the retaining screw has been removed, the knob is free and can then be gently pulled from the shaft bearing.
- On the right-hand side of the microscope stand just above the focus knob that has been removed, are two holes containing Phillips-head screws that hold the two sides of the stand together. These screws are longer than the other screws removed to this point, so place them in a separate area or label them to remind yourself about their function, especially if you will not be reassembling the microscope soon.
- At this point, the stage and rack gear assembly can be removed from the stand. Hold the two halves of the stand together and use the remaining focus knob to rack the stage to the bottom of the stage guide and then gently remove the stage and gear assembly from the guide and pull it away from the stand, being careful not to damage the wires connecting the stage lamp housing to the stand.
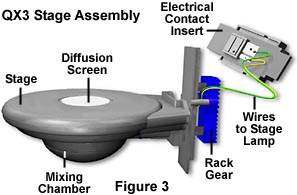
- Hold the microscope stand on its side and gently pull the two halves apart to expose the interior of the stand. When the right half of the stand is removed, an insert containing electrical contacts to the microscope body will be free and likely fall out of its bracket in the stand. The insert has a six-inch long set of yellow and green wires attached to the contacts that run to the stage lamp housing (Figure 3). Set aside the stage, wires, and contact insert (they are all attached together) until the microscope stand is re-assembled.
- Remove the trim cover from the left-hand focus knob with the thin flat-blade screwdriver. Next, grip the knob housing and unscrew the retaining Phillips-head screw to release the knob. Pull the knob from its shaft bearing and set it aside. Note that the knob bearings are coated with a thin layer of petroleum jelly for lubrication. This lubricant is also applied to the pinion-rack gear set at the factory during assembly of the microscope.
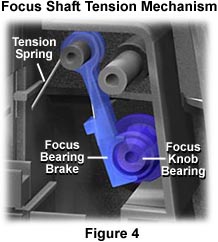
- Using your index finger, compress the bearing brake shoe against its tension spring to remove the focus shaft and bearing (refer to Figure 4). The brake needs to only be moved a couple of millimeters in order to allow the bearing retaining collar to clear the shoe. After the focus shaft (containing the knob bearings and pinion gear) is removed, you can remove the Phillips-head screw that secures the brake shoe tension spring and remove this assembly.
- If the spring has sufficient tension to press the brake shoe firmly against the focus shaft bearing, then it should not be stretched and the brake tension assembly should not be removed from the stand. However, if the tension spring feels soft, then use a pair of needle-nosed pliers to slightly stretch the spring.
- After the microscope has been in use for an extended period of time, much of the petroleum jelly lubricant may be absent or contain a substantial amount dust, dirt, fibers, and hairs, which will impede the action of the focus mechanism. While the microscope stand is apart, it is a good idea to replace the lubricant on the focus shaft bearings and rack and pinion gear set. Carefully clean the bearings and gear set with a lint-free cloth or tissue and re-apply the lubricant. Remember to also clean the bearing housings that are molded into the right and left sides of the microscope stand.
At this point, the microscope stand is completely disassembled, with the exception of the stage. To re-assemble the stand, reverse the order of the procedures listed above. Always check the brake tension assembly and focus shaft bearings to ensure they are lubricated and have full motion throughout their range. As the parts are reinstalled, check them carefully to make certain they are assembled correctly. Remember to use the two longest screws to hold the microscope stand halves together. Remember that once you have completed the disassembly procedure, your microscope warranty will be invalidated.
BACK TO INTEL PLAY QX3 MICROSCOPE ANATOMY
Questions or comments? Send us an email.
© 1995-2025 by Michael W. Davidson and The Florida State University. All Rights Reserved. No images, graphics, software, scripts, or applets may be reproduced or used in any manner without permission from the copyright holders. Use of this website means you agree to all of the Legal Terms and Conditions set forth by the owners.
This website is maintained by our
Graphics & Web Programming Team
in collaboration with Optical Microscopy at the
National High Magnetic Field Laboratory.
The QX3 microscope design is copyrighted © 2025 by Mattel, Inc. Intel® Play™ is a registered trademark of the Intel Corporation. These companies reserve all of their rights and privileges under copyright law. The material contained in this website is solely the opinion of the authors and is intended for eduational use only.
Last Modification Friday, Nov 13, 2015 at 02:18 PM
Access Count Since December 24, 1999: 39168
Visit the official Intel Play website:
![]()