
QX3 Interactive Software
Paint Menu
(Part 1)
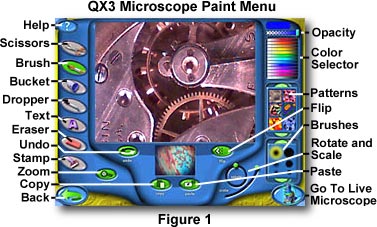
The Intel Play QX3 software Paint Menu contains a selection of tools to enhance, manipulate, and customize digital images collected with the QX3 microscope. Use the Paint menu button (illustrated with a paint brush) in the Main menu to navigate to the Paint menu. The paint tools consist of scissors, a paint brush and bucket, an eyedropper, a text tool, a stamp tool, and an eraser for mistakes.
Several of the paint tools are controlled by special palettes, which provide configuration options and other controls. Using the Paint tools, students can combine images, add text, change colors, paint patterns onto their images, stamp icons, or create totally new images from scratch. For many children, the Paint menu will serve to be their introduction to image-editing software, and the kid-friendly interface will make it easier to understand and work (or play).
| Interactive Java Tutorial | |||||||||||
|
|||||||||||
When the QX3 Main menu window initializes, it loads the last image stored in the Main Activity window back into the window if there are no new digital images recorded from Live View. After capturing one or more digital images using the Live View menu, you can click on the reverse green arrow on the lower left of the menu to navigate to the Main menu. The last image recorded will appear in the Main Activity window in the Main menu. To digitally manipulate the image, click on the Paint menu icon from the Main menu palette, and the image will appear in the Paint Activity Window when the Paint menu initializes.
There are a number of tools available in the Paint menu, and we will review these separately starting at the upper button on the column of tools located to the left of the Paint Activity window in Figure 1.

The Scissors button (Figure 2) allows selection of a field in the Paint Activity window for separate editing from the rest of the image, or for copying to the Windows clipboard. When a portion of the image is selected, the Paint brush and bucket, Eraser, and Stamp tools operate only in the selected portion of the image. To use the Scissors tool, click on the button and the cursor will turn into a pair of scissors when it rolls over the Paint Activity window. After selecting the Scissors tool, go to the menu on the right side of the Paint Activity window and select either the free-form Lasso (Figure 3, middle button) or the Rectangle (Figure 3, top button) Scissor type. Depress and hold the mouse button to mark a circle, oval, or complex shape to be selected by the tool. You can also select a rectangular area if you have chosen the Rectangle Scissors feature. When the mouse button is released, the program will complete the selection area by drawing a straight line from the point where the cursor is positioned to the beginning of the selection area. If you are trying to draw a pattern or circle, make sure to close the loop to complete your selection area.
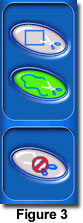
The Scissors tool is accompanied by a control panel that is illustrated in Figure 3. When one of the Scissors options is selected from the control panel, the button background color changes from white to green to alert the user that this option has been selected. The free-form Lasso Scissors option in Figure 3 is selected and has a green background. Use this option when tracing circles, ovals, or freehand patterns with the Scissors tool. The top button, containing a pair of scissors and a rectangle, is used to select square and rectangluar areas. When this option is turned on, the cursor automatically draws lines at 90-degree angles to form a box from the starting point to the finishing point of the selection. The bottom button in Figure 3 contains a pair of scissors with the universal "No" symbol. Use this button the undo a selection made with the Scissors tool. A selection can be deleted by depressing the Delete key on the computer keyboard. The deleted area is replaced by a white fill.
As the selection is being made, the program draws a line following the cursor to indicate the border selected by the Scissors tool. This line undulates in a rainbow-like spectrum of colors to highlight it from the rest of the image. After a selection has been made, the border remains a line of changing colors, and the cursor turns into a hand when the mouse is rolled within the selected area. At this point, holding and depressing the left mouse button allows you to move the selection around the window, even past the boundaries of the window. The area formerly occupied by the selection becomes white after the selection is moved. Clicking outside of a selection or on the scissors button with a universal No symbol will cancel the selection and flatten the image.
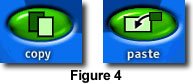
After a selection has been made with the Scissors tool, it becomes the only area that can be edited with the other painting tools such as the brush, bucket, text tool, eraser, and stamp. The selected area can also be copied to the Windows clipboard and pasted back into the image or into other images. To copy a selection to the clipboard, use the Scissors tool to make a selection, then click on the green Copy button (Figure 4, left) to copy the selection. To paste the selection back into the image (or another digital image in the Paint Activity window), click the Paste button (Figure 4, right) and the selection will appear in the center of the image with a colorful border surrounding the selection. When the mouse cursor moves over a pasted selection, it turns into the hand symbol and, by holding down the left mouse button, the selection can be moved around the image before flattening.
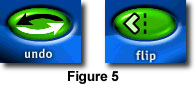
The Undo button, located below and to the left of the Paint Activity window (Figures 1 and 5, left), will undo the last action performed by the paint program, including the deletion of a selection border. In situations where it becomes necessary to undo several changes, use the erase to original option of the Eraser tool, discussed in part 2 of the Paint menu. Once the Paint menu has been exited back to the Main menu, images in the Paint Activity window are automatically saved and added to the collection. Returning to the Paint menu will not allow you to Undo the last action made before exiting, but the original image is also in the collection, so it can be modified again.
The Flip button (Figures 1 and 5, right) will flip a selection or the entire image (if no selection is made) 180 degrees, with priority being given to a selection. This is an excellent method for producing mirror images during digital editing.

The Paint Brush tool (illustrated in Figure 6) is used to paint single colors or patterns onto a digital image in the Paint Activity window. This tool has the widest range of options, which are displayed and configured in three palettes (Figures 7 to 9) located directly to the right of the Paint Activity window (Figure 1). When the Paint Brush tool is first selected, it defaults to the largest anti-aliased brush size (Figure 9) with the color blue at full opacity in the color selection palette (Figure 7). These settings can be easily changed to suit the user. Also, when a color has been selected for the Paint Brush tool, the cursor turns into a miniature paint brush when rolled over the Paint Activity window.
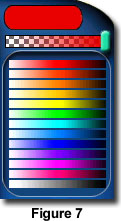
The color palette used for choosing a brush color, hue, and transparency is illustrated in Figure 7. The upper portion of the figure contains an oval-shaped bar with a slider located underneath. When a color is selected from the color palette, it is loaded into the oval bar at the transparency level determined by the slider. Moving the slider to the left increases the transparency level of the color, while moving it to the right decreases the transparency level (increasing the opacity). Below the slider is a palette of 12 colors and an additional grayscale selection. The individual color hues show increasing saturation from the left to the right of each individual color bar within the palette. When selecting a color, blue for example, use the mouse cursor to select the exact shade of blue by selectively clicking on that shade in the blue color bar. For instance, clicking on the far left side of the bar produces a brush with a very light blue color. Clicking in the middle section of the bar produces a brush with a rich and saturated blue color, while clicking on the right portion of the bar produces deep blue colors approaching black. As the mouse cursor is moved over the color palette bars, it changes into an eyedropper icon with the tip of the dropper being the active site of the cursor.
Once a color has been selected, the transparency can be adjusted using the slider above the color palette. Depressing and holding the mouse button starts a screen paint using the color and transparency selected in the color palette at a brush size and shape determined by the Brush Palette.
The paint Brush Size and Shape palette, which is located to the bottom right of the Paint Activity window, is illustrated in Figure 8. The default brush size and shape is the largest circular anti-aliased brush that is approximately 35 pixels wide (highlighted in Figure 8 with a yellow grow around the periphery of the brush).
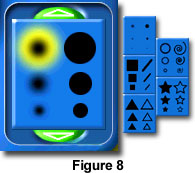
There are 6 smaller circular or round brushes that have diameters of 25, 20, 10, 5, and 2 pixels. Brushes can be chosen that produce anti-aliased borders (brushes on the left in Figure 8) or sharp borders that are not anti-aliased and produce somewhat jagged edges. The program also has five additional brush shapes to choose from, including a square shape that produces either a flat brush face or one angled at 45 degrees. Other brush shapes include open and closed triangles and stars, and an open circular and spiral shape. All brush shapes (with the exception of circular) have choices for one of three sizes. The three largest diameter circular brush shapes appear by default in the brush palette, but other brush shapes and sizes can be loaded by clicking on the green and white arrow buttons positioned above and beneath the palette.
There are several ways to apply "paint" to a digital image. After selecting a brush size and shape, you can move the cursor into the Paint Activity window to apply the paint color. Depressing the mouse button while dragging the mouse will create a line the width of the brush size with a leading edge reminiscent of the brush shape. To produce circles, squares, rectangles, stars, etc., move the cursor into the window and single click the mouse button once to place these shapes into the desired position.
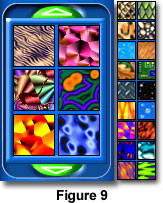
The QX3 Paint menu also allows you to paint with textures from a texture palette (Figure 9), which is positioned to the center right of the Paint Activity window. All paint brush shapes and sizes can be used with the texture palette, and brushes will behave in a manner similar to that described above. The transparency slider can also be used with textures to change their opacity from a solid texture to a semi-transparent texture that can be seen through.
The texture palette has 24 preloaded textures to choose from, with six textures appearing in the default palette window. To access additional textures, use the green and white arrow buttons above and below the palette window. The textures will load in sets of six and, like the brush shape and size windows, will recycle if you toggle through the entire set.
This completes Part 1 of the QX3 Paint menu. Part 2 of the Paint menu tutorial discusses the paint bucket, eyedropper, text tool, eraser, and the stamp tool.
BACK TO QX3 INTERACTIVE SOFTWARE
Questions or comments? Send us an email.
© 1995-2022 by Michael W. Davidson and The Florida State University. All Rights Reserved. No images, graphics, software, scripts, or applets may be reproduced or used in any manner without permission from the copyright holders. Use of this website means you agree to all of the Legal Terms and Conditions set forth by the owners.
This website is maintained by our
Graphics & Web Programming Team
in collaboration with Optical Microscopy at the
National High Magnetic Field Laboratory.
The QX3 microscope design is copyrighted © 2022 by Mattel, Inc. Intel® Play™ is a registered trademark of the Intel Corporation. These companies reserve all of their rights and privileges under copyright law. The material contained in this website is solely the opinion of the authors and is intended for eduational use only.
Last Modification Friday, Nov 13, 2015 at 02:18 PM
Access Count Since December 24, 1999: 30964
Visit the official Intel Play website:
![]()