Photographic Microscapes
Exploring Color Photomicrography
Michael W. Davidson
National High Magnetic Field Laboratory
Tallahassee, Florida USA
INTRODUCTION
Photographing thin crystal preparations between crossed polarizers with either a microscope or macro lens has been the subject of numerous articles (see references). In fact, the growing interest in photomicrography as an art form is partially evidenced by the increasing number of photomicrograph contests held each year both on a domestic and international basis. Additionally, the keen competition in the scientific trade journal and arbitrated scientific periodical market has resulted in a dramatic increase in the use of photomicrographs appearing on periodical front covers as an eye-catcher.
|
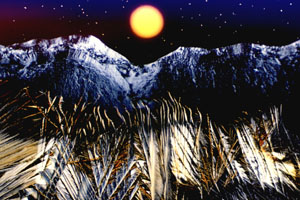
A multiple (5) exposure of asorbic acid (the wheat field in the foreground), liquid crystalline xanthin gum (the mountains), the field diaphragm defocused with an orange filter (the moon), and polybenzyl-l-glutamate spherulites (the stars) with a blue filter. |
Employing an assortment of classical and non-classical microscopy techniques, I have succeeded in assembling a series of photomicrographs designed to resemble unusual and/or alien landscapes, which will be referred to as "microscapes." The basic construction of these photomicrographs involves the classical microscopy techniques of brightfield and cross-polarized illumination, assisted by basic visible light color-filtering processes. Microscapes consist of multiple exposures (so far from 2 to 9) fashioned on a single frame of 35mm transparency film.
MICROSCAPE CONSTRUCTION
In my laboratory, each micrograph was fabricated using both 4x and 10x low magnification microscope objectives (lenses). For these purposes, expensive high-powered microscope objectives (20x - 200x) are limited in their usefulness, due to a very narrow depth-of-field and their inherent loss of contrast.
The first step in microscape construction is the exposure of a foreground, which consists of a selected recrystallized chemical usually imaged with polarized light using the lower power objective and positioned so that only the bottom 30-50% of the film is exposed. Color transparency film is black when unexposed so the top half of the film remains black (unexposed) due to the crossed polarizers. A mask is then cut (from a portion of black poster board) to follow the profile of the first exposure and placed directly on the field lens (at the base of the microscope) to selectively cover and prevent the first exposure from receiving any additional light.
The second exposure can be an additional overlap on the first exposure (see Figure 2, for example), a crystalline formation resembling mountains (Figure 1), a seascape created with filters, or simply a simulated sky. Mountains can be simulated using a variety of recrystallized chemicals, although certain formations are more realistic than others. For instance, the snow-covered mountain effect illustrated in Figure 1 is obtained from a concentrated liquid crystalline solution of the polysaccharide xanthin gum in water. Other useful mountain backgrounds can be produced using crystals made from the organic buffer HEPES, from aspirin or sulfur crystallites, and from ampicillin dissolved then recrystallized from water. Figure 3 is an example where the foreground and mountain were composed in a single crystal formation using recrystallized sulfur.
There are a variety of methods that can be applied to form diverse sky effects. After carefully cutting a mask to cover previous exposures, the microscope can be placed in the brightfield mode and a blue filter inserted into the light path (see Figures 3 and 4). A very low-intensity (10 to 20cc blue) filter will work best because the color saturation of the sky can be controlled by reducing or increasing exposure times. Very short exposures yield a dark blue sky while long exposures create a much lighter sky. It is extremely important here that the mask conforms to the topography of all previously exposed regions of the film. On exceedingly irregular boundaries like the mountains in Figure 1, a very short exposure time will result in a deep blue sky and avoid overlap of blue regions in the white mountains.
|
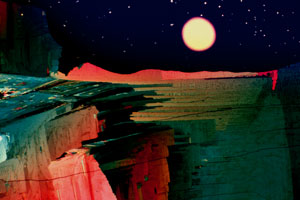
A multiple (4) exposure of sulfur crystals (the canyon-like foreground), the field diaphragm defocused with a yellow filter in the light path (the moon), and liquid crystalline polybenzyl-l-glutamate spherulites (the stars) with a blue filter to simulate the sky. |
A striking alternative to the blue filter technique involves cutting a 1 x 2cm portion of a polyethylene sandwich baggy and stretching it longitudinally to approximately 1 x 3cm. This action tends to align the chain-like polyethylene molecules, which enhances their birefringence. When viewed through cross polarizers, the aligned molecules combined with the thickness gradient created by the stretching induce the sheet of polyethylene to generate a prism-like effect. When the field is defocused, the sharp lines diffuse resulting in a yellow>red=>blue morning sky effect as illustrated in Figure 2. A third effect that I take advantage of is the stormy bluish-purple cloudy sky effect obtained by defocusing a bead of epoxy resin when imaged in polarized light with a 530nm retardation plate positioned between the sample and the analyzer (Figure 5). Light diffracted by the mask accentuates the highlights producing an uncanny storm-like appearance. A blue filter can be added at the edge of the mask to make the effect more realistic.
At this point, a sun or moon can be added to the micrograph. This is accomplished by closing the field diaphragm of the microscope until the desired sun or moon diameter is reached. Next, the image of the shutter leaves is defocused until they merge to form a complete circle. After placing the appropriate filter (usually orange, yellow, or red) in the light path, the image of the field diaphragm can be relocated to any position in the view field simply by adjusting the centering thumbscrews on the substage condenser. Placing a mask over the bottom portion of the image will create a rising sun effect as illustrated in Figures 2 and 5. With a yellow or orange filter, the exposure time length determines the outcome of color distribution. Very short exposures produce images with a reddish perimeter and a saturated yellowish interior (Figure 1, for instance) while longer exposure times tend to wash out the image to yield more of a moon-like effect shown in Figure 3. Long exposure times when using a red filter will cause a yellowish center (Figure 5), while shorter times result in an even color effect (not shown).
To simulate the reflection of the sun or moon on water, two methods can be applied. After the diaphragm image is correctly placed, a diffraction grating can be inserted into the light path to spread out the image and shift the image colors to longer (redder) wavelengths (not illustrated). I typically use Polachrome HC instant 35mm transparency film exposed to intense daylight because the manufacturing process for this film results in a series of very finely space lines which serve as an excellent diffraction grating when the film is greatly overexposed. Alternatively, a fine tooth comb inserted into the light path will produce the effect shown in Figure 2.
The new moon impression depicted in Figure 4 is produced simply by inserting the tip of a ball-point in the light path. A yellow filter used here instead of orange produces a more realistic appearance.
Generation of stars and/or clouds (not shown) is the fina exposure in the series. After the field diaphragm exposure has been completed, a sealed microscope slide containing a solution of small liquid crystalline spherulites of the polypeptide polybenzyl-l-glutamate is placed on the microscope stage. At low magnifications (10x), the spherulites appear as point-sources of light (Figures 1, 3, and 4). By leaving the field diaphragm closed, an area on the slide can be located that is devoid of spherulites and this area is placed directly over the previously exposed diaphragm image area. This prevents stars from being imaged in the center of the moon or sun. After recentering and fully opening the field diaphragm, the exposure is made. Almost any crystallite preparation that produces small isolated crystals can be substituted for the polypeptide preparation.
|
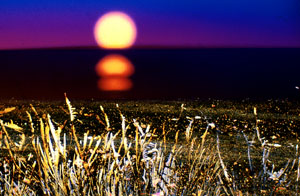
A multiple (5) exposure of ascorbic acid slowly crystallized from ethanolic solution and smeared across the microscope slide while drying (the sandy, rocky beach foreground), melt-recrystallized ascorbic acid (the sea oats in the foreground), stretched polyethylene with a cyan filter (the water and morning sky), the field diaphragm defocused with a yellow filter in the light path (the rising sun), and the field diaphragm defocused with a fine-toothed comb inserted in the light path (the reflection of the sun). |
I have found that ascorbic acid (vitamin C) will produce suitable isolated crystallites when dilute solutions in ethanol are evaporated quickly. Many other preparations will probably produce acceptable star candidates, although the best results are usually obtained from evaporation of dilute solutions of the appropriate chemical. Clouds are produced by defocusing colorless birefringent crystals of Cibachrome bleach. These crystals are usually imaged in the top-most portion of the view field and exposed for long times to wash out all color.
Perhaps the most difficult shot is the beach scene (Figure 2) where the morning sky and ocean are created in a single exposure. This is accomplished by placing a blue filter over the mask at the field lens and defocusing the microscope until a sharp boundary occurs at the junction of the blue filter and the stretched polyethylene image. Correct positioning of the field diaphragm image to create a rising sun effect can be especially difficult when attempting to construct beach scenes.
CHOOSING YOUR FILM
Photomicrographs are notoriously low in contrast and I usually underexpose one to two f-stops and push E6 processing an f-stop. This dramatically increases contrast and color saturation.
The majority of microscopes use either a quartz-halogen or tungsten-halide light bulb as a light source. Quartz-halogen bulbs are very expensive and are usually found only on specialized microscopes. Tungsten-halide bulbs are the most commonly used light sources for polarized light microscopy. These bulbs emit a very bright light with a wavelength spectrum centered in the 3200ºK color temperature (tungsten illumination) range. There are a wide variety of films available which reproduce this color balance correctly. Kodak now manufactures three tungsten-balanced Ektachrome films with ISO ratings of 64, 160, and 320 (The ISO numbers on Kodak tungsten balanced films are followed by a "T" in reference material and packaging). These films reproduce colors fairly accurately, however they tend to have an overall cooler (more blue) cast. I prefer the excellent contrast and deep color saturation provided by Fujichrome 64T. Recently, Fuji has introduced a refined ISO 64-tungsten emulsion, which supports push processing with very little sacrifice in density or grain size.
For Kodachrome lovers, Kodak makes a fine-grained slow speed (ISO 40) 3400ºK color balanced Kodachrome which can be corrected for a tungsten-halide light source by addition of a Kodak 82A filter or equivalent between the light source and the first polarizer. Filters added in this fashion can be placed directly on the field lens or taped to an external light source. In my experience, Kodachrome 40, like the Ektachrome counterparts, tends towards cooler (bluish) casts, especially when the light source color temperature is altered by filtration. This effect can usually be compensated with either a 5cc or 10cc magenta color compensation filter in the light path.

|
A multiple (4) exposure of melt-recrystallized ascorbic acid (the wheatfield), the field diaphragm defocused with a yellow filter and a ball point pin inserted into the light path (the moon), and liquid crystalline polybenzyl-l-glutamate spherulites (the stars) with a blue filter to simulate the sky. |
If you are in a hurry, Polaroid's High Contrast Polachrome HCP (ISO 40) will produce satisfactory results. The polaroid direct positive process results in rather grainy transparencies, but color rendition and saturation is superb. Also, this film can be user-processed in only 2 minutes.
Transparency film is preferable to color negative film for several reasons. Most importantly, all color negative films are color balanced for 5500ºK and must be manipulated during printing to avoid a decidedly yellow cast. Most photo processors can not or will not produce satisfactory results with photomicrographs on color negative film. Also, the contrast and color saturation in transparency film cannot be equaled by color negative film. Finally, color transparencies are easier to label; store, and catalog and they can be projected at seminars.
With a high illumination 50 to 100 watt tungsten-halide bulb in your microscope, exposure times are usually short and allow the use of very slow films (such as Ektachrome 64T, Kodachrome 40, or Fujichrome 64T). These films are considerably less grainy than the faster versions of tungsten-balanced films.
If tungsten-balanced films are not to your liking or are unavailable, you can insert a Kodak 80A blue filter or its equivalent between the light source and first polarizer as described above to allow the use of daylight-balanced films with minimal color shift. Kodachrome 25 and the new Fujichrome Velvia 50 are probably the best transparency films available, and using this filter technique will enable their application to photomicrography. However, when you use this filter, remember to increase exposure 1 to 3 f-stops to allow for reduction in light intensity. My experience has indicated that it is very difficult to correctly balance color when using daylight film in a microscope. For this reason, I recommend the use of tungsten-balanced film whenever possible. When experimenting with new samples or lighting conditions, bracketing the first roll of film is the best way to get a handle on exposure times.
![]()
|
A multiple (3) exposure of ascorbic acid slowly crystallized from ethanolic solution and smeared across the microscope slide while drying (the sandy, rocky foreground), an epoxy resin bead with a 530 nm retardation plate inserted between the sample and the analyzer with a blue filter in the light path (the sky), and the field diaphragm defocused with a red filter (the rising sun). |
CONCLUSIONS
It is not necessary to follow this outline exactly in order to obtain nicely formed microscapes. For instance, when I observe an unusually promising crystalline formation I usually compose enough images to fill several 24-exposure magazines of film. In this case, I proceed through the sequence as outlined above for the first series of exposures (to produce the intended microscape), then reverse the procedure constructing another very similar microscape thus minimizing the number of substage condenser centering operations. Because the sun or moon is not relocated during recording of the two successive microscapes, almost identical copies are obtained. This is especially beneficial if the resulting arrangement of exposures is optimal. With the proper equipment on hand for the assembly of microscapes, the interested photographer is limited only by the boundaries of his (or her) own imagination.
REFERENCES
1. Michael W. Davidson and Randolph L. Rill, "Photomicrography. Common Ground For Science and Art, "MICROSCOPY and Analysis May, issue #11, page 7-12 (1989).
2. Michael W. Davidson, "Fabrication of unusual art forms with multiple exposure color photomicrography," The Microscope, v. 38, pages 357-364 (1990).
3. John G. Delly, Photography through the microscope, Eastman Kodak Company, Rochester, New York, Publication P-2, pages 104 (1988).
4. The Editors, "Photomicroscopy: Topical Images, New Techniques Emerge in Small World Competition" Photomethods, v. 32, pages 23-27 (1989).
5. Michael W. Davidson, "Some Artistic Techniques in Photomicrography," Journal of Biological Photography, v. 59, pages 165-168 (1991).
6. Michael W. Davidson, "A Photomicrography Primer," The Science Teacher, v. 58, pages 12-18 (1991).