
Interactive Java Tutorial
Color Balance
Color balancing belongs to an important class of digital image enhancement algorithms that are useful for correcting color casts in captured images. In most cases, unusual overall color casts (or uniform discolorations) typically result from color temperature effects in specimen illumination or are due to improper adjustment of the electronic detector (usually a digital CCD or CMOS camera system) used to capture the image.
The tutorial initializes with a randomly selected specimen image, captured in the MIC-D digital microscope, appearing in the left-hand window entitled Specimen Image. Each specimen name includes, in parentheses, an abbreviation designating the contrast mechanism employed in obtaining the image. The following nomenclature is used: (BF), brightfield; (DF), darkfield; (OB), oblique illumination; and (RL), reflected light. Visitors will note that specimens captured using the various techniques available with the MIC-D microscope behave differently during image processing in the tutorial.
Before the image has been loaded into the Specimen Image window, the tutorial randomly introduces a color cast that must be corrected by operation of the Color Balance sliders described below. To operate the tutorial, select a specimen image from the Choose A Specimen pull-down menu and adjust the tonal range by utilizing the Cyan/Red, Magenta/Green and/or Yellow/Blue sliders. As the sliders are translated, the numerical value of the tonal adjustment is indicated in the color balance text input boxes positioned above the sliders. To re-initialize the image correction, use the blue Reset button to erase all of the adjusted tonal values.
Appearing to the right of the Specimen Image window is the RGB Histogram window, which displays the red, green, and blue histograms of the specimen image. The Red, Green, and Blue checkboxes may be utilized to enable or disable any of the channels that are displayed in the RGB Histogram window. To alternate from the three color channels to a view of the image grayscale histogram (in the histogram window), use the mouse cursor to select the Grayscale Histogram checkbox. When this option is selected, the title of the RGB Histogram window changes to Grayscale Histogram. The original image can be viewed and compared to the currently modified image by placing a checkmark in the Show Original checkbox. Visitors are encouraged to explore the effects of color balancing on the appearance of the specimen images (and their histograms) in the tutorial.
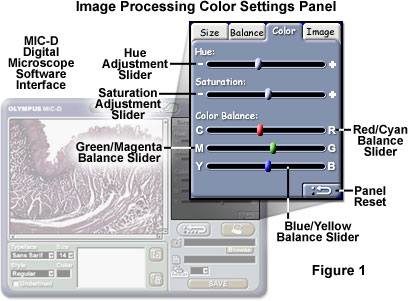
The Olympus MIC-D digital microscope software is equipped with hue, saturation, and color balancing algorithms that are available by selecting the Color tab within the image processing window, as illustrated in Figure 1. These image processing algorithms operate in a manner similar to that described for the interactive tutorial above.
The Color settings panel contains slider controls to process digital images with respect to Hue (+ or -), Saturation (+ or -), and Color Balance. The Color Balance sliders enable the user to alter one or more of the three available color channels: Cyan/Red, Magenta/Green, and/or Yellow/Blue. After an image has been loaded into the display window, these controls can be employed to make the necessary adjustments to digital images captured with the MIC-D microscope. Clicking on another settings panel tab will commit the changes made with the sliders in the Color settings panel. Alternatively, clicking on the Panel Reset button located in the lower right-hand corner of the panel will restore the image to its original condition.
Balancing color relies on an enhancement algorithm that enables the adjustment of the balance between red and cyan, green and magenta, and blue and yellow tones in a digital image. The technique is similar to a brightness-mapping algorithm that specifies an output brightness value for each input brightness value in the image. For this reason, color balancing is often implemented procedurally as a lookup-table (LUT) operation. For each of the brightness categories, a unique lookup-table function is utilized in order to target the appropriate range of brightness values.
The color balancing algorithm can be utilized to correct a cast or color tinge in a digital image that occurs during capture when the microscope or digital imaging device is not properly adjusted. As an example, if an image has an unwanted blue cast, then the problem can often be corrected by shifting the yellow-blue balance slightly toward yellow. When the color balance of an image changes, pixel luminosity (brightness) values, which are measured in terms of the corresponding grayscale pixel brightness levels, may also change.
The HSI (Hue, Saturation, and Intensity) color space is often used to represent colors in an intuitive way. Hue describes the dominant wavelength of a color, and saturation describes the purity of a color. A hue control can be used to shift all of the colors in the image in a uniform way, and a saturation control can be used to increase or decrease the purity of colors. Setting saturation to zero results in a grayscale image.
In order to maintain the same brightness relationships between pixels in the modified image, a preserve luminosity option is often included in software or hardware implementations of color balancing and hue/saturation adjustment. Visitors should compare the effects of color balancing and hue/saturation adjustment on each of the image histograms when the Preserve Luminosity feature is enabled versus when it is disabled.
Contributing Authors
Kenneth R. Spring - Scientific Consultant, Lusby, Maryland, 20657.
John C. Russ - Materials Science and Engineering Department, North Carolina State University, Raleigh, North Carolina, 27695.
Matthew J. Parry-Hill and Michael W. Davidson - National High Magnetic Field Laboratory, 1800 East Paul Dirac Dr., The Florida State University, Tallahassee, Florida, 32310.
BACK TO DIGITAL IMAGE CAPTURE AND PROCESSING
BACK TO THE OLYMPUS MIC-D DIGITAL MICROSCOPE
Questions or comments? Send us an email.
© 1995-2022 by Michael W. Davidson and The Florida State University. All Rights Reserved. No images, graphics, software, scripts, or applets may be reproduced or used in any manner without permission from the copyright holders. Use of this website means you agree to all of the Legal Terms and Conditions set forth by the owners.
This website is maintained by our
Graphics & Web Programming Team
in collaboration with Optical Microscopy at the
National High Magnetic Field Laboratory.
Last Modification Monday, Sep 18, 2017 at 12:37 PM
Access Count Since September 17, 2002: 15653
Visit the website of our partner in introductory microscopy education:
|
|