
QX3 Microscope Modifications
The Intel Play QX3 microscope is very functional in its stock configuration, but several minor modifications can dramatically improve the performance of the microscope. Although we don't recommend these modifications for microscopes intended to be used by young children, advanced users may find this information helpful in obtaining better digital images.
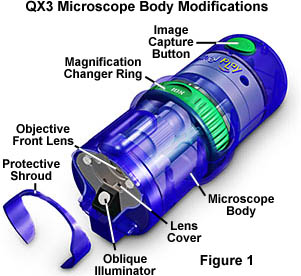
The most important modification (other than auxiliary illumination) is removal of the transparent blue plastic shroud that protects the objective lens cover and oblique illuminator diffusion screen. The shroud serves both to protect these critical parts from damage and also to act as an objective working distance guide when the microscope body is used in the standalone mode. Consider this modification only if you have no intention of ever using your microscope in standalone mode again.
The problem with having the shroud in place is interference with proper oblique illumination from external light sources. If auxiliary illumination is not used routinely, then removal of the shroud is not necessary. However, to completely illuminate opaque specimens with reflected light, the shroud must be removed to allow illumination to strike the surface from as many azimuths as possible.
A Dremel-type high-speed drill motor is the preferred tool for removal of the plastic shroud. Use a flat abrasive cutoff wheel and cut as closely as possible to the microscope body, being careful not to accidentally cut into the lens cover or lamp housing. To avoid damage, it is a good idea to protect the cover and housing with masking or duct tape before removing the shroud. After the shroud has been removed, use a small folded piece of 400-grit sandpaper to remove burrs and spikes from the remaining plastic.
The working distance of the objectives is quite large (25-28 millimeters) compared to common laboratory microscopes. However, when the shroud is in place, the distance from the shroud to the stage is only about 5 millimeters when the microscope is brought into focus. Auxiliary oblique illumination from the side of the microscope must pass through the transparent shroud to reach the specimen. Light passing through the shroud is filtered by the dyed plastic to remove yellow colors and the illumination turns blue before it strikes the specimen, rendering it with a bluish tinge. Removal of the shroud allows illumination of the specimen with either white light, or light that has been filtered with another color.
Without the shroud, the distance between the front of the microscope body to the specimen is about 18-20 millimeters, greatly increasing the area open for illumination. The larger illumination area also makes it possible to raise the angle of oblique illumination.
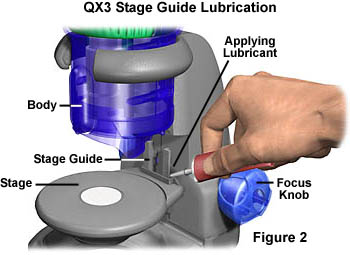
Attention should be paid to the stage focusing mechanism and the guide on the microscope base that aligns the stage with the microscope optical axis. As the focus knobs are turned, the stage rides up and down on the guide (Figure 2) to bring the sample into focus. The fit between the stage and the stand guide is somewhat loose, presumably to accommodate a wide variety of specimens. Some wear occurs to the plastic surfaces and edges after many hours of use. We routinely add a small amount of petroleum jelly (perferred), graphite lubricant, or lithium grease between the grips holding the stage to the guide. Be careful to add only a very small portion of lubricant to this area. Too much will cause a mess and may contaminate specimens.
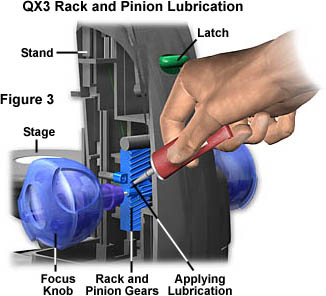
To aid the serious microscopist, a couple of minor adjustments can also be made to the rack and pinion QX3 microscope focus mechanism. The tension of the focusing mechanism was very consistent in the 10 microscopes we examined, but the mechanism was much looser than desired. In order to access the focus mechanism, the microscope base and stand must be disassembled, but this is not as easy as might be expected. We have provided detailed instructions for disassembly of the microscope stand.
Once the base has been carefully disassembled, apply petroleum jelly, graphite, or lithium grease sparingly to the pinion gear teeth in order to lubricate the rack and pinion gear mechanism. These gears, along with the focus shaft bearings, are lubricated with petroleum jelly at the factory during assembly. Always check to ensure that the petroleum jelly in the bearings and gears does not accumulate a significant amount of dust, dirt, fibers, and hairs that is a consequence arising from routine use of the microscope.
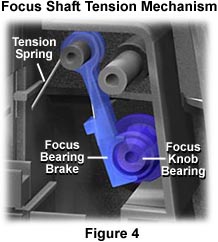
Tension on the focus mechanism is controlled by a plastic brake that exerts force on the right-hand focus knob shaft bearing that fits into the side of the base (Figure 4). A spring is used to apply pressure to the brake, which in turn presses against the shaft bearing and slows rotation. Heavy specimens can cause the stage to spontaneously move downward under the load if the spring tension is insufficient to bear the weight of the specimen. Most specimens will not be a problem, but if the microscope base has already been disassembled, then it is a simple task to stretch the spring slightly in order to increase tension.
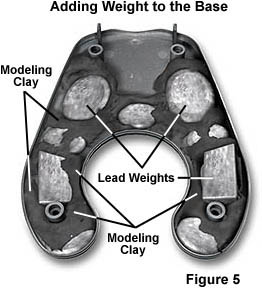
Another problem with the microscope is the lightweight stand, which leads to focus problems due to vibration and strong air currents from heater and air conditioner vents. To help alleviate this problem, we have modified the base to add weight and stability to the microscope. Illustrated in Figure 5 is the bottom cover of the microscope base filled with modeling clay and flattened lead fishing weights. The weights and clay can be purchased locally in department stores for a couple of dollars. Use a hammer to flatten the the soft lead composing the fishing weights until they are thin enough to fit into the narrow space between the cover and base cavity. Secure the weights into place by filling voids between them with modeling clay, as illustrated in Figure 5. Work the clay in and around the weights to ensure they will not break loose and move around inside the microscope base. Increasing the weight of the base is an easy modification that only requires removal of the four Phillips-head screws that fasten the base cover to the microscope base.

Additional stability can be obtained by isolating the microscope through the use of vibration dampening techniques. After weights have been added to the microscope base, it is much more stable, but still prone to vibrations from the table or other operating surface. We have found that the addition of simple bumper feet (Figure 6) to the underside of the microscope base greatly reduces focus problems due to vibration. These bumper feet can be purchased at home repair stores or discount marketers such as Wal-Mart and K-Mart. Most bumpers have an adhesive placed on one side to allow them to be firmly attached to the underside of the base.
The simple modifications discussed above are easy to perform and will greatly enhance performance of the QX3 microscope. Disassembly of the microscope will definitely void the manufacturer's warranty, and we can only recommend this procedure to advanced users who are modifying the microscope in other manners, or who do not intend to ask for a replacement microscope.
BACK TO INTEL PLAY QX3 MICROSCOPE ANATOMY
Questions or comments? Send us an email.
© 1995-2022 by Michael W. Davidson and The Florida State University. All Rights Reserved. No images, graphics, software, scripts, or applets may be reproduced or used in any manner without permission from the copyright holders. Use of this website means you agree to all of the Legal Terms and Conditions set forth by the owners.
This website is maintained by our
Graphics & Web Programming Team
in collaboration with Optical Microscopy at the
National High Magnetic Field Laboratory.
The QX3 microscope design is copyrighted © 2022 by Mattel, Inc. Intel® Play™ is a registered trademark of the Intel Corporation. These companies reserve all of their rights and privileges under copyright law. The material contained in this website is solely the opinion of the authors and is intended for eduational use only.
Last Modification Friday, Nov 13, 2015 at 02:18 PM
Access Count Since December 24, 1999: 44799
Visit the official Intel Play website:
![]()