
QX3 Interactive Software
Software Installation
(Part 2)
Jump back to Interactive Software Installation, Part 1.
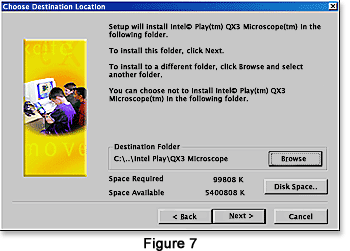
Up to this point in the installation, Setup has run a systems diagnostic test, displayed and confirmed the software license agreement, and determined the type of installation to perform. The next installation dialog box (the Choose Destination Location box illustrated in Figure 7) asks for a destination location to install the QX3 software. The default location is:
which is a good location if there is sufficient room on the hard disk for the 99.8 megabytes of files and scratch disk space necessary for the installation. Setup determines the amount of hard disk space available and displays this information in the dialog box. If you want to install the software in another location, you must choose the Browse button and select a target directory. Clicking on the Disk Space button launches a mini Available Disk Space dialog box (not shown) that will provide the amount of available space on all disks and allow you to choose an alternate hard drive.
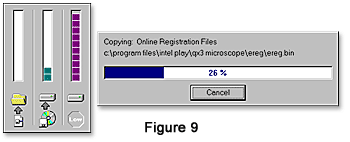
After the installation destination has been chosen and the Next button is clicked, Setup displays the Select Program Folder dialog box (Figure 8), which displays the default folder and lists the existing folders. The default program folder is Intel Play QX3 Microscope, but this can be renamed to suit custom purposes. After selecting a program folder, the Next button is clicked and Setup begins installing files on the hard drive. During installation the File Copying dialog box set (Figure 9) is displayed with a blue progress bar that advances from left to right as the files are written to disk.

The typical InstallShield drive indicators appear in a set of three vertical bars to the left of the progress dialog box. The left most indicator fills as data is written to the hard drive, while the center indicator fills as the CD-ROM is read. The indicator on the right specifies the amount of free disk space left on the drive where the installation is taking place. During file installation, several black splash screens appear transiently to list specific components (RealPlayer components, MediaPlayer, etc.) as they are installed. The individual file names appear in the dialog box as they are being copied. Setup rolls through these at a fast rate, so it is often difficult to see the name of each file as it is being copied.
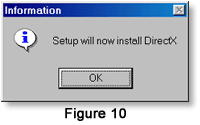
After Setup has copied the necessary runtime files, dynamic link libraries, and other system files, an Information dialog box appears (Figure 10), which informs the operator that DirectX components will be installed next. You must click on the OK button to start installation of these components.
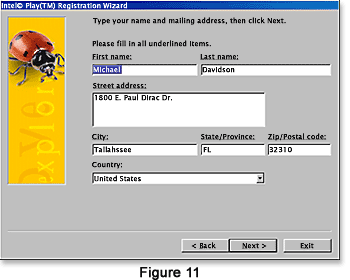
After the DirectX components are installed, Setup proceeds to the Registration Wizard (Figure 11) where you can register the microscope and software. The first Registration Wizard dialog box contains a form for your name and address. Once the form is filled out, clicking the Next button takes you to the second Registration Wizard dialog box (Figure 12).
This box queries the nature of your Internet connection (your internet service provider) and has text boxes for your email account and phone number. The dialog box also has a radio button that must be selected if you do not want to receive information about updates and new products from Intel and Mattel.
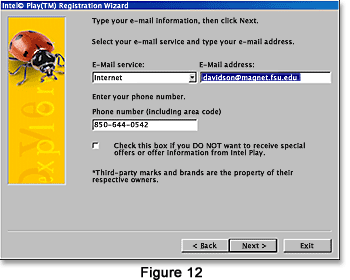
Clicking the Next button takes you to the third dialog box of the Registration Wizard that will be discussed in Part 3 of the installation tutorial.
Continue to Part 3 of the software installation tutorial.
BACK TO QX3 INTERACTIVE SOFTWARE
Questions or comments? Send us an email.
© 1995-2022 by Michael W. Davidson and The Florida State University. All Rights Reserved. No images, graphics, software, scripts, or applets may be reproduced or used in any manner without permission from the copyright holders. Use of this website means you agree to all of the Legal Terms and Conditions set forth by the owners.
This website is maintained by our
Graphics & Web Programming Team
in collaboration with Optical Microscopy at the
National High Magnetic Field Laboratory.
The QX3 microscope design is copyrighted © 2022 by Mattel, Inc. Intel® Play™ is a registered trademark of the Intel Corporation. These companies reserve all of their rights and privileges under copyright law. The material contained in this website is solely the opinion of the authors and is intended for eduational use only.
Last Modification Friday, Nov 13, 2015 at 02:18 PM
Access Count Since December 24, 1999: 27408
Visit the official Intel Play website:
![]()