
QX3 Interactive Software
Special Effects (F/X) Menu
After capturing digital images with the QX3 microscope, you can first preview them in the Main menu, then choose one of several options to digitally manipulate, customize, and add special effects to your images. To explore the built-in special effects in the QX3 software, click on the Special Effects button in the Main menu to navigate to the Special Effects Menu (Figure 1).
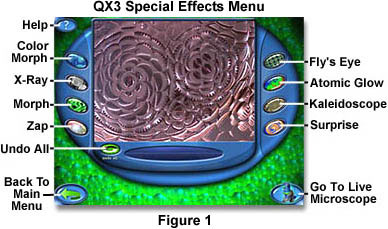
This menu contains eight special effects filter buttons in addition to the usual audio help button, reverse arrow return to Main menu button, and return to the microscope button. The latter three buttons appear in the same locations in all of the QX3 software activity windows. There is also an Undo All button that will return the image to its original state.
Intel and Mattel software designers have assigned special names to the effects that they have created. The effect filters are named (see Figure 1) Color Morph, X-Ray, Morph, Zap, Fly's Eye, Atomic Glow, Kaleidoscope, and Surprise Effect. The individual filters are discussed in more detail below.
When a special effect is being added to a digital image, the cursor turns into a small clock icon that ticks away the time until the effect-specific calculations can be applied to the image. The special effect filters work cumulatively on images, which means additional special effects build upon previous effects. After the first special effect has been applied to an image, applying a second effect will change only the already modified image. In order to try a new special effect on the original image, click on the Undo All button to erase all previous special effects applied to the image.
The Special Effects menu will only operate on one image at a time. To load another image, the user must exit to the Main menu and pick a new image from the collection or exit to Live View and acquire a new image from the microscope. After the new image is loaded into the Main Activity Window, then the Special Effects menu can be relaunched and loaded with the new image.
After creating a special effect that you want to save, click on the green reverse arrow (lower left corner of the menu) to return to the Main menu or the QX3 microscope button (menu lower right corner) to return to Live View. This action automatically adds the image altered by special effects to the digital image and movie collection stored on the computer's hard drive. The new image added to the collection does not overwrite the original image so both will be available in the Collection window from the Main menu.
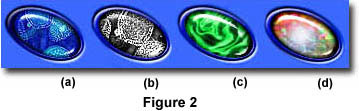
The four special effects buttons that appear to the left of the Special Effects Activity Window are illustrated in Figure 2(a) through 2(d). The button in Figure 2(a) is the Color Morph button that applies an invert algorithm to the image, which has the effect of inverting all colors in the image, as illustrated in Figure 3(b).
All of the images in Figures 3 and 5 have been modified by QX3 software Special Effects menu filters with the exception of the first image, which illustrates a beautiful miniature red flower that was originally captured with the microscope software in Live View. The other images in Figures 3 and 5 are QX3 Special Effects derivatives of Figure 3(a).
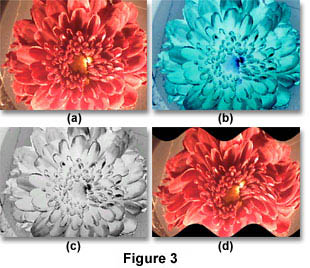
The effect or action of the Color Morph filter algorithm is to change red colors to cyan, green colors to magenta, and blue colors to yellow. You can accomplish the same effect in many image editing programs such as Adobe Photoshop by selecting the Invert command in the Image Adjustment menu.
Appearing in Figure 2(b) is the X-Ray button that appies the equivalent of a Photoshop Convert to Grayscale filter to the image, by dropping all color information from the image. The QX3 software then inverts the gray levels. A sample of what this does to the flower image in Figure 3(a) is illustrated in Figure 3(c).
The image illustrated in Figure 3(d) has been modified by a ripple filter that introduces a wavy effect to the original image (Figure 3(a)). This special effect is termed Morph by the QX3 software designers and does not have a direct equivalent in Photoshop, although numerous aftermarket plug-ins will produce a similar effect. The Morph algorithm is added to the image by clicking the button illustrated in Figure 2(c) in the Special Effects menu.
The Zap special effect is applied by clicking the button illustrated in Figure 2(d), and produces the effect shown in Figure 5(a) to the original image. A similar effect can be reproduced in Photoshop using the Solarize algorithm followed by an image color invert.
Special Effects buttons illustrated in Figure 4 appear to the right of the Special Effects Activity Window in the QX3 software, and operate on microscope images to produce the effects illustrated in Figure 5(b) through 5(d).
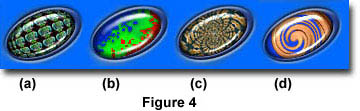
A realistic Fly's Eye effect produced by the button illustrated in Figure 4(a) produces an image that mimics the vision of multiple lens elements found in this insect's eye (shown in Figure 5(b)). A similar effect can be produced in Photoshop using the Distort filter followed by a Glass filter adjusted to simulate numerous hexagonally arranged miniature lens elements.
The Atomic Glow special effect illustrated in Figure 5(c) transforms the original image into a semi-inverted complement with the application of extremes in color saturation and contrast enhancement using the colors red, blue, and green. This algorithm is applied by clicking on the button illustrated in Figure 4(b). It is difficult to reproduce this effect with pre-canned Photoshop filters, but it can be closely simulated using curves, color saturation, and contrast filters. Using the Atomic Glow special effect filter is a good idea when attempting to add color to a grayscale image.
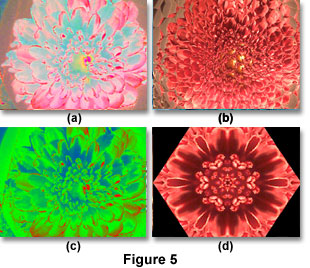
The Kaleidoscope filter produces beautiful images that resemble patterns commonly seen in reflecting/refracting kaleidoscopes, as illustrated for a filtered derivative (Figure 5(d)) of the original flower image (Figure 3(a)). This effect is produced by specialized Photoshop plug-ins and a number of alternative image editing programs. The filter can be applied by clicking on the button shown in Figure 4(c).
The final special effect option in the QX3 software is called Surprise Effect, and is actually two of the seven previously described effects applied randomly and back-to-back. This filter will produce a wide spectrum of images with 128 possibilities, providing an almost never-ending combination of effects to captivate young audiences.
You can also add special effects to the movies and time-lapse cinemicrography sequences that you capture with the QX3 microscope. First, choose the movie or time-lapse sequence from the collection in the Main menu or acquire it with Live View, then proceed to the Special Effects menu. Click on the button for the effect you want to filter the movie with, and the software will initiate application of the filter.

While the movie is being processed by the filter, a progress bar (Figure 6) with a single Cancel button appears in the Special Effects Activity Window. The cursor also turns into a clock that ticks time away while the special effects are being added. To stop processing and return to the original movie, click on the cancel bar. You can then exit the Special Effects menu or choose another effect to add to the movie.

When a movie has been modified by the Special Effects menu and this menu is exited, a copy of the filtered movie is added to the collection and is available for loading into the Main Activity Window. Movies can also be played in the Special Effects Activity Window, both before and after adding special effects. When a movie is loaded into the activity window, a set of playback controls appears beneath the window, as illustated in Figure 7. To play the movie, click on the green forward arrow button (not illustrated), which will turn into a pause button while the movie is being played. To step through the movie one frame at a time, use the forward and backward arrow buttons to the right of the movie progress bar.
The amount of time it takes to apply the special effects algorithms to a digital image or movie depends upon the complexity of the image and the length of the movie. It is also heavily dependent upon the speed of the computer that is running the software. Movies are processed frame by frame and applying some effects can take a considerable amount of time, especially for lengthy movies. For this reason, the Cancel button is provided to halt filteration if the user decides the computer is taking too much time to process the movie.

Luckily, the QX3 Special Effects menu is provided with a relief valve: the Undo All button that returns the digital image or movie to its original condition, regardless of how many filters have been applied. This saves reloading images that get mutated beyond recognition with a brigade of special effects filters piled one on top of the other.
Like other menus in the QX3 software, the Audio Help button will activate the cursor to transform into a question mark that initiates a short audio clip describing the special effects buttons as the mouse (acquiring a question mark cursor) rolls over them. This is just another example of the excellent programming design and thought that was put into this software by Intel and Mattel engineers. The Special Effects menu requires very little in the way of a learning curve, allowing kids to get a good head start on the more complex filters and image editing tools that accompany some of the high-end platforms like Photoshop.
BACK TO QX3 INTERACTIVE SOFTWARE
Questions or comments? Send us an email.
© 1995-2022 by Michael W. Davidson and The Florida State University. All Rights Reserved. No images, graphics, software, scripts, or applets may be reproduced or used in any manner without permission from the copyright holders. Use of this website means you agree to all of the Legal Terms and Conditions set forth by the owners.
This website is maintained by our
Graphics & Web Programming Team
in collaboration with Optical Microscopy at the
National High Magnetic Field Laboratory.
The QX3 microscope design is copyrighted © 2022 by Mattel, Inc. Intel® Play™ is a registered trademark of the Intel Corporation. These companies reserve all of their rights and privileges under copyright law. The material contained in this website is solely the opinion of the authors and is intended for eduational use only.
Last Modification Friday, Nov 13, 2015 at 02:18 PM
Access Count Since December 24, 1999: 32837
Visit the official Intel Play website:
![]()